|
|
Post by chrisperoni on Mar 25, 2015 18:03:57 GMT
|
|
|
|
Post by chrisperoni on Mar 25, 2015 18:04:33 GMT
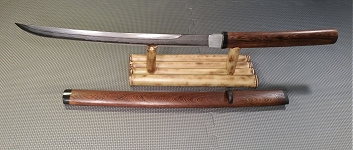
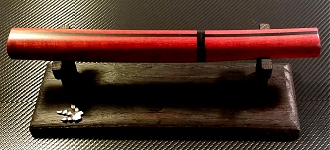
More sword and knife customizingLINK Han Dynasty Jian
-this link in particular has several other links within it covering the steps I took  LINK ebay ShirlySword ito lacquer
-lacquered the ito using a mix of Minwax Wipe On, Watco Lacquer and some lacquer thinner. Rubbed it in after brushing it on. Darkened up the ito some - I like it before and after  Oh, I also took it from regular sharp, which could kinda cut paper but also kinda just tear it, to "dang!, that's sharp! I'm bleeding." - cuts strips of paper with a straight push now, don't even need to draw it across the paper. I really think that the standard 1x30 belt sander is the best option for a cheap motorized sharpener. I know we were talking about that WorkSharp system but that thing looks overly complex with less ease of use. With a 1x30 I can remove the platen and get a great flex to the sandpaper or strop, which lets me keep the shinogi ji perfectly shaped and even polished well while passing along the belt(s). Knife Sheath & Leg Strap  -this was a very enjoyable piece to work on. The sheath is made sword scabbard style, with a leather lined poplar core, and a brass chape I soldered together (not the cleanest solder lol, but it works). The leg strap is intentionally a separate piece from the sheath- just an idea I had in my head to make it that way. The knife was holding very well in the sheath core but after the leather covering dried around it it actually pulled the wood loose a tiny touch, so I shimmed the spine edge with a little square of leather--- tight as a drum again  and the knife stays in upside down even with shaking. The finish on the leather was a new thing for me. I went with beeswax mixed with mineral oil, rubbed and buffed in. In my opinion it's superior to lacquers in look and feel, is very good at repelling water, seals the dye in, and so far I haven't found a downside to it. Over time I will be able to compare it to lacquer further. This was also my first go at stitching with sinew (artifical) and setting snaps.  Axe sheath and handle protector, belt frog Axe sheath and handle protector, belt frogFor my throwing axes purchased from forum friend Fallen. This week I made the other axe sheath and such. The piece of leather I used for the 2nd one was from the edge of the side and so was stiffer and darker to begin with- hence the darker colour overall. I actually scuffed back some of the dye as it was a very dark brown once it dried with the red not showing. Also made a frog for them-- I know, I know-- how many things can I end up hanging from my belt, right? Well I'm going for the medieval equivalent of batmans utility belt  , plus we all know it's easier to run from zombies and prep your home for imminent attacks with your hands free. All the leather is 3-4oz from Tandy- their low cost option called Craftsman Oak. My thanks to Fallen for the excellent steel and to Chenessfan for the idea of making sheaths for the axes.      Windlass Spartan 300 mods Windlass Spartan 300 modsout of the box  Did several applications of hot peroxide/salt to stain and pit the steel. The hilt metal did not react as strongly to the solution as the blade did. On the blade I started by taping off the edge, then I decided to remove the tape for the last couple washes and pit the whole blade; hence the line across 1/2" in from the edge.  Rewrapped the grip. Pulled off the cheap leather wrap which was very slick and did not feel good in hand. Left the wood core, however as the original grip was too small for my liking I added strips of leather to the edge-side to give it a "D" shape. Added three risers and cord underwrap, then covered in 2oz veg tan. Dyed with a home mixed oxblood, gave a coat of acrylic and then mineral oil/wax mix to seal.  Buffed the blade with a scotchbrite pad and mothers then cleaned it with windex. Sharpened the edge using my belt sander. Started with 100 grit on the blunt edge, then 20 micron, 15, 9 and finished with a leather strop and green compound.  Oak Waster Oak Waster
Link made an oak waster Micarta Knife Handle and Leather Sheath Micarta Knife Handle and Leather SheathLink build along for micarta handle knife  Scabbard for Short Sword Scabbard for Short SwordI finished the scabbard for my zs short sword. It is styled to match the zs knife which you can see in this thread on page 1. Of note is the blade contour I followed at the mouth of the scabbard - I like that feature . I plan to make a baldric which will allow back carry with the blade handle at my shoulder or my hip, so the snap will provide a bit of extra confidence in this case. I had a go at antiqued finish on this piece. While wrapping the leather I was not especially careful and allowed the leather to get marked up and such.I also purposefully darkened the edges of the risers across the front to accentuate those lines. When applying a finish I started with watered down 'canyon tan' ecoflo dye, then the full strength of same, then 'all in one acorn brown' (with drying time in between each application of course). I really like the all in one stuff - it gets used up fast compared to just dye but it is easy to apply and buff to nice finish. I will still give this a rub of beeswax/oil mix.   Wood Knife Handles and Sheaths Wood Knife Handles and SheathsBought two knives from forum member Moredhel. I've replaced the grips using spalted hackberry wood scales which are pinned and epoxied in place. Also gave them little lanyard holes. I had done file work on the spine of one but ended up grinding it off (mostly) in favour of the grip shape I wanted.      
|
|
|
|
Post by chrisperoni on Mar 25, 2015 18:54:25 GMT
Leather SatchelThis was made off the cuff; drew up the pattern on the spot and just sort of went at it. Now, this little "purse" would also easily work as a "satchel" which is of course what us fellows would call it if we were wearing one . It's 6.5" across the bottom, and the strap is 18" long, which is just right for my little girl to wear on her shoulder. The strap is attached with snaps so that I could easily thread/loop it around my belt a couple of times to cinch it up against my waist if I wanted to.   I decided to make some loops that snap onto the back for wearing on a belt. I used the same dye for all the purse parts - the strap and loops came out more orange because I was able to buff it in faster and with more force vs. on the purse.   Skyrim Shield for my Daughter Skyrim Shield for my DaughterLink build along for child's shield Other wood projects not related to swords, but still fun stuff I make --ash wood bowl --child's bench seat, prop for my wife's photography biz --plane, prop for my wife --moon bed, prop (photo by sherri peroni photography) --wall mounted shelves        Ebay Damascus Knife Handle and Sheath Ebay Damascus Knife Handle and Sheathebay damascus blade with maple scales and denim/canvas mycarta bolsters, tan leather sheath. Finished this a while ago and then decided to torch the handle. Still not happy with a bunch of little things about it.   Spear SpearFinished mounting the spear head from Fallen. This is incredibly enjoyable to handle! If you haven't got a spear yet you need to pick one up and try it out. Some stats: -Total length is 63" -Spear head is 5160, length 5 & 1/2", Width 1 & 1/4", Thickness 3/16", Overall Length 9 & 3/4", Weight 7 oz, epoxied and brass pinned in place -Haft is 1 & 1/8" diameter Brazilian hardwood finished with Watco dark walnut danish oil -Counterweight is a 1/2" eyebolt with the bolt end set into the haft, epoxied and brass pinned in place -Copper collars are hammered down at each outside end, epoxied and brass pinned in place - Sheath is veg tanned leather finished with a mix of Eco Flo canyon tan all in one and Fiebings oxblood leather dye       
|
|
|
|
Post by Cottontail Customs on Mar 25, 2015 20:52:27 GMT
Ummmmm..........yeah, whole lotta win and epic in here!
-Josh
|
|
|
|
Post by chrisperoni on Mar 25, 2015 21:19:34 GMT
Thank you Josh I feel the same about all the incredible work you do. Here's the most recent project- Pattern Welded / Damascus Short Sword Hilt and ScabbardLINK Hilt and Scabbard build along  |
|
|
|
Post by chrisperoni on Mar 26, 2015 2:58:22 GMT
It's not sword related but here's another little bench I made between yesterday and today. It's 26" by 11" and it's for my wife to use in her photography business. Pretty straightforward stuff - pine with dowels and glue to fasten everything together, antique oil buffed in for a natural finish.  |
|
|
|
Post by DigsFossils-n-Knives on Mar 26, 2015 3:11:55 GMT
You're an all-around craftsmen!
|
|
|
|
Post by Adrian Jordan on Mar 26, 2015 3:25:24 GMT
Super awesome work, Chris! Also, I wish I could be there ten years from now when your girl murders you for posting her naked baby pic on the forum, hahaha.
|
|
|
|
Post by chrisperoni on Mar 26, 2015 3:55:58 GMT
Thanks Digs I do little things here and there but man I wish I had the patience to do the kind of detail and finish work I see in some of your stuff. That recurve bowie with desert ironwood, red and white g10 etc- man! that's real crasftmanship Thanks Adrian and, meh - the pic was taken by my wife so she owns it, gave me permission to use it |
|
|
|
Post by chrisperoni on May 20, 2015 1:24:45 GMT
My latest projects: Customized ken sword - Komugi no kuki no ken build along: sbg-sword-forum.forums.net/thread/44330/ken-sword-wipVideo of finished sword: And these little guys I whipped together just now. A friend of ours asked me to make some wooden swords for a play at her kids school this weekend. I fired the first one out last night real quick and the other three just now. They are made from recycled bamboo flooring and have a dowel pin hammered in just above the guard to help keep it in place (and glue of course). They measure about 17" total.   |
|
|
|
Post by chrisperoni on May 20, 2015 14:56:54 GMT
After seeing and playing with the wooden swords I made yesterday, my daughter insisted I finally make one just for her. I took more time on hers naturally - was more careful with measuring/cutting, beveled the edges, added a pommel and painted it to match her Skyrim shield. She calls it "Metal Golden Sword", and it is awesome.    She wouldn't let me take an pics of her with it though, but yesterday I was able to record her using one of the other toy swords to do some sword drill practicing;) complete with a very appropriate soundtrack! |
|
|
|
Post by chrisperoni on Jun 8, 2015 23:08:40 GMT
|
|
|
|
Post by chrisperoni on Feb 22, 2016 2:04:27 GMT
updating - Faobhar a' Chridhe - Edge of the Heart - Custom Sgian Dubh link to wip  |
|
|
|
Post by chrisperoni on Jun 18, 2016 15:52:18 GMT
|
|
|
|
Post by Lancelot Chan on Jun 18, 2016 16:24:42 GMT
I like the dog on the stand and the toy swords!
|
|
|
|
Post by chrisperoni on Jun 18, 2016 16:26:15 GMT
I forgot about those swords. That was a fun project
|
|
|
|
Post by Deepbluedave on Jun 18, 2016 20:07:40 GMT
Great work Chris.
|
|
|
|
Post by wazikan on Jun 18, 2016 20:40:25 GMT
I really enjoyed lookng at this thread. Thanks
|
|
Paul
Member
Senior Forumite
Posts: 1,771 
|
Post by Paul on Jun 18, 2016 21:42:59 GMT
A lot of time and hard work going on with all those projects, love your work.
|
|
Deleted
Deleted Member
Posts: 0
|
Post by Deleted on Jun 18, 2016 21:52:37 GMT
Youre very skilled, really...wish i wouldnt have two left hands!
|
|


 and the knife stays in upside down even with shaking.
 , plus we all know it's easier to run from zombies and prep your home for imminent attacks with your hands free.


 Unfortunately I'm an edge-perfectionist. Also one wrong move when unsheathing and the throat nicks the edge on either side.