Deleted
Deleted Member
Posts: 0
|
Post by Deleted on Nov 24, 2008 1:17:02 GMT
Ha! It cracked in about 5 places.
Graceful sori though.
Cris
|
|
Deleted
Deleted Member
Posts: 0
|
Post by Deleted on Nov 24, 2008 1:40:02 GMT
that sucks about the blade. what clay are u using? the stuff i used bubbled up when i tried to cure it...now i have to start again.
|
|
Deleted
Deleted Member
Posts: 0
|
Post by Deleted on Nov 24, 2008 1:40:06 GMT
AHhh! Well, you did quench in water, what did you expect. did you atleast interrupt, or maybe water then to oil?
|
|
Deleted
Deleted Member
Posts: 0
|
Post by Deleted on Nov 24, 2008 1:43:31 GMT
what clay are u using? the stuff i used bubbled up when i tried to cure it...now i have to start again. Satinite. I had no problems with it bubbling up at all. Only thing I had problems like that with was the Rutland furnace cement. AHhh! Well, you did quench in water, what did you expect. did you atleast interrupt, or maybe water then to oil? There's such a long story to that...I'm not even going to go into it, other than to say my wife won't be out taking any more pictures while I'm quenching. On a side note though, 1060 should be water hardenable... had the interrupted quench gone through as planned. I'll get some pictures up later when I'm in a bit better mood =/. Cris |
|
Deleted
Deleted Member
Posts: 0
|
Post by Deleted on Nov 24, 2008 2:05:00 GMT
AHhh! Well, you did quench in water, what did you expect. did you atleast interrupt, or maybe water then to oil? On a side note though, 1060 should be water hardenable... Cris And here is your first mistake.Starting with mystery steels can and will most likely cause heartache. I know Matt had said the rail clips they use are 1060 or thereabouts, but it doesn't mean yours are. If you do not definately know what steel you are using. Second mistake is USING WATER. No steel anymore short of RR spikes is water hardening, even though they are called such. Water is QUITE advanced quenchant to use, you really have to understand how to use it and how not to, and it is different for each steel also. Understanding how to use water takes time and expeirience, and alot of blades, your personal learning curve and understanding of such depends on how many fail before you get the hang of it, then how many fail once you do. What was your plan for the interrupted quench? What went wrong? Your third mistake was taking information without confirming or testing that out yourself first. I don't mean to say anyone was wrong, Matt or Kerry especially. What I mean to say is DO NOT TRUST ANYONE, me included. Take the info you are given, then test it yourself and gain your own conclusions. you should have taken the time to forge and grind out a 3 test samples, one to test in oil, one to test in water, and one to test otherwise. You do not deserve to be angry, you knew the risks. If conditions were not ideal then you knew that too. Lessons learned start over, learn from the mistakes and don't repeat them. And don't be mad at your wife give her a big smooch for taking the pictures for you. |
|
Deleted
Deleted Member
Posts: 0
|
Post by Deleted on Nov 24, 2008 2:36:18 GMT
On a side note though, 1060 should be water hardenable... Cris And here is your first mistake.Starting with mystery steels can and will most likely cause heartache. I know Matt had said the rail clips they use are 1060 or thereabouts, but it doesn't mean yours are. If you do not definately know what steel you are using. Second mistake is USING WATER. No steel anymore short of RR spikes is water hardening, even though they are called such. Water is QUITE advanced quenchant to use, you really have to understand how to use it and how not to, and it is different for each steel also. Understanding how to use water takes time and expeirience, and alot of blades, your personal learning curve and understanding of such depends on how many fail before you get the hang of it, then how many fail once you do. What was your plan for the interrupted quench? What went wrong? Your third mistake was taking information without confirming or testing that out yourself first. I don't mean to say anyone was wrong, Matt or Kerry especially. What I mean to say is DO NOT TRUST ANYONE, me included. Take the info you are given, then test it yourself and gain your own conclusions. you should have taken the time to forge and grind out a 3 test samples, one to test in oil, one to test in water, and one to test otherwise. Actually Sam...Matt said 1070...I got my information from the manufacturer...UnitRail. Just letting you know =). I was basing my quenchant choice off of what experienced smiths like Randall Graham, Jesus Hernandez, and a few others are doing, plus discussions in PM's from guys over on Don's forum which prompted me to experiment some. Also my understanding is most Japanese style blades are quenched in water regardless...due to the need for sori formation. There are many threads over on Don's forum about Japanese style blades coming out with reverse sori quite regularly when quenched in oil. This is with steels with quite high carbon contents (1095, W1), as well as the lower carbon steels. I'm not saying it's the 'right' thing to do...we both know in this game there's a lot of rights, and a LOT of wrongs too lol, just saying what prompted my choice. As for the interrupted quench...I laid out the plan to my wife...told her exactly what I was going to do...and when I would like her to take pictures. Again, all I'll say is there will no longer be pictures of my quench processes unless I grow another arm...and that I figure the initial 7-9 seconds the steel spent in the quench before the interrupt...while I was 'discussing' things with her in the middle of the process we spent 15 minutes going over before I started it is probably what did the trick. I can't blame her entirely though...this was my first time doing it, and I didn't know what to expect myself. I kept wondering why it was still straight even after the long initial quench, and sticking it back into the water lol. I didn't know, or realize that the sori is actually something that happens very late in the process. I mean I knew it was the last thing...but not like 15 seconds or more last. Expensive (in time...as well as fuel costs) lesson...but the next one I'll know a bit better on...and will NOT have a pretty little 5'5" tall stack of distraction 'helping' me. Ahh well, I knew I'd have one fail in time...and to be honest I figured it would be this one lol. It was going WAY too well =D. I have that tanto next up, and a katana after that...both for a friend who competes in cutting competitions. He'll be my quality control lol, once I get one to live anyhow. I may knock out that last knife design I posted up with this material over the early part of the week...just to get back into a bit of a groove before starting though. I've got some time that was scheduled out for polishing this blade before I need to start the tonto. Ahh, just caught your edit =). I actually did three samples lol (that's what I meant by 'experiment' above). 3"x1" profile with a curve to the tip, 1/4" thick spine, 1/16" edge. I made three of them (out of the uncracked portion of a screwed up billet I had), and did one with an interrupted quench in brine, one with a full quench no interruptions just to see what happened, and one into oil. I didn't use clay on any of them though. The full quench cracked, the interrupted in brine didn't, and the oil was noticeably softer than the brine with a file test. There's a thread discussing some of it in the metallurgy section on Don's forum. Like I said, I think I know where in my process the cracks initiated =/. Just sucks because this thing was going so very well. Now that I know though...and have done it once...the next one should actually go smoother...which will decrease the work involved in getting it to the heat treat stage again. Wish me luck =). Cris |
|
Deleted
Deleted Member
Posts: 0
|
Post by Deleted on Nov 24, 2008 2:38:56 GMT
You do not deserve to be angry, you knew the risks. If conditions were not ideal then you knew that too. Lessons learned start over, learn from the mistakes and don't repeat them. And don't be mad at your wife give her a big smooch for taking the pictures for you. LOL saw your second edit =). I'm not angry...and never stay angry at her for long even if I was. By better mood, I meant all around...it's depressing when something like this screws up is all lol. There will DEFINATELY be more to come =D. Cris |
|
Deleted
Deleted Member
Posts: 0
|
Post by Deleted on Nov 24, 2008 3:08:15 GMT
That's right I forgot about the unitrail thing  . I understand where you are coming from and where you based your judgment on quenchant better now. ", and a katana after that...both for a friend who competes in cutting competitions. He'll be my quality control lol, once I get one to live anyhow. " This I DO NOT like to hear. If you cannot get a hang on long blades and have not even knocked a few successful under your belt, how do you expect to trust something that someone will be swinging around around other people (not to mention the danger to themselves). How do expect them to trust it? How could you justify it if some unknown variable you did not know about yet, caused harm and possible death to someone? Secondly, hardness is not everything, only a part. I can get 5160 screaming ass hard in water, but it will destroy it. Sacrificing a little hardness in this case I say would have been beneficial, or maybe a combination quench but that would have been pretty advanced as well. You will not get the best out of a steel unless you use the proper tools in the situations where you cannot skimp IE shell out the 100$ for real quench oil if you wish to use a steel that cannot really be ideally quenched in slow oils. Or switch to steel that can be quenched in oil. Right now you are square pegging a round hole. |
|
Deleted
Deleted Member
Posts: 0
|
Post by Deleted on Nov 24, 2008 3:23:58 GMT
That's right I forgot about the unitrail thing . I understand where you are coming from and where you based your judgment on quenchant better now. ", and a katana after that...both for a friend who competes in cutting competitions. He'll be my quality control lol, once I get one to live anyhow. " This I DO NOT like to hear. If you cannot get a hang on long blades and have not even knocked a few successful under your belt, how do you expect to trust something that someone will be swinging around around other people (not to mention the danger to themselves). How do expect them to trust it? How could you justify it if some unknown variable you did not know about yet, caused harm and possible death to someone? No no lol, he won't be USING them in competition (yet)!! He'll be the one going over them to make sure they're first of all, accurate in shape and function, and second of all, sound for cutting. When (not if), I get good enough for him to use them...he will =). He requested the two blades to see what I can do in terms of shaping (gave me very specific measurements). If I can meet his requirements in that respect, and they live through the heat treat...we'll be moving on to the cutting aspects. He was going to check this one out for me...but now that's unnecessary lol. I can see how that might have sounded a bit alarming lol. On a side note...I've got to get something worked out for heating up the longer blades. I thought my big new forge would work...and the blade did fit wonderfully. The problem is, the air...as usual...picks its own preferred exits out the tuyer holes. It's certainly NOT a linear thing where the air comes out all holes evenly. In todays case it was both ends. I wish it had been the middle at least. The forge being 3' or so long just magnified the issue. I think that's what got the wife distracted (it took a while to get the blade heated evenly...longer than I told her to expect), which then ended up getting ME distracted lol. Poor sword is sitting on my desk in front of my keyboard...and every time I look at it I know I'm making this sad little face lol. My wife keeps looking at me like our dog just passed or something. Maybe when I get some time I'll polish it up, give it some furniture, and give it to her to hang over her desk =). I think the hamon was going to be pretty attractive lol. Carbon steel wall hanger! Cris |
|
slav
Member
Senior Forumite
Katsujin No Ken
Posts: 4,457
|
Post by slav on Nov 24, 2008 4:01:29 GMT
No offence, but I saw that coming a mile away. (Just ask randomnobody  ) But it was a valiant effort, and a learning experience, I'm sure. My first blades were 1095 quenched directly in water. Even despite their shortness (all under 6" blade length) and the fact that I normalized them religiously beforehand, about half of my blades cracked terribly upon quench. While just a teeny bit less traditional, I have since followed Sam's sage advice and begun quenching my blades (interrupted) in water and then oil. Haven't had any problems since! Like this (but a lot less fumbly): Honestly, there is no difference in the appearance of the finished product when quenching this way. Here is a photo of two of my blades. The bottom one was water-quenched, and the top one was quenched as I discussed above:  No difference, really. Just a much higher success rate. Better luck next time, friend!  |
|
Deleted
Deleted Member
Posts: 0
|
Post by Deleted on Nov 24, 2008 4:38:41 GMT
Thanks Slav =). Yeah...I can see with 1095 there is a definite need for the water/oil. ALL of the hardening is initiated in the first 2-4 seconds. What happens after that...while not irrelevant perse, is irrelevant to the hardening of the blade. The parts that cooled quickly enough in the first 2-4 seconds will harden on martensite start (around 500* for my steel)...the parts that didn't, won't. Everything we do after that first few seconds is a stress relieving act to keep the blade from cracking =). To be honest, if I were setup better here I would have done water/oil even with the 1060...just to keep the shock levels down. I even considered a 3 second initial quench, and NO re-immersion...to see what would happen...but decided against it because I didn't figure this blade was a good one to experiment with lol. I think the problem with my deal though was the initial quench period being too long. If you notice in your video you carefully counted to 3 or 4, then out, then into the oil. Mine was in the water WAY too long =/. Like 7 seconds or a bit more. Then I fumbled with it after trying to figure out why there was no sori lol. I think that's where the cracks came from...and next time I know what to expect. I'm looking forward to starting the Osoraku tomorrow =). Anyhow, here's some pictures of the process:  Ingore the messy work area lol, I'm in the process of putting up some shelves and a tool storage area. Anyhow this is the basic clay layout. Ingore the messy work area lol, I'm in the process of putting up some shelves and a tool storage area. Anyhow this is the basic clay layout. Blade going into the fire... Blade going into the fire...  Water temp over 100*F. I just used orange hot chunks of scrap to heat it while I was bringing the forge up to temp and getting everything ready for the blade. Water temp over 100*F. I just used orange hot chunks of scrap to heat it while I was bringing the forge up to temp and getting everything ready for the blade. Blade at critical, ready to go into the quenchant... Blade at critical, ready to go into the quenchant...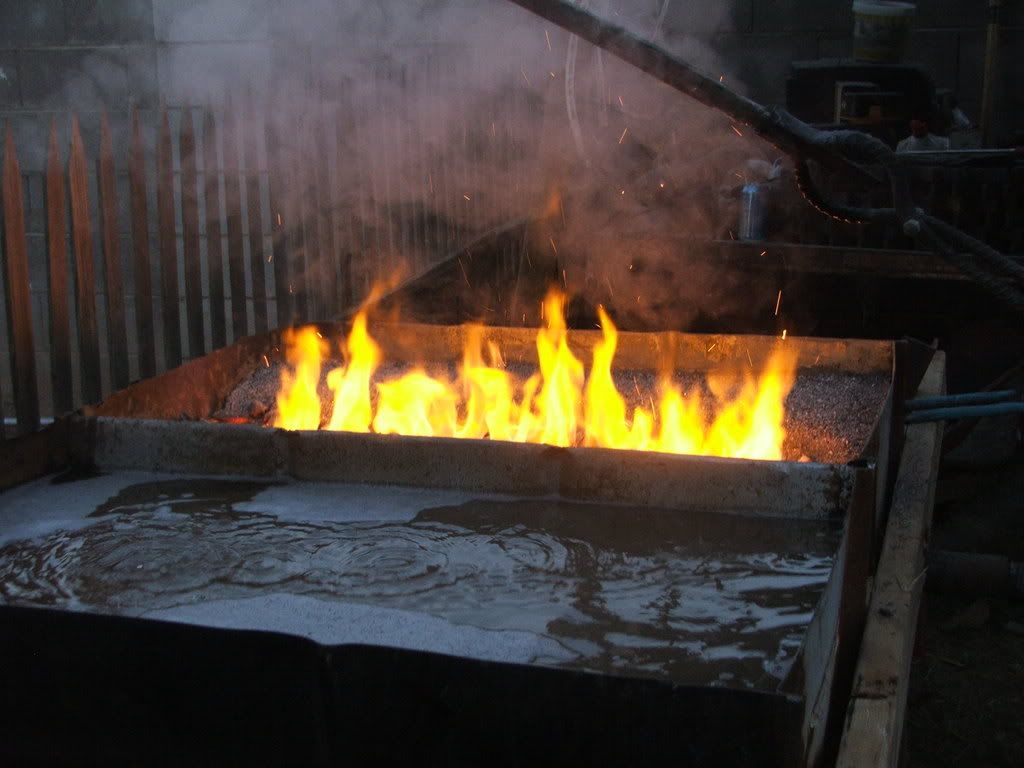 After what seemed like a 25 minute discussion while the blade was in the water... After what seemed like a 25 minute discussion while the blade was in the water...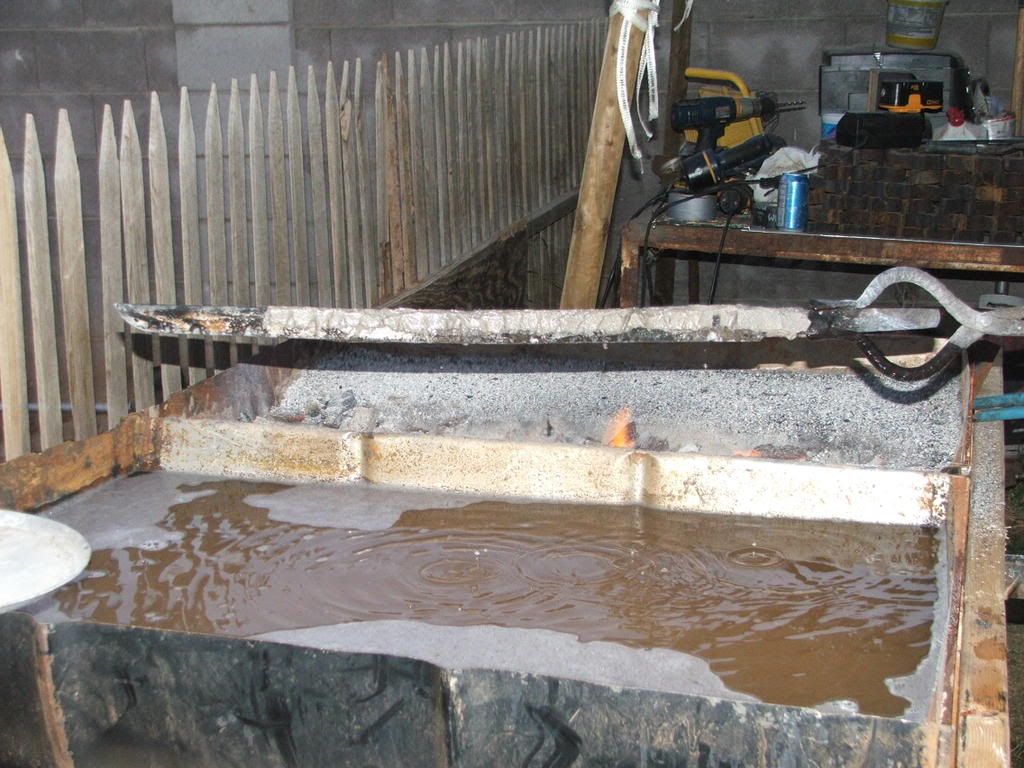 Completely cool. Completely cool. Remaining clay removed...it actually continued to gain a bit of sori after this. Remaining clay removed...it actually continued to gain a bit of sori after this.And the cracks: 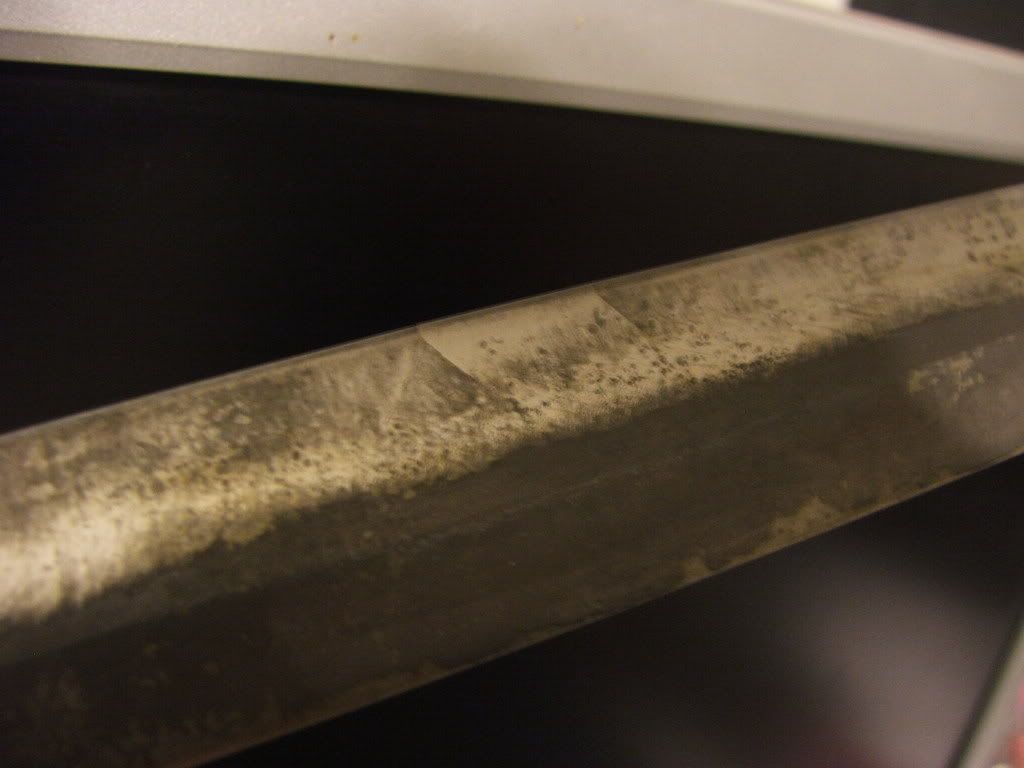 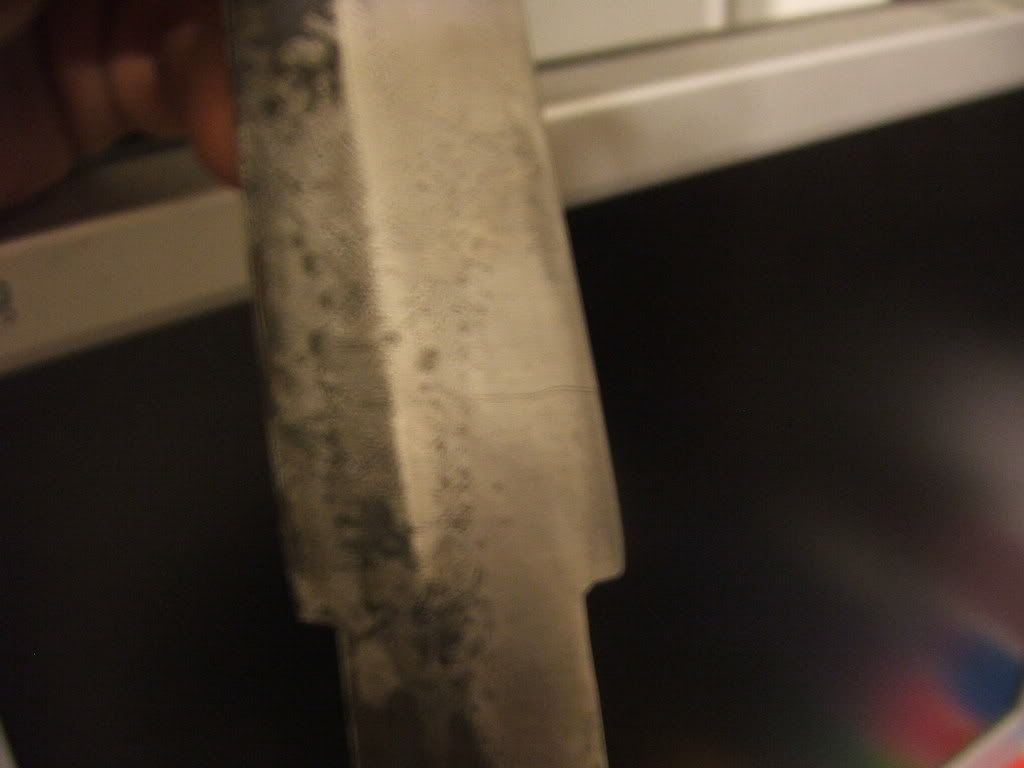  All in all I wish things had worked out better of course. Sharp and slightly painful reminder to keep your eye on the ball lol. Ahh well, next one will come out better...and if doesn't, the one after that will. Cris |
|
|
|
Post by Dan Davis on Nov 24, 2008 14:42:52 GMT
I think the problem with my deal though was the initial quench period being too long. If you notice in your video you carefully counted to 3 or 4, then out, then into the oil. Mine was in the water WAY too long =/. Like 7 seconds or a bit more. Then I fumbled with it after trying to figure out why there was no sori lol.
The initial cooldown below critical takes 1/10th of 1 second; 3 seconds in the quench is too long and 7 seconds is a busted blade. But you already know that.
Ingore the messy work area lol, I'm in the process of putting up some shelves and a tool storage area. Anyhow this is the basic clay layout.
Your clay coating is too uneven, your ashi are in the wrong places and I would definitely expect that blade to pop like a candy cane at the monouchi where it pitches forward. And it did, too.
I did warn you to get your spine completely straight, didn't I?
In fact, most Japanese swordsmiths (even Yoshihara-san) pre-curve their blades in the direction that they want the sori to go. Anytime you pitch the blade forward and expect the sori to pull it back into a curve you are looking at a failed blade.
Your nakago should be completely, totally encased in the clay coating and the coating on nakago should be twice as thick as the thickest part on the rest of the blade. You CAN leave half the nakago uncoated so you can get it in your tongs but if you do make sure you don't put that part of the nakago into the water
[/IMG] Completely cool.And the cracks: [/color][/size][/quote]
Pretty much right at the base of the monouchi and at the nakago, neh? |
|
|
|
Post by Brendan Olszowy on Nov 24, 2008 15:36:44 GMT
I feel your pain bro. Beautiful Sori actually. I can't help you with the cracks, but my forge is also a drum cut in half. The longest blade managed to get a clean HT out of that was a 16" blade. Now I just use it as a spot forge with bricks to shape it. I would rather a rounder more dished out forge, now that I'm not trying to HT in it.
I can 100% rave about my brenno built / brotherbonzai designed kiln. If you get $400 of your US dollars available and 15-20 hours to build one - then just do it. It's simple but fidley.
|
|
Deleted
Deleted Member
Posts: 0
|
Post by Deleted on Nov 24, 2008 19:28:42 GMT
The initial cooldown below critical takes 1/10th of 1 second; 3 seconds in the quench is too long and 7 seconds is a busted blade. But you already know that.
Yes...I'm still very frustrated with that part of it. The other mistakes I can live with...they were mistakes based on lack of knowledge and experience. That mistake is the most frustrating...because I know better. Regardless of the reasons, I shouldn't have been so easily distracted. From what it sounds like below though lol...it would have cracked regardless.
Your clay coating is too uneven, your ashi are in the wrong places and I would definitely expect that blade to pop like a candy cane at the monouchi where it pitches forward. And it did, too.
I did warn you to get your spine completely straight, didn't I?
In fact, most Japanese swordsmiths (even Yoshihara-san) pre-curve their blades in the direction that they want the sori to go. Anytime you pitch the blade forward and expect the sori to pull it back into a curve you are looking at a failed blade.I'm not sure what you mean about the clay being uneven? Do you mean in thickness...or from side to side? The 'ridges' at the edge of the clay before it transitions down to the uncoated area are supposed to be there from my understanding? I'm basing the things I'm doing here off of other people's work, and in this case off a tutorial...so it's tough for me to weed out what's junk and what's not. In that case though...the tutorial was by Randall Graham...so I took it for gospel. He quenches W1 in water (he quenches everything in water)...so I felt his tutorial was most reliable. The link is here: www.swordforum.com/summer99/swordshop.htmlI do see where I went wrong with the ashi though. They should not touch at the bottom of the blade =/. On the spine bending forward...there's three points I'd like to bring up. First, you're 100% correct...but let me explain. When I shaped the blade (you have to look at previous pictures)...I shaped the profile with 'fumbari'. I should have just left it even all the way through...but I wanted to make the 'best' blade I could =/. The fumbari made it impossible to totally straighten the spine...and did make it look like it pitched forward some at about half blade. This was something of an optical illusion. Laying the blade on a table showed the point less than 1/16" off of true, and only for the last few inches. Here's what I think is the problem though. It's VERY clear in the last few pictures that there is a definite curve in the blade, in the wrong direction. I believe this curve generated while normalizing, and I was so caught up in getting any side to side bends and little warps out of it...that I totally missed it =/. Again...another lesson learned. Apparently blades can warp in ANY direction during normalization...and the width of the spine to edge is no protection. Your nakago should be completely, totally encased in the clay coating and the coating on nakago should be twice as thick as the thickest part on the rest of the blade. You CAN leave half the nakago uncoated so you can get it in your tongs but if you do make sure you don't put that part of the nakago into the water. The clay on the nakago was about twice as thick (1/4"), but there wasn't a sharp transition...it's probably difficult to see in the pictures. I also didn't dip the uncoated portion into the water...it wasn't at critical regardless. I actually succeeded in keeping the heat localized from the clay forward. I do see that I should have coated it a bit farther back either way. There wasn't a lot of room there for mistakes the way I had it coated.
Pretty much right at the base of the monouchi and at the nakago, neh? Yes and no...there are no cracks right at the nakago...unless you mean the one crack 1" up the blade from the ha-machi. Then there are two right after the monouchi, one 5" from the tip, and one 1" down from the yokote. Bleh! One other thing I did is snapped the blade at the crack 5" from the tip. It actually snapped...I expected it to bend (not flex) a little first considering all that remained was the unhardened spine. It flexed about 15* (remember this was 5" down from the spine...there wasn't much room to flex more), then snapped very cleanly. To me, by eye, the grain looks very fine and smooth. That's one good thing anyhow =/. I'll post up some pictures in a little bit and let you guys take a look. One last thing...thank you Dan for taking the time to go through and point out the mistakes you saw. A few of them I'd figured out...others I most certainly didn't. They will all help me improve the next blade. Cris |
|
Deleted
Deleted Member
Posts: 0
|
Post by Deleted on Nov 24, 2008 19:32:29 GMT
I feel your pain bro. Beautiful Sori actually. I can't help you with the cracks, but my forge is also a drum cut in half. The longest blade managed to get a clean HT out of that was a 16" blade. Now I just use it as a spot forge with bricks to shape it. I would rather a rounder more dished out forge, now that I'm not trying to HT in it. I can 100% rave about my brenno built / brotherbonzai designed kiln. If you get $400 of your US dollars available and 15-20 hours to build one - then just do it. It's simple but fidley. Thanks Brenno, it's amazing how much emotional energy one puts into these things lol. Gives you sort of a sinking feeling each time you look at it. On the kiln thing...I've been working on it. Just waiting for the right pair of blown kilns to show up on our local craigslist =). Seeing the results you guys get and have gotten with your far more complicated blade shapes and geometries has far more than sold me on it lol. Cris |
|
Deleted
Deleted Member
Posts: 0
|
Post by Deleted on Nov 24, 2008 21:08:48 GMT
Well here's some pictures of the grain:     It looks good to me...but I don't really know for absolute sure what 'good' is lol. All I have for comparison is that railroad spike which was most DEFINATELY bad. What do you more experienced people think? I'm considering polishing the cross section down, and etching it to see what kind of pattern there is in the hardness. I figure...may as well learn as much as I can from all that work. Cris |
|
Deleted
Deleted Member
Posts: 0
|
Post by Deleted on Nov 25, 2008 0:42:38 GMT
it's amazing how much emotional energy one puts into these things lol. Gives you sort of a sinking feeling each time you look at it. Cris Boy I remember those days, when I used to finish things hahaha. Why don't you go see frikkin Tai Goo already? |
|
Deleted
Deleted Member
Posts: 0
|
Post by Deleted on Nov 25, 2008 0:48:31 GMT
it's amazing how much emotional energy one puts into these things lol. Gives you sort of a sinking feeling each time you look at it. Cris Boy I remember those days, when I used to finish things hahaha. Why don't you go see frikkin Tai Goo already? LOL!! No kidding =). On the Tai Goo thing lol...I've got to justify $500 or so to the wife. Maybe I'll just keep fugging up things to the point where she realizes getting some organized education is an investment rather than an expense lol. Seriously though...I could do it now I suppose, but with Christmas coming up, and the way the economy is going (and how it's affecting my business in particular) it's hard to justify it to myself at this point. I WILL be seeing him...but it's more likely not to happen until after Christmas. I know that I'll learn more in three days than I have in three months of messing around by myself. Cris |
|
Deleted
Deleted Member
Posts: 0
|
Post by Deleted on Nov 25, 2008 0:56:16 GMT
Well here's some pictures of the grain: It looks good to me...but I don't really know for absolute sure what 'good' is lol. All I have for comparison is that railroad spike which was most DEFINATELY bad. What do you more experienced people think? I'm considering polishing the cross section down, and etching it to see what kind of pattern there is in the hardness. I figure...may as well learn as much as I can from all that work. Cris Ahhhh!!!! These pictures tell a thousand words!!!!!!! How long did you let your blade sit before you snapped it then took those end grain pictures?> The dark section on each crack could and might possibly be evidence the cracks existed before you even quenched it. |
|
Deleted
Deleted Member
Posts: 0
|
Post by Deleted on Nov 25, 2008 0:58:20 GMT
Umm...it probably sat for....5hrs or more? I took the pictures today. Remember also that I also polished one side up some (only to 80 grit), and used some ferric chloride to see if there was any hamon activity. That might be affecting anything you're seeing in the already cracked portion.
|
|


 . I understand where you are coming from and where you based your judgment on quenchant better now.
 )
)