Deleted
Deleted Member
Posts: 0
|
Post by Deleted on Jul 5, 2009 17:36:45 GMT
Absolutely gorgeous BB.
|
|
|
|
Post by shadowhowler on Jul 5, 2009 19:14:52 GMT
I want one so bad...  |
|
Deleted
Deleted Member
Posts: 0
|
Post by Deleted on Jul 6, 2009 0:53:04 GMT
That is f**king awesome.
What did you sculpt it in ...Chavant NSP medium? Its one of my favourite clays to sculpt in. I know the molding/casting is a long process but could you possibly outline the steps you are taking and materials when making the mold for the wax casts. A series of pictures would be enough. I have quite a bit of experience with body casting and prosthetic make up...etc but want to be able to make multiple microcrystalline wax copies on my fittings quickly. Its like I need a wax template or blank that I can screw around with. I've never make a mold with flexible innards and a hard jacket before, everything has been plaster. Any information that could stop me from wasting materials would be greatly appreciated.
Back to legal issues. Its quite possible that you could sell this in parts with no real problems. Ive been looking around the web for anything precedent. I ll keep you posted.
|
|
Deleted
Deleted Member
Posts: 0
|
Post by Deleted on Jul 6, 2009 6:22:21 GMT
I really hope that you canget to sell this sword for it is going to rock and I really want one  Mind blowing work and a master piece in the making. |
|
|
|
Post by Brendan Olszowy on Jul 6, 2009 7:27:03 GMT
Very beautiful, no? Yes! mmm...
|
|
Deleted
Deleted Member
Posts: 0
|
Post by Deleted on Jul 6, 2009 8:39:31 GMT
brotherbanzai it looks like this sword is going to be seriously beautiful, I can’t wait to see the completed sword.
|
|
|
|
Post by brotherbanzai on Jul 6, 2009 17:44:11 GMT
Thanks LPBoyle I keep forgetting to get that "sword dynamics" post started. Me too shadowhowler, fingers crossed  Thanks stonehart ;D Thanks Brendan  I've got some other casting projects coming up in a couple of weeks so it shouldn't be too much longer. Thanks KingRat  Hey mrfatbucket, please do keep me posted if you find out anything about this legal mumbo jumbo. I use Roma Plastilina #2 or #3 for most of my clay sculpting. I already have a few in process pics of the Father's sword molds I can show you. However, there are several different ways to make molds and the process I use, while it gives the best detail, provides the most easily usable molds, and conserves the most materials, is also the most difficult technique and therefore isn't the best suited to the casual mold maker. A simple poured block mold would probably be the easiest thing to get a basic blank out of. Go to www.smooth-on.com/ and polytek.com/ and read their sections on mold making. They have a bunch of tutorial type stuff and also offer very cheap trial kits which I think they ship outside the US. Smooth-on is cheaper but I generally use polytek as I find that the materials are often better. In any case, here's how I make molds. It's my own variation on the "French method". Step one: bury the object to be molded halfway in clay and include a pour spout for the wax. You have to pay careful attention to where you make the parting line on you object so that you will be able to get your mold apart, pour wax in and out without trapping air, and preserve all the detail. My girlfriend, who had seen my molds in various stages of completion over the years, assumed that I just squished them down into the clay. Actually you have to build the clay up around the piece and very carefully sculpt it in to form a smooth parting line. Some molds can be made as an open face one sided mold (like the little skull). Most pieces will require at least a two sided mold, and some require several different sections.  The picture above shows the parts buried in clay. There is a little retaining wall built up around them, a few small keys along the edges and a groove to mate the two halves together perfectly. For the mold I use a soft non-sulfur clay. Some rubbers will react badly with the sulfur in regular sculpting clay and not set up. Step two: The exposed surface of the object and the mold clay are sealed and coated with a mold release and left to dry. Then the rubber is applied. It comes in two parts which are weighed out (or in some cases measured by volume) and mixed together. I put the rubber on the three coats. The first coat is very thin and will capture detail without trapping air bubbles. The second coat goes on an hour later after the first coat has set and will be a bit thicker to build the rubber up. The third coat is very thick and will fill in any undercuts. If you don't design your mold to have draft, you won't be able to get the parts of the mold off the original or the mold shell off the rubber. Here are the molds with the three layers of rubber applied to the first side.  This thin rubber mold makes it easy to fold it over itself and get the waxes out without damaging them, like pulling off a glove. Too thin and it will tear, too thick and it won't flex much and can be very difficult to remove complicated pieces. The rubber also goes up the little wall around the mold. This will hold the thin rubber securely in the support shell. Stop three: Let the rubber cure for a day and then apply the support shell. For big molds it's handy to make the support shell from light weight plastic but for little stuff it's far cheaper to use plaster (use molding plaster, plaster of Paris is too weak). The plaster also usually goes on in two or three coats. One thin coat to perfectly match the shape of the rubber underneath. Then a thicker coat with some burlap or hemp fiber for reinforcement. Sometimes one more coat if the piece is bigger. These coats are done one right after another before the plaster sets. The little retaining wall keeps the plaster from running off the mold and all over the place. You have to work quick here as molding plaster sets very fast.  Step four: Let the plaster set for an hour and then flip the molds over. Now remove the clay that was built up to bury the object halfway, but leave the little retaining wall. Often there will be a bit of the soft clay left behind which will have to be carefully cleaned off from the object and the rubber. Then you'll be left with this.  One side of the mold is done and the objects are now buried halfway in rubber instead of clay. Step five: Build a new little retaining wall around each piece. This is why we left the little wall in place from the first side, it will give the wall on the second side something to be attached to. Sometimes this is also where you attach a pour spout as you can see on the piece on the far left. The pour spout on the center piece is between the two mold halves and you can see it poking out on the left side of the metal tang blank. The little skull was an open face mold and is finished at this stage since it doesn't need a second side. The rubber and new retaining wall now get a coat of sealer and then mold release and are left to dry.  Step six: Apply three coats of rubber to the second side. This would look pretty much like the first side. Let the rubber set for a day. Step seven: Apply the support shell to the second side. Again, this looks the same as for the first side. Let the plaster set for a couple hours. Step eight: Remove the little clay retaining walls and pull the mold apart. First pull the plaster shell off both sides of the rubber. Sometimes a little compressed air needs to be blown in between the rubber and the plaster to get the plaster off as the fit should be perfect and some suction can occur. Then, very carefully, pull the two rubber halves apart and remove the original. Clean out any residual clay from the rubber, put the whole mold back together and let the rubber continue to fully cure for another couple days before using.  Notice that the mold for the pommel was made with a metal tang blank in place through the pommel. This blank will be put back in the mold when waxes are poured so that there will be a channel in the pommel for the tang. Like I said, this probably isn't going to be the best method for your purposes, but in my experience is the best way to make quality, high detail, easily usable molds in general. Takes some practice though. Some people spend years making molds professionally (even teaching classes in it) and still make really crappy molds. Since you've done molding before, you probably won't have much trouble moving in to rubber molds. Incidentally, there are a ton of different rubbers out there for all kinds of purposes. You might be interested to know that there are body safe rubbers you can use for life-casting in addition to alginate. I've used both and they're pretty nifty. |
|
|
|
Post by Dave(utilityslave) on Jul 6, 2009 22:55:43 GMT
Well then............there you go.................very interesting!
|
|
|
|
Post by shadowhowler on Jul 6, 2009 23:21:58 GMT
Well then............there you go.................very interesting! Your a man of few words, aren't you? |
|
Deleted
Deleted Member
Posts: 0
|
Post by Deleted on Jul 6, 2009 23:38:46 GMT
Thank you. Thats an awesome tutorial.
Sorry if i missed it but whats the shrinkage you get from this method? Or is it basically lossless? There is an excellent video on youtube about the guy from mythbusters where he gives a 20 min talk about recreating a prop from a movie, the Maldives Falcon. In the end he as forgot to accound for the lost with each cast and subsequent molding and the final bird ends up about a third smaller over all. But I expect that this only occurs when the process is repeated over and over.
How many cast can you pull before the molds fail?
I know what you mean with how complicated the process can get. I worked at a porcelain/fine china manufacturer when I was younger and some of the figurines had molds that were divided into many, many parts. I particularly remember the mold for a Labrador dog that had one tiny partition that was just for the very tip of its tale. It was all hand cast slush molding with slip, everything was held together with rubber bands. The amount of knowledge the one man had was astounding. I have no idea how he worked out the best way to divide the sculpt so perfectly. The undercuts on some of the scuplts were phenomenal. Its a shame as all that is now lost in my city.
|
|
|
|
Post by Dave(utilityslave) on Jul 7, 2009 4:10:13 GMT
Well then............there you go.................very interesting! Your a man of few words, aren't you? .........................................................................yep! |
|
|
|
Post by enkidu on Jul 7, 2009 14:26:30 GMT
Wonderful, amazing sculpting skills !
|
|
|
|
Post by Brendan Olszowy on Jul 7, 2009 15:08:47 GMT
Hmm, just looking some more. I will surely go with the longsword, but the blade might change (ALOT). I might have to go for more profile taper, the parallel profile bugs me. I'm getting excited to see this coming on, but no rush of course.
BTW BB, I am hanging on to Aslan while I finish up my new Peter's sword (Rhindon), it's not very far off. A couple of weeks. I just need to make a new crucible - I fried that other one trying to melt that copper - it leaked brass all through my forge, lots of wasted brass. Lucky I have a good respirator. Anyhoo I'm doing a brass guard for it, very different to the movie sword.
|
|
|
|
Post by brotherbanzai on Jul 7, 2009 18:27:00 GMT
Yep, there you go, thanks utilityslave Your welcome mrfatbucket. The shrink is about 2% at each molding step. So 2% from original to wax copy and another 2% from wax to bronze. Some rubbers shrink more than others, the same with waxes. The usable life of the mold depends on the rubber it's made from, what's cast into it, and how well it was made. Some inexpensive high production rubbers are very easy to use repeatedly but the mold rubber will only last for a few years before it starts to turn back to liquid. Most good rubbers can last decades and you could pull dozens or even hundreds of waxes from them if you store them properly and use a release agent with every casting. Thanks enkidu ;D Hey Brendan, are you going to do some more photoshopped alternatives? I'd be interested to see what else you come up with. Re Aslan: Ive got a couple molds to make in another couple weeks so if it gets here soon enough I can do it with them. If not, no biggie. Good luck with your casting |
|
|
|
Post by Brendan Olszowy on Jul 7, 2009 23:52:45 GMT
Hey Brendan, are you going to do some more photoshopped alternatives? I'd be interested to see what else you come up with. Re Aslan: Ive got a couple molds to make in another couple weeks so if it gets here soon enough I can do it with them. If not, no biggie. Good luck with your casting Yeah I'd like to send him now, but I have to see Rhindon done first How about this for my Atlantean, type XVI shaped blade with flared forte, but no fuller, Runic inscriptions down the hex section. 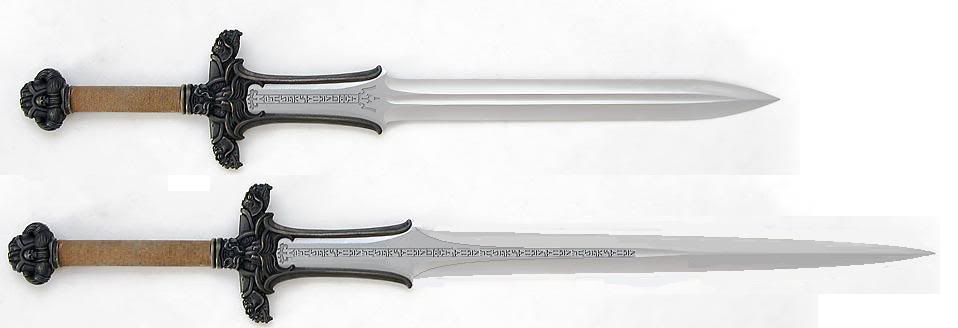 I'm not doing fancy casting. I'm just making billets. I'm using some square 7/8" tube and standing it up and filling that up to make billets of brass from which I can sculpt my bits as usual. With the shrinkage I can just drift the billet out of the tube. I far more enjoy grinding brass than steel, it's so fast. |
|
|
|
Post by brotherbanzai on Jul 8, 2009 13:13:37 GMT
Hmm, it doesn't look bad but I'm not sure that I like it. Maybe if the taper were less extreme, more XIIa or XX. I think the sharp taper looks out of place to me since the hilt is going to be too heavy for it to ever be any kind of light, fast thrusting sword. But I'm biased 'cause I like it the way it was in the movie. I like what you've done with the inscriptions.
|
|
|
|
Post by Brendan Olszowy on Jul 8, 2009 16:26:17 GMT
That's still going to be pretty broad as drawn. It's 70mm across at the flare, so it's still going to be over 2" across through much of the body, and the tip will be thrustable though not super acute, it'll still cleave witches and demons real good.
|
|
Deleted
Deleted Member
Posts: 0
|
Post by Deleted on Jul 9, 2009 18:55:41 GMT
Brother banzai: Found these links to a sword maker in the UK called raven armoury. This was their take on a an atlantian sword. There is little information regarding these swords though and I have no idea how long its been since their site was updated. The earliest memory I have on this maker was back in the early nineties when they made the slayer sword given away for the top prize in the UK games workshop painting competition. Im not sure if they still do the swords for that anymore. www.raven-armoury.co.uk/MKI.htmwww.raven-armoury.co.uk/MKII.htm |
|
Deleted
Deleted Member
Posts: 0
|
Post by Deleted on Jul 9, 2009 19:14:04 GMT
Wow...this is some advanced stuff...keep it comin guys!
|
|
|
|
Post by Brendan Olszowy on Jul 10, 2009 0:41:43 GMT
Geez, when you look at those raven pieces you can see just how far and away BBs skills are. Maybe because it's a passion and a pleasure for him, he spends the time on his work. It's just so much better envisaged and detailed.
|
|


 I've got some other casting projects coming up in a couple of weeks so it shouldn't be too much longer.

