Deleted
Deleted Member
Posts: 0
|
Post by Deleted on Jan 7, 2009 0:10:21 GMT
Hello everyone. I decided that I would post up pics as I work on customizing an old Del Tin 5140 I got a while back. Initially, I had done a grip wrap and a basic wood core scabbard, but I decided to revisit this wonderful sword and do some more work. First off, I redid the wood scabbard core tapering and thinning it further. Additionally, I added risers to support an idea that I had for an integral baldric. I also added a stiff rawhide triangular flap to go under and reenforce the flap I will be doing when I cover the scabbard. Note: My wife found the NO GLUE comment I made to myself between the risers for the belt exceptionally funny.   Originally, I simply rewrapped the stock grip, which was just too thick and not nearly elegant enough. so, I did a complete rework of the stock Del Tin grip and added a highly sculpted waisted one similar to the one found on some of the Albion hand-and-a-halfs such as the Fiore or the Earl. I spent a good deal of time hand-sanding. The idea I had is a little complex; the upper and lower are waisted - terminating in a hexagonal cross-section near the guard. I've got some finish sanding to do, but its 90% complete as is. I went ahead and added the leather risers as reference points.  Lastly, I hand filed hexagonal finals (to match the grip upper) and grooved around the cross to add a little more detail. The guard was just too plain and looking at some of Shooter Mike's stuff made me jealous.  I could have done more, but I am waiting on a bulk leather order to come in. I plan on doing the baldric in black and finishing the grip and scabbard in matching oxblood. I'll probably be bluing the cross and pommel as well if I can find more cold blue (WalMart near my house is fresh out, I think I've bought it all...) I'll repost once I get more done! |
|
Deleted
Deleted Member
Posts: 0
|
Post by Deleted on Jan 7, 2009 0:16:00 GMT
|
|
Deleted
Deleted Member
Posts: 0
|
Post by Deleted on Jan 7, 2009 1:09:38 GMT
Lookin' good.
I like how the contours of the grip complement the pommel.
|
|
Deleted
Deleted Member
Posts: 0
|
Post by Deleted on Jan 7, 2009 1:32:33 GMT
I did not have a buckle for the baldric, so I took the Dremel to an old buckle I had laying in the junk drawer. I gave it a roped look, which should stand out a little better once I find some damn cold blue. It will serve in the place of a cast buckle for now...  |
|
Marc Ridgeway
Member
Retired Global Moderator
"The best cost less when you buy it the first time." - Papabear
Posts: 3,122
|
Post by Marc Ridgeway on Jan 7, 2009 1:38:38 GMT
Excellent job!!!
You and Mike are some Euro modding machines!!
Good work
|
|
Deleted
Deleted Member
Posts: 0
|
Post by Deleted on Jan 7, 2009 2:07:11 GMT
Awesome work man =). I wish that the Japanese sword crowd would accept some judicious modding on occasion. Anyone found personalizing a katana to that extent is summarily beheaded =D. I've got some really cool ideas for shaping tsuka cores, as well as custom wrap jobs that should complement the whole 'Japanese katana' theme, while still being totally custom/fantasy based. As has been mentioned in another thread...that's a difficult thing to pull off =). First though, I have to enroll in a police protection program so that when it's completed the katanaphiles looking for me to hang as a terrorist won't have a chance.   Cris |
|
|
|
Post by ShooterMike on Jan 7, 2009 2:10:15 GMT
That's gonna be NIIIICCCE. I really like the contours on the grip, and the file work on the guard is really nice too. It will be classy with blued hilt parts too.
Are you going to wrap the wooden grip core with cord before the leather goes on? Or do the leather directly on the wood? Either way seems to work well.
|
|
Deleted
Deleted Member
Posts: 0
|
Post by Deleted on Jan 7, 2009 3:44:52 GMT
The cord made the grip a little too fat last time. To keep it slim as possible, I am gonna go with a straight leather wrap then bind to dry in thin cord. On another note, I went to six WalMarts today and no-one has Birchwood-Casey cold blue anymore. I guess I have to bite the bullet and order some off feeBay. As to Wally World stopping carrying cold blue, I suppose some liberal has said that the overly-dangerous substance can be used as an assault rifle or something.  |
|
Deleted
Deleted Member
Posts: 0
|
Post by Deleted on Jan 7, 2009 4:00:33 GMT
The cord made the grip a little too fat last time. To keep it slim as possible, I am gonna go with a straight leather wrap then bind to dry in thin cord. On another note, I went to six WalMarts today and no-one has Birchwood-Casey cold blue anymore. I guess I have to bite the bullet and order some off feeBay. As to Wally World stopping carrying cold blue, I suppose some liberal has said that the overly-dangerous substance can be used as an assault rifle or something. Have you thought about cold rust blueing? From my understanding it's substantially more durable, and is quite an attractive finish when oiled. Cris |
|
Deleted
Deleted Member
Posts: 0
|
Post by Deleted on Jan 7, 2009 5:07:56 GMT
Thanks for the complements!
If the sword was not peened, I'd might rust blue it; but as it stands, I'd have no way to seperate the blade from the guard/pommel without doing some serious work. I could build a jig and a box to expose just the pommel/guard to the bluing acids, but boiling the furniture in water to convert the red oxide to black could not be done unless I unpeened it. A tad too advanced for me as of yet, though it does look really great and has 10 times the durability of a out-of-the-bottle cold blue.
Good idea though that I will try in the future. Thanks for the suggestion!
|
|
Deleted
Deleted Member
Posts: 0
|
Post by Deleted on Jan 7, 2009 12:54:00 GMT
looks grand indeed......I too like the grooves you added to the guard..certainly makes it stand out more...
cheers,
Bill
|
|
|
|
Post by brotherbanzai on Jan 7, 2009 14:46:09 GMT
That looks really good so far. I like where you're going with the grip and the file work on the cross adds a nice touch. Looks like you're taking a nice, but somewhat plain, sword and making it something special.
In my experience your "no glue" notes to yourself are a very good idea. It's way too easy to get so into what you're doing that you forget stuff like that and end up with lots of extra work to do.
|
|
Deleted
Deleted Member
Posts: 0
|
Post by Deleted on Jan 8, 2009 23:39:26 GMT
I got the scabbard cover glued on and basically formed this morning. Right now, its drying in my shop overnight. I took some pictures but did not have a chance to upload them yet. I'll post some of this phase tomorrow.
Once dry, I will re-emboss all of the details to give them their final form and add any textures/scabbard decor (not sure yet what I might do). I plan on cutting, dying, and adding the intergral baldric tomorrow morning. The scabbard should be completely finished by tomorrow evening.
The regrip is ticking me off. I am really anxious to see it take shape, but I have to wait. I have the leather, but I am still waiting on feeBay purchased cold blue to show up - which could be another 3-4 days.
More pictures tomorrow...
|
|
Deleted
Deleted Member
Posts: 0
|
Post by Deleted on Jan 9, 2009 15:42:38 GMT
I'm back. Here is the scabbard yesterday still wet and before being embossed:   I got off work, raced home, and got to cracking. My goal was to finish before lunch so I could get a little sleep today. Here is all that was done: Scabbard cover embossed. Cuts made for intergral baldric. Belt cut and dyed. Belt threaded through scabbard cover. Holes punched in belt for laces and laced. Buckle attached and laced. Application of leather gloss. ...and for the first time in my life...I DID NOT USE A SINGLE RIVET! ;D Here is the result after about 3 hours worth of work:   And sadly, below is the Del Tin sans grip wrap. Still waiting on !*&%#@ cold blue to arrive...  I am foaming at the mouth to see how this looks completed...  Now..off to bed. Perhaps mail truck will deliver what I need to get done this weekend while I sleep! |
|
Deleted
Deleted Member
Posts: 0
|
Post by Deleted on Jan 9, 2009 16:33:38 GMT
The customization looks great but the sword really catches my eye, how would you rate this one? Too heavy? Whippy? Anything like that and is it me or is it not sharpened?
|
|
Deleted
Deleted Member
Posts: 0
|
Post by Deleted on Jan 9, 2009 18:40:41 GMT
Hmm, I might have to make a scabbard for my brand new, pre-owned DT2142 over the summer...
What's the thickness of the leather you used, and where'd you get it? The only stuff I ever bought turned out to be too thick(though I've found plenty of other applications for that 1/4 hide...).
|
|
Deleted
Deleted Member
Posts: 0
|
Post by Deleted on Jan 9, 2009 20:57:46 GMT
Coming along nicely.
|
|
Deleted
Deleted Member
Posts: 0
|
Post by Deleted on Jan 9, 2009 22:33:56 GMT
The customization looks great but the sword really catches my eye, how would you rate this one? Too heavy? Whippy? Anything like that and is it me or is it not sharpened? DT is my favorite sword manufacturer by a long shot. They were at the top of their game with this hand and a half here. I'd rate most Del Tins 5 out of 5, including this one. Not too heavy or whippy at all. I did not sharpen this blade because the blade form does not really make for a good cutting sword as much as it is a thrusting sword. Additionally, keeping it blunt means that I can continue to take it to area events where in some cases sharps are banned. Now, on the other hand - THE COLD BLUE IS HERE! Woot! Gonna get to work! ;D |
|
Deleted
Deleted Member
Posts: 0
|
Post by Deleted on Jan 10, 2009 6:33:20 GMT
Well, all done. I blued to a nice antique grey effect, then added the grip. I touched up the risers with a little black to give them more definition. All in all, its a very comfortable grip - 10x more than the stock Del Tin one it had a few months back and better than my previous attempt. These pictures are a little dark, but I'll try to do some outdoor ones tomorrow. Here it is:   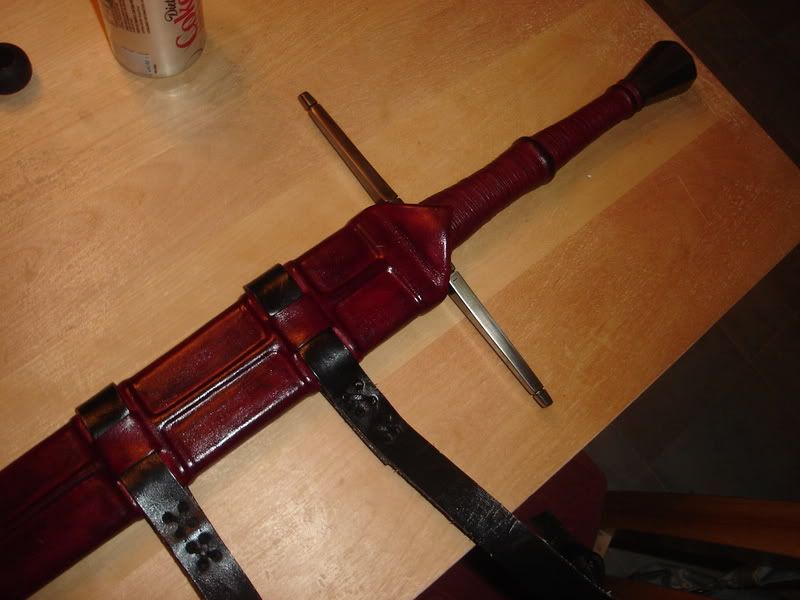 |
|
Deleted
Deleted Member
Posts: 0
|
Post by Deleted on Jan 10, 2009 6:49:32 GMT
sexy, well done.
|
|


 I am foaming at the mouth to see how this looks completed...
 Unfortunately I'm an edge-perfectionist. Also one wrong move when unsheathing and the throat nicks the edge on either side.
