Deleted
Deleted Member
Posts: 0
|
Post by Deleted on Dec 28, 2008 11:05:57 GMT
I work evenings on my job, so when I am off, it always strikes me to do something in the small hours of the night sword-related. The wife and step-son are asleep and re-runs of X-Files get old pretty quick. I recently had an idea. I've been trying my hand at scabbard making and had pretty good results. But, I wanted to try something completely different in a fantasy vein. I wanted to add three dimensional art to one of my scabbards. I am not talking about a symbol, crest, or some risers. I wanted something freaky to be on the outside of it - Jody Samson-ish if you will (no disrespect intended, I really like his work - just inspired by some of his darker imagery). So, I chose the sword that I will be wearing to the Ren Faires/Cons this year; the DSA Black Knight. This is such a nice sword, but it's rather mundane in its non-descript scabbard. Next, I picked the idea I thought of. I wanted a dragon's skull popping right out of the side of it - like something you'd see in a Danzig video or Elmore painting. I freehanded something between a dragon, a horse, and a bull which I felt conveyed the image I had. I crafted the skull in Sculptie and baked it for about half an hour. Once it had cooled and hardened, I sculpted the back of it with sandpaper to the contour of the DSA scabbard. I then took some 2oz leather scrap that I normally use for grip wrapping, wet the leather, covered it and the skull with glue, and began embossing it. An hour or so later, it looked like this:  A little more drying, and I embossed a little more detail making sure that the glue had adhered to all the nooks and crannys. I took the skull and trimmed off the excess leather scrap around it. Once this was done, I covered the bottom of the skull and leather trim with glue and stuck it to the scabbard. As it dried, I embossed the edges to make sure there was a good seal all the way around. After, I gave it a few coats of leather sheen to bring out the art: 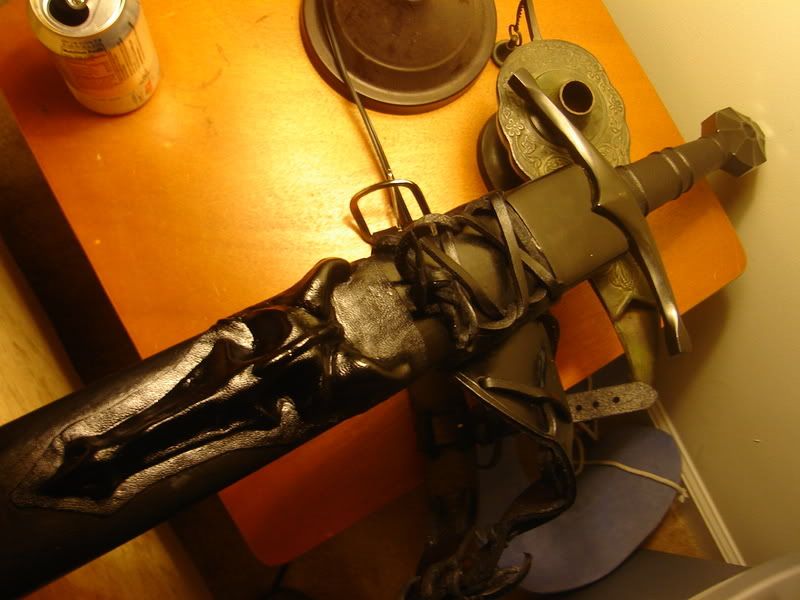 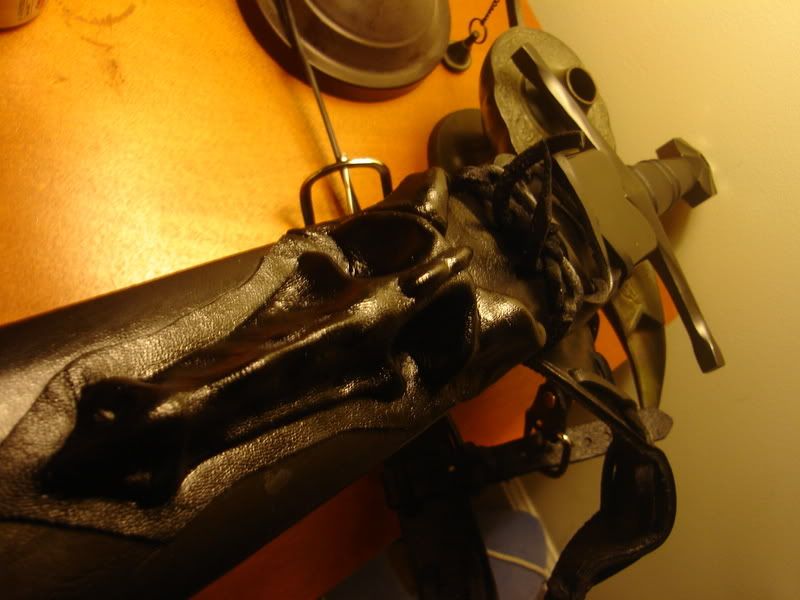 The photos are a little dark and the light is really bouncing off the sheen, but the overall blend is somewhat better than the pictures portray. Also, there are alot of added details that are not showing, but you get the picture. I'll do some natural light images once its turns daytime. Ideally, I would have done this under the wrap of a new scabbard. But, since I am planning on making a new DSA scabbard at some point, I wanted the idea of how it looked and if it could be done. It turned out so well, I think I might just leave it this way for now - or at least though the faire season. I just wanted to see the results of such an undertaking and let others know that are considering doing such a thing that its really not that hard at all. Rock on... |
|
Deleted
Deleted Member
Posts: 0
|
Post by Deleted on Dec 28, 2008 18:35:24 GMT
Nifty!
|
|
|
|
Post by genocideseth on Dec 28, 2008 20:33:24 GMT
Wow, now that is new!
|
|
Deleted
Deleted Member
Posts: 0
|
Post by Deleted on Dec 28, 2008 22:13:33 GMT
Pretty wicked.
|
|
Deleted
Deleted Member
Posts: 0
|
Post by Deleted on Dec 28, 2008 22:25:16 GMT
That's awesome, Odingaard!!!!
|
|
SlayerofDarkness
Member
Review Points: 65
"Always give everyone the benefit of the doubt."
Posts: 3,067
|
Post by SlayerofDarkness on Dec 28, 2008 22:31:06 GMT
Odingaard, that is SERIOUSLY impressive. Would you make a how-to thread on this? Please, please, please??? ? If so, please include a list of materials used and their cost. Thanks, that is awesome!
|
|
Deleted
Deleted Member
Posts: 0
|
Post by Deleted on Dec 28, 2008 23:46:17 GMT
Thanks for your complements. It's not hard to do, you just have to be patient. Here is a basic how to for those interested: List of materials:
- Block of white polymer sculpting material ($10.00 for the big block of Sculptie).
- 2oz leather upholstry hide, enough to cover your art. I get this on eBay in bulk for about $30.00 for 27-31 sf, but you can get smaller amounts, get a small peice at the craft store, or cut up an old leather jacket/car seat.
- Sandpaper or sanding sponge ($3.00 - $5.00).
- Titebond or Elmers All Purpose Weatherproof White Glue ($2.00 - $5.00).
- Tin foil.
- Scrap cardboard square large enough to hold the sculpture.
- Plastic bag or plastic wrap.
- Steel embossing tool ($5.00) OR something stiff with a small rounded point on it.
Step One: Make your sculpture out of the Sculptie. Keep in mind you don't want it to be too tall or have really small details that can break off later when you emboss it. You want the bottom to be flat, so I mold it on a piece of tin foil on a flat surface. Don't mold it on the scabbard because you need the bottom to be flat in order to emboss it good later. Step Two: Put the sculpture on tin foil. Bake it at 275F for 15 mins for each 1/4" of its thickness. So, if you are doing a 1" thick sculpture, it needs to bake for 60 mins total. Once its finished, take it out and let it cool for about an hour. Once is cooled off, it should be rock solid. Step Three: Get out the sandpaper and sand the scabbard's concave shape into the back of the sculpture. You want it to match just about perfectly. Sand slow and check the fit often. Step Four: Take the leather and cut a piece with plenty extra to cover the artwork. Then, soak the piece in hot tap water for a few mins. Take out the leather and wring out the extra water. Pat it dry with a towel so its barely damp to the touch. Step Five: Take the cardboard and wrap it in plastic wrap to make a non-stick work surface. Put your sculpture on top and cover it completely with a liberal amount of glue. Make sure you get glue covering the complete sculpture and all the details. Step Six: Take the damp leather, cover the sculpture-facing side with glue (like when you do a grip rewrap), then put it over the sculpture. Begin forming the leather to the sculpture with your hands, pressing the leather into all of the fine details as best as you can. Keep a damp cloth or sponge on hand to wipe away the excess glue as you squeeze and press it out around the edges. Wipe off any glue that gets on top of the leather, but don't worry too much about it - it dries clear. You are working your way to have a nice tight 'skirt' of even flat leather around the whole piece, while having the details show. Step Seven: Let this dry for about 30 mins under a fan or desk lamp. Then take the sculpture and begin embossing the details. I use a small tool called a deer hoof, but you can use anything that has a fine rounded smooth point. What you are doing is essentially tracing over the design using medium pressure to seat the leather into the smaller details. In the end, the picture should look like my first picture above. The leather will mold like damp clay, so you can really get creative here, adding folds, creases, or other details you might want to show. Emboss again and again at the leather dries to get the design to 'hold' properly. Step Eight: Set aside and let the whole piece dry for a few hours out of direct light. The leather will further shrink into the details and adhere to the piece. Step Nine: Cut out the sculpture leaving about a 1/2" skirt around it. Smear the whole bottom of the sculpture and leather with glue and mount it on the scabbard. Press out the excess glue around the edges and make sure that your leather does not rise, roll, or develop creases. Just keep pressing down stubborn spots with your fingers until they stick. I watched a movie while continually rubbing the edges to make them flat. Wipe away any excess glue with a damp cloth. Step Ten: Let dry overnight. Step Eleven: Don't bother buying store leather sheen. It's just a glue and water mix that you can easily make and apply yourself: Mix 1 part glue with 3 parts water in a small container (ie - 1 oz of glue, 3 oz of water). Mix well until it looks like skim milk. Take a small sponge and begin to wipe this mixture thinly over the art dampening it completely. Let dry between coats (about 10 mins). Do this several times and you will have a high gloss finish that is weather proof. You can also use this solution on sword grips, scabbards, or any other rigid leather to give it a nice sheen. Step Twelve:Have a beer or your drink of preference. You are done! Take pictures and post them here. |
|
Deleted
Deleted Member
Posts: 0
|
Post by Deleted on Dec 29, 2008 1:30:59 GMT
Thats realy good! I like the over all theme, Dark, is your garb going to be dark to match???
|
|
|
|
Post by kidcasanova on Dec 29, 2008 2:14:57 GMT
That Sculpey really is great stuff. I've worked with it quite a bit (I, like you, spent time doing odd projects in the wee hours of the night/morning because of my old job).
+1 Karma for some creativity! ;D
|
|
Deleted
Deleted Member
Posts: 0
|
Post by Deleted on Dec 29, 2008 3:15:05 GMT
I am doing an entire set of embossed black leather plate from Schmitthenner for a Dragonhighlord look, AKA, Dragonlance this year.
It's my first try at the fantasy look, and I plan on blowing it out of the water. Normally, I do a historically accurate rendition of something, but that is going to change due to the amount of cheesy/cheap fantasy stuff I've seen out there in recent years, I am investing about 3k into new armor that is out of this world. I'll also be using the armor during my WMA events (Schola St. George). Though its not historically accurate by any means, it still meets the protection requirements needed.
Now the DSA will match. ;D
|
|
Deleted
Deleted Member
Posts: 0
|
Post by Deleted on Dec 29, 2008 4:11:46 GMT
Right on! Make sure you post pics of the whole assemble..........SanMarc.
|
|
|
|
Post by brotherbanzai on Dec 30, 2008 18:04:28 GMT
That's a very cool idea odingaard. Nicely done too. I look forward to seeing your leather plate when you get it done. +1 to you for putting out a nifty idea with instructions for everyone.
|
|
|
|
Post by Brendan Olszowy on Jan 1, 2009 10:12:35 GMT
I gotta go a +1 for this. It's a whole world of potential, and I look forward to seeing more of them.
|
|
|
|
Post by shadowhowler on Jan 1, 2009 14:26:31 GMT
VERY interesting stuff... a +1 from me for sure. Your quite the Renaissance Man. I've now seen all kinds of craft related skills displayed by you. Bravo.
|
|
Deleted
Deleted Member
Posts: 0
|
Post by Deleted on Feb 6, 2009 3:36:36 GMT
 very cool +1
|
|
Deleted
Deleted Member
Posts: 0
|
Post by Deleted on May 22, 2009 15:39:39 GMT
Odingaard, that RAWKS man! I love it! I'm going to use your writeup to do something similar later on...I have an idea that should be simpler than what you've shown us. Thanks man, +1 for that.
|
|
Deleted
Deleted Member
Posts: 0
|
Post by Deleted on May 22, 2009 15:48:20 GMT
you should do a video tutorial because I just can't visualise the steps and this looks like something I would be interested in trying. Also hail Lord Verminaard I salute you  |
|
Deleted
Deleted Member
Posts: 0
|
Post by Deleted on May 22, 2009 22:07:46 GMT
Holy bump from the past...thanks! ;D
The idea is not that complicated as is. You essentially make a a small Sculptie sculpture that will fit onto a scabbard, then wrap it in leather (like you would a scabbard core).
I might work up a video or do further pictures at some point for those interested. Though I don't really plan on doing this to anything else soo, I will perhaps just take some leather scrap and demo the process...
|
|
|
|
Post by Darksword Armory on Aug 21, 2009 0:54:14 GMT
Hey Odin,
Very interesting !
Seems like a lengthy process. Not sure I would have the patience for that lol. The result however is very impressive....really nice work! I'd love to see more of your designs.
Eyal Azerad
Darksword Armory
|
|
Deleted
Deleted Member
Posts: 0
|
Post by Deleted on Sept 28, 2009 21:00:44 GMT
Very cool and freaky! Thanks for the how-to, I think I might try this myself. Was there some trial and error in the whole process?
|
|


 very cool +1
 Unfortunately I'm an edge-perfectionist. Also one wrong move when unsheathing and the throat nicks the edge on either side.
