Deleted
Deleted Member
Posts: 0
|
Post by Deleted on Oct 30, 2008 2:08:16 GMT
Ok, I did a lot of research, and found a lot of questions popping up about the method. The universal thing I hear is that it is the most controllable etching method, but then there's some other things that kind of bother me. First, what happens if when I start working on my actual sword, it doesn't quite work right...is there something I can do to minimize the damage? Next, the most basic method I saw (a link to a forum post which at the moment won't open for me) seems to have involved attaching one bud to the metal being etched, and the other bud to a cotton ball. However, I read on some other sites that you have to attach the latter to either the same kind of metal as you are etching or a piece of graphite (varies based on where I looked), and then put a cotton pad on it. Then I read that it's better to use special etching solution than salt water, and that they have different ones for stainless and carbon steel. I'm hoping it's the least complicated method, which basically involves your power source, stencil, a cotton ball, and salt water. I did find a nice do it yourself rig for the power source, which would cost about $11.25 to put together, at this site: www.navaching.com/forge/etching.htmlWould this be the kind of thing I want to put together, or could it be even simpler? Lastly, I need to find out about the stencils. I'm going to need several different stencils, a total of eight for the crossguard, two for the langets, and probably a fairly large one to use on the ricasso. The ricasso will be the same on both sides, so I can re-use that one. So that brings the total to 11 stencils...I worry this could get costly... So, any suggestions/ideas to help me out in that area? Is there a simple way I can make my own stencils, say using a material that will act as the resist and tracing the characters/designs on with transfer paper and cutting it out manually? My funds are quite limited at the moment, so I'm willing to do more work if I can do it cheaper, and more reliably. Sorry for making a third thread, but this should be the last one before I start working. I just don't want to take the dive until I'm sure I have all the details right. After all, my only sword... -Jonathan |
|
Deleted
Deleted Member
Posts: 0
|
Post by Deleted on Oct 30, 2008 2:56:46 GMT
I can't see the stencils costing you more than 20$ from a graphics shop (I think even Kinko's does the graphics for signs). Also, do NOT reuse the stencil for the ricasso...get two. The vinyl, while not so much 'sticky' perse, can be very touchy about being reapplied. I mean, it might work...but for a few dollars more, it's best to have a fresh, clean resist for each etch. That's also one reason I wouldn't use fingernail polish or paint on your sword. If it lifts for some reason, or somehow chips or cracks...you won't find out till after the fact...which is a really poor time you know? The vinyl is pretty much razor cut and very precise. If you post up some sort of image of the design you want, I might be able to refine it a bit for you so you can take it to the graphics shop and they can make a template from it. That'll save you some money on their setup.
As for the carbon with a cotton pad...I think they're just trying to ease resistance maybe. As long as your q-tip or cotton ball is sufficiently wet, I can't see it being a problem.
I saw the site you linked as well, and he is doing a different thing than what the guy I linked you did. He's using a bath to transfer the current. While this works, I don't think it's what you're going to need. His system should work fine for your needs as far as the electronics goes, but skip the bath and just use a wetted cotton ball or Q-tip. Also, used computer power supplies are cheap (or sometimes free) on craigslist. No reason you can't use one of those. Hell, one guy even used a straight up 12v car battery lol, you just need current from what I understand, and a way to apply it.
My best advice is to grab a couple batteries and tape them together. Apply positive and negative wires across them in line then tape over that so it's secure. Grab a stainless butter knife, your girlfriend or wife's (hopefully one OR the other, most of us don't have both lol...at least those of us withOUT a deathwish) least used bottle of fingernail polish (this limits the butt chewing when you're found out, as long as it wasn't new lol), and just experiment. Butter knives are cheap lol, and who knows, if it works well you can do the whole set to make 'em match =).
I'm probably going to do something similar before this weekend. If I learn anything I'll let you know!
Cris
|
|
Deleted
Deleted Member
Posts: 0
|
Post by Deleted on Oct 30, 2008 3:20:04 GMT
Well, if you think I can get the 12 stencils I need that cheaply, I'll see about getting the designs finalised and post them so you can see if it looks doable enough. I need to do the mesurements anyway, especially for the crossguard (not a lot of room to spare on those). I'll do some searching for a good celtic knotwork stencil that I can adapt in photoshop, and see how it all comes together.
I also think I'll grab a double D-cell battery holder and wing it the rest of the way, but might as well have a steady carriage to wire up to. Now that I think of it...I can probably get that tomorrow and try it on an old knife. I have access to the wires, and plenty of cotton balls, salt water, and I think I know where to get a bit of nail polish...
Again, thanks for the quick advice!
-Jonathan
|
|
Deleted
Deleted Member
Posts: 0
|
Post by Deleted on Oct 30, 2008 17:41:31 GMT
Well, I did some testing with a couple D's, they didn't do anything but make the q-tip bubble. The 9v got better results, but it was still really rough and nasty looking (the mark, not just the q-tip). Could it be that I really need to just use a power supply and forget batteries? It seems there's something other than voltage at work here...
|
|
Deleted
Deleted Member
Posts: 0
|
Post by Deleted on Oct 30, 2008 21:15:33 GMT
Well, I did some testing with a couple D's, they didn't do anything but make the q-tip bubble. The 9v got better results, but it was still really rough and nasty looking (the mark, not just the q-tip). Could it be that I really need to just use a power supply and forget batteries? It seems there's something other than voltage at work here... Can you post a picture of the mark? The edges of the mark should be clean with whatever resist you used. The depth of the mark is a function of how many times you 'pat' the q-tip down. Lots of short pats will remove more than one long pat...it's the function of connecting the circuit I believe that removes the metal. Also, I finally figured out how to make an image a vector graphic that can be used in my mother's Signlab application for her printer/plotter/cutter. I'll be running a set of my own makers marks this weekend along with some other stuff...so, if you get me REALLY good measurements and images, I can probably make your stickers for you for a reasonable price, or maybe in trade for a good section of that rayskin =). Cris |
|
Deleted
Deleted Member
Posts: 0
|
Post by Deleted on Oct 30, 2008 22:34:19 GMT
Hmmm, I think I'll try to get some fingernail polish and try again...I tried marker but it washed off far too easily. I didn't notice anything happening with patting, but I'll give it another shot and take some pics of the results. I'll try a different knife too, that may have something to do with it.
Let me know how that printer works for you, I'm going to keep working on my inscriptions (writing with a purely phonetic alphabet is a bit tricky when you're so used to our bizzare english language).
Maybe we can trade off for the rayskin when it arrives...he said it would be in by next weekend. If the skin is not that great though, I'd be glad to pay for some stencils made by a fellow sword enthusiast. Be sure to let me know how your makers marks come out, and if you are successful with them.
|
|
Deleted
Deleted Member
Posts: 0
|
Post by Deleted on Oct 31, 2008 1:50:43 GMT
Well, I did a bit of testing on a piece of mild steel. 12v battery with some small jumper wires hooked up to it. The battery probably wasn't fully charged, but it had plenty of juice to create a nice spark and melt the end of the leads on the alligator clips when they touched lol. My results were...well not good but not really bad either. For one I didn't clean the metal much so it still had the black coating on it that most mild steel does. I think that affected the etch a good bit. Another thing I learned is the negative lead is the etching lead lol, the positive plates. The vinyl works great as a resist. I took a piece of scrap and cut some triangles in it and the pattern was pretty clearly defined, just not very deep (on a side note the plating worked great lol, and quickly). Later this evening after dinner I'm going to use clean steel, a battery charger instead of a battery, and see how that works =). Hopefully I won't end up a news story lol. All in all it's a pretty cool technique. By the way, found a few more links to different but similar etch methods: www.britishblades.com/forums/showpost.php?p=607867&postcount=2www.britishblades.com/forums/showthread.php?t=52558From what I'm reading, you can't use salt water on stainless...liquid drain cleaner however, is supposed to work wonders =). Salt water is for carbon steels. I'll experiment more tonight and let you know what I find out. Cris |
|
Deleted
Deleted Member
Posts: 0
|
Post by Deleted on Oct 31, 2008 2:21:20 GMT
Hmmm, I worried this would be a bit more complicated. Well, I'll try it with some drain cleaner here in a minute...we can compare notes later...
Something tells me I ended up plating the metal, not etching...
|
|
Deleted
Deleted Member
Posts: 0
|
Post by Deleted on Oct 31, 2008 2:58:34 GMT
Hmmm, I worried this would be a bit more complicated. Well, I'll try it with some drain cleaner here in a minute...we can compare notes later... Something tells me I ended up plating the metal, not etching... Yep, bet you did. Here's a funny thing. When I was running directly off a battery, positive to the metal and negative to the 'bud' etched, the other way plated. When I hooked up my battery charger...it was the reverse lol! Bleh, electronics!! Anyhow, here's some pictures of my results with a bit more salt in my solution, the scale sanded off the mild steel, and a battery charger instead of a battery. I also used a makeup applicator pad instead of a q-tip. Pretty positive results, considering I didn't leave things on there very long. Probably six or seven applications at 4 seconds each. There was a nice black patina to it but I wire wheeled it off so I could get a better idea of the depth of the etch. 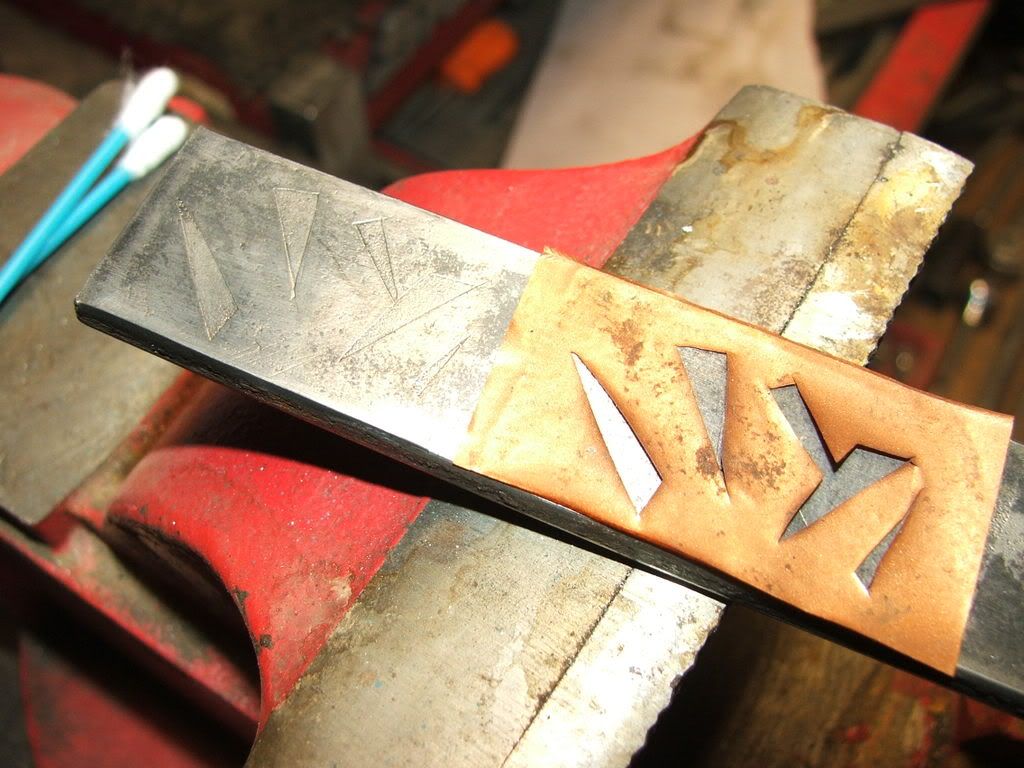 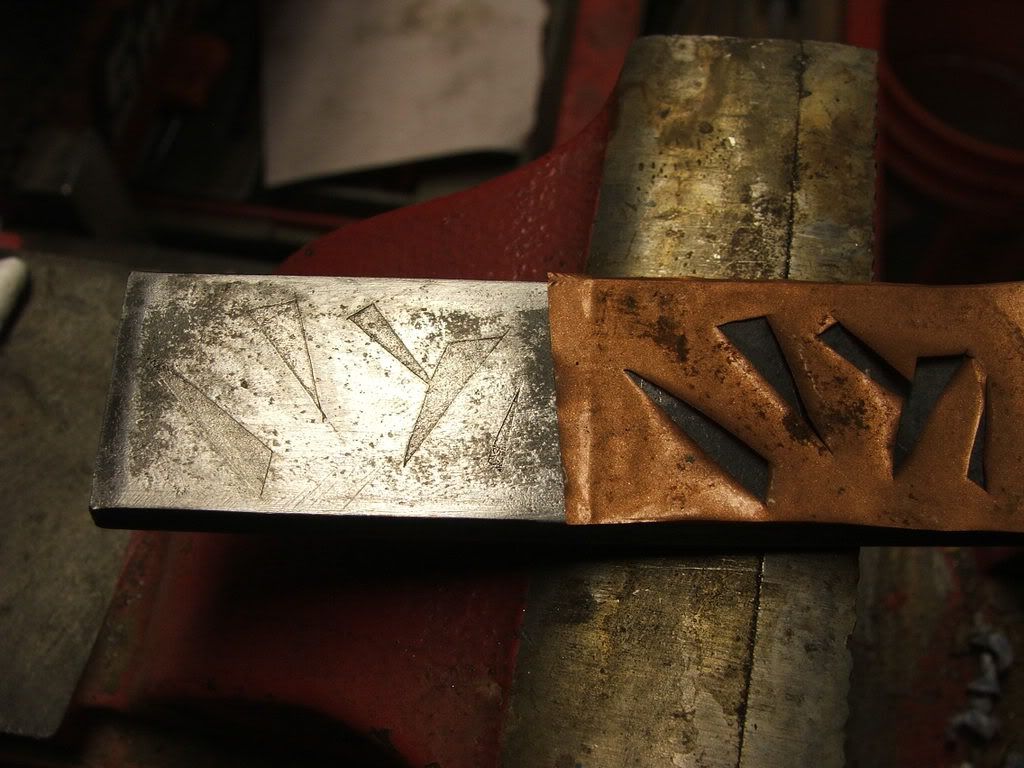 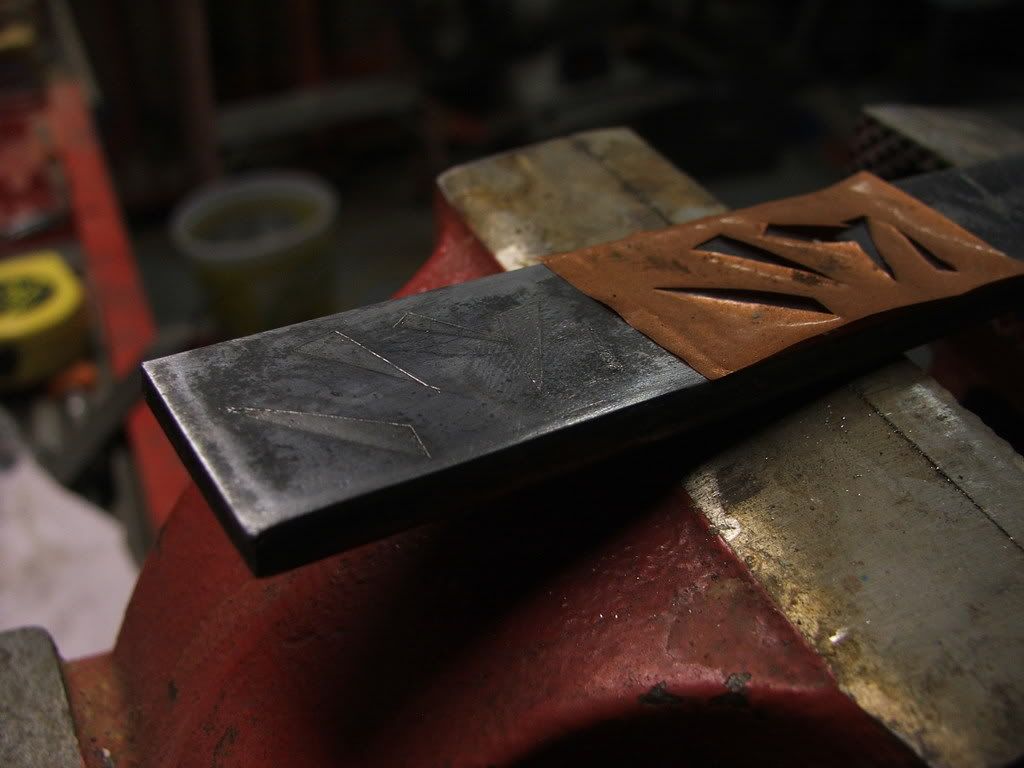 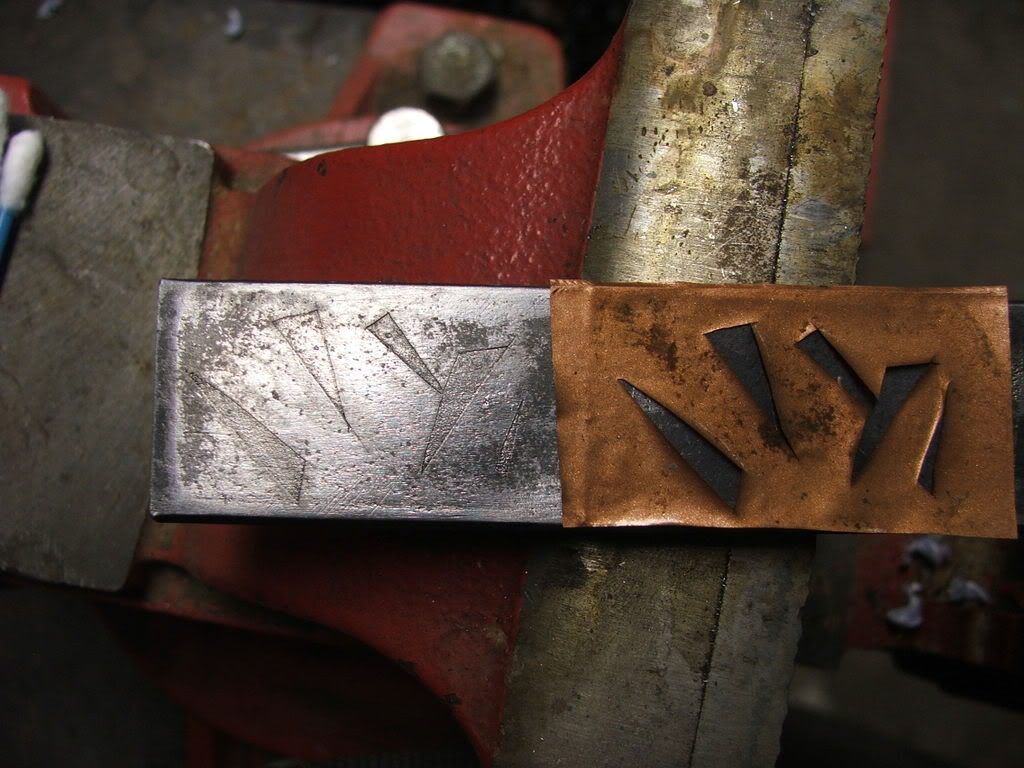 Later I'll get around to doing some tests to see what kind of depth I can acheive, along with image transfer accuracy. As you can see the precision on this go was pretty clean. With a precision cut stencil out of a plotter it should make for a really sharp etch. From my understanding with stainless the results will be the same using very diluted drain cleaner...the electricity is only an accelerant for the oxidization. By the way, for those of you wondering...this is something you could easily do at your kitchen table. You don't need any sort of shop at all. There is NO mess whatsoever. And only the faintest of 'chlorine' odors. While I wouldn't advise breathing it for hours on end...the faint smell is a lot less noticeable than your wife using bleach on laundry day. Cris |
|
Deleted
Deleted Member
Posts: 0
|
Post by Deleted on Oct 31, 2008 3:43:18 GMT
Turns out I DID electroplate the knife earlier...I ended up with a yellowish discoloration and when I checked my alligator clips a minute ago, I saw the tip had been eaten right off of the one that was on the q-tip. Ouch, but at least I know how to electroplate now.
Well, I gave it another shot...this time it worked. I got a big old kitchen knife, painted a patch of nail polish on it, and had my mom scratch her initials in it with a pencil (her knife). Then I used a strong salt water solution, since I have no drain cleaner on hand, and it worked! Actually etched it this time, not plated...and it got to a decent depth. The black marking wasn't too consistent, but the depth was.
So, apparently the salt water does work on stainless steel as well...and it is rather fast. The mark wasn't very fine, but hey what can you expect from pencil marks in dried nail polish? By the way, I used a 9v battery. I'll try a battery charger later, and maybe cut a shape out of some vinyl or something, and see if I get better results that way. Then I can rest assured the method works and I can start work on my final designs. Resting easier tonight...
|
|
Deleted
Deleted Member
Posts: 0
|
Post by Deleted on Oct 31, 2008 3:49:28 GMT
Turns out I DID electroplate the knife earlier...I ended up with a yellowish discoloration and when I checked my alligator clips a minute ago, I saw the tip had been eaten right off of the one that was on the q-tip. Ouch, but at least I know how to electroplate now. Well, I gave it another shot...this time it worked. I got a big old kitchen knife, painted a patch of nail polish on it, and had my mom scratch her initials in it with a pencil (her knife). Then I used a strong salt water solution, since I have no drain cleaner on hand, and it worked! Actually etched it this time, not plated...and it got to a decent depth. The black marking wasn't too consistent, but the depth was. So, apparently the salt water does work on stainless steel as well...and it is rather fast. The mark wasn't very fine, but hey what can you expect from pencil marks in dried nail polish? By the way, I used a 9v battery. I'll try a battery charger later, and maybe cut a shape out of some vinyl or something, and see if I get better results that way. Then I can rest assured the method works and I can start work on my final designs. Resting easier tonight... Use electrical tape if you have it..I doubt you'd have any kind of sticky vinyl laying around if you know what I mean. It wouldn't work for a sword, but it'll do for an experiment. Do you have any pictures of your etch? I'm curious why it seemed to take a bit of time with mine to get any depth lol, but yours went quickly? Maybe it's the stiffness of the salt solution. Ahh more testing! Cris |
|
Deleted
Deleted Member
Posts: 0
|
Post by Deleted on Oct 31, 2008 4:41:07 GMT
Well, it wasn't super fast...I probably spent two minutes on it total. I didn't get serious depth, but your fingernails will catch on the initials, so it's decent enough for a quick test. I'll get a pic tomorrow...don't have a camera handy at the moment. Also it was quite a small area I was working with...only two initials which were no more than half an inch tall.
I'll also try out the electrical tape...I think I'll also try using a flattened out cotton ball to give it more surface area, see if it works as well as the q-tip. Might as well expirement a bit...have lots of knives around.
-Jonathan
|
|
Deleted
Deleted Member
Posts: 0
|
Post by Deleted on Oct 31, 2008 5:43:32 GMT
Well, it wasn't super fast...I probably spent two minutes on it total. I didn't get serious depth, but your fingernails will catch on the initials, so it's decent enough for a quick test. I'll get a pic tomorrow...don't have a camera handy at the moment. Also it was quite a small area I was working with...only two initials which were no more than half an inch tall. I'll also try out the electrical tape...I think I'll also try using a flattened out cotton ball to give it more surface area, see if it works as well as the q-tip. Might as well expirement a bit...have lots of knives around. -Jonathan What I used the second time around, was one of those foam make up application pads. Not the cotton ones. I wasn't sure if it was going to work...but it did. The nice thing about it was it was firm enough to rock it side to side without sliding it, and since it was wedge shaped it had a nice square footprint on the metal. Tomorrow when I try another one I'm going to see if I can't etch it deep. I'll line up a strip of vinyl on the steel with say 10 circles or something cut out, all the same size. This way I can test each circle using the number of applications at 4 seconds each (with a wipe down every third application) to lable them, then gauge the depth using a dial indicator. This should give us a good idea what kind of results we can get and how to go about getting just what we want. I'll post pictures after of course =). Cris |
|


 Unfortunately I'm an edge-perfectionist. Also one wrong move when unsheathing and the throat nicks the edge on either side.
