

Kaze Customization - Tsukamaki & Samemaki Saya
Jul 17, 2008 19:16:23 GMT
Post by Deleted on Jul 17, 2008 19:16:23 GMT
Hello everyone!
Some of you may have seen what I did with my Tenchi several months back, which was my first try on tsukamaki - My Tenchi Reborn thread
Several months after customizing my Tenchi, I finally had the time and funds to do another customization. This time with my Kaze and it involves my 2nd try on tsukamaki and a 1st with samemaki saya (rayskin wrap on saya).
This customization started last April 2008 and until now I haven't finished with it. But let me share with you what I have done so far. Please bear with me on this one, it's kinda long and it has lots of pictures! ;D
Samemaki Saya
First, the parts, materials used, and the costs...
Original Kaze saya
Scrap of rayskin = got it for free from a Japanese seller, only paid for the shipping of ¥1,000 (approx $9.50)
Sandpapers - I've lost count of how many I bought and spent
A couple of paint brush - doesn't really cost that much
Glazing putty (1 quart) = $2.00
Black lacquer (1 quart) = $2.00
Wood plane = $1.70
Wood glue = $1.30
2 spring clamp = $6.00
Total cost = about $22.50
You all know what the Kaze looks like, but I'll post a picture for the "before and after".

The moment my scrap of rayskin arrived, I immediately started out with the saya. Stripped off the paint by using 150 grit sandpapers. But I realized that its taking a long time to strip off the paint with this grit, so I changed grit to 60-80. This definitely hasten the paint stripping. While I was stripping off the paint, I realized that there was a white coating underneath the black lacquer. I realized that it was some sort of putty. So I asked my local hardware store, what type of putty is used for wood, and they gave me the glazing putty.
After stripping off the paint:

I removed the kurikata because I didn't like the placement of the kurikata on Cheness' sayas. They were very near the koiguchi. So I had to carve a new one, but made a (1st) mistake with my measurement of the new groove, and carved out a wider one.

But it was easily fixed by cutting a piece of bamboo chopstick to fill the gap. I did the same thing on the original groove of the kurikata, which will be covered by the rayskin.

Another thing that I don't like about Cheness' sayas, is that the circumference is too wide or fat. So I had to shave off a lot of wood from the saya to achieve my desired circumference.


I think that's a lot of wood I shaved there...
But it's still not enough... I have to remove more wood on the part of the saya where I'll be wrapping the rayskin to keep it flushed.

The raykins above were still wet... when they are wet, they become soft, rubbery and flexible. Cutting the rayskin was really tough because the nodes were quite hard that I had to use a heavy duty pair of scissors, then sand the edges to make them even.
I think I shaved off enough wood here (but later on realized that it weren't enough... I should have removed more wood! 2nd mistake along the project...)

Now it's time to wrap the rayskin...

I readied the materials I'm going to use... 2 spring clamps, wood glue, cotton cord (which are used as an ito and sageo), and the rayskin that I'm going to wrap was still being soaked in water. My 3rd mistake in this project was when I cut the rayskin panel when it was still wet. I thought I measured it accurately, with an excess to make it flush. But I forgot that when the rayskin dries up, it shrinks and hardens like that big scrap above.
4th mistake was when I applied too much glue!


After wrapping the rayskin on the saya, I wrapped it with the cotton cord. Then placed clamps on both ends, so when it dries up and shrinks, (hopefully) it'll be flushed.


Now what's an electrical clamp doing there? Hahaha... well, I need to reinforce the wrap and this was the next thing to a spring clamp that I found.
After 24 hours...


The result of too much glue and wrong measurement that the rayskin left a gap when it dried off.

The result of not enough wood removed...
Oh... I forgot, before applying the rayskin, I glued back the kurikata first, then made a measurement on the rayskin for the kurikata.

Oh well... I don't think I can undo what I did now that the rayskin has been glued on. Have to move forward and see if I can still do something about those mistakes.
After cleaning up the rayskin, and gluing a strip of rayskin to fill the gap (I was told over at SFI not to fill the gap with putty or caulk or anything, but only with nodes), I applied the glazing putty.


Now time to lacquer the rayskin...


After lacquering and letting it dry off, I started sanding the nodes. 5th mistake! I unevenly sanded off the nodes.


There you go. My semi-finished samemaki saya. I still haven't applied a clear gloss lacquer and haven't painted it as well, because I'm still thinking what color should the saya be. I'm also thinking if I can still fix the uneven sanding of the nodes.
Man... I sure have learned a lot in this project, especially from the mistakes I made. I was quite disappointed in how it turned out and I know it looks like crap and I know I could have done much better... But hey, this was my first try with this and I hope to really do better on my 2nd try. Anyway, I still have a lot of rayskin left (enough to do a full wrap on a saya) and I can always buy a new saya from Cheness.
Now, let's go to the Tsukamaki[/u]
There will be no mistakes with this one.
First, the parts and costs...
From Nishijin Sword
Samurai fuchi/kashira = $39.80
Naginata Yoroi menuki = $32.50
Namigumura tsuba = $67.40
Shipping = $9.57
Total $149.27
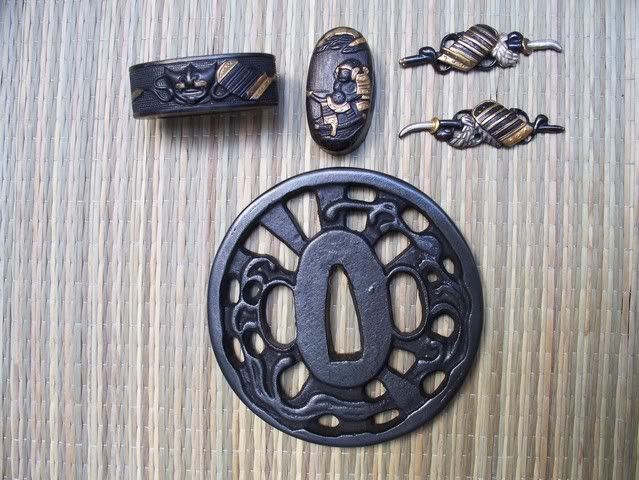
All of these fittings were made in Japan. The Namigumura tsuba is the tsuba used by the Yagyu clan. I chose it for its historical background, and I liked the design and it was within my budget. I was planning on mounting an authentic old tsuba, but couldn't find one within my budget.
Okay, moving on...
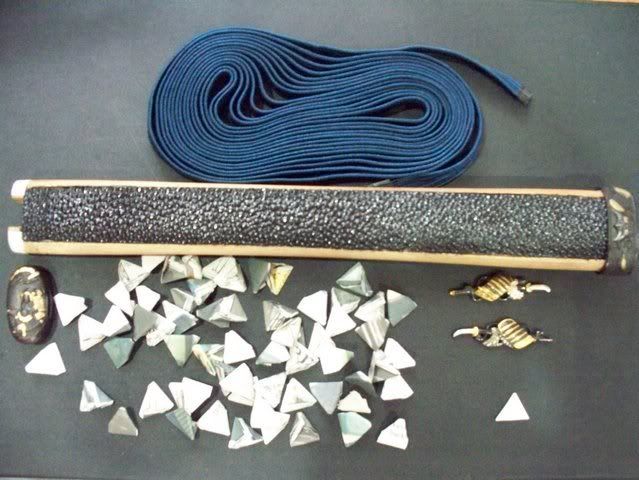
From Shadow of Leaves
14 ft of Nando silk ito = $41.30
180 cm of Nando Chem Fiber Kakuchu sageo = $18.00
Shipping = Free
Total = $59.30
I love buying at Shadow of Leaves, gives an extra length of ito (I think about a foot) and gives a 10% discount, so $5.93 was refunded. So the total cost for the ito and sageo is $53.37

The tsuka I used was a replacement Shura tsuka (this picture was shown in my other customization thread - My Tenchi Reborn).

I didn't use the original tsuka of the Kaze because it was cracked. And then when I got the replacement tsuka from Cheness, it didn't have the groove for the rayskin panels.

The picture above shows the replacement Kaze tsuka without the groove, then below it is the Shura replacement tsuka. I think I read about it somewhere before, that a groove is necessary on the tsuka if you're going to use rayskin panels, so that the panels won't shift from side to side or move from its place.

The rayskin panels I used are cut outs from my stock of rayskin where the nodes are bigger and better quality. The fit of the fuchi and kashira on the tsuka was quite loose. So I had to glue some paper strips so it'll have a tight fit. I also did some sanding on the tsuka to make it slimmer (sorry for the blurry picture).
My first try in folding the hishigami before was quite a task. But this time, I got the hang of folding them and finished 60+ paper triangles easily and uniform in shape and size.
The tsukamaki...


In placing the menuki, I had to do a test wrap to make sure it'll be in place.

Then tightening up the wrap.

Placing the 2nd menuki.

Done with the 2nd menuki, and now its time for the ura and omote side knot.

If you have noticed the yellow plastic straw, I mentioned its usage in my Tenchi customization thread. This is necessary to easily insert the ito underneath the folds without loosing the tightness of the wrap.
Done with the ura side knot.

After 5 hours with aching fingers, I am finally done with the tsukamaki.
"Before"

"After"
Omote side

Ura side

Omote side at a different angle

A close up of the omote side


Ura side at a different angle

A close up of the ura side


A side by side comparison with my 1st tsukamaki


If you have noticed, the diamonds on the Tenchi are much wider, and that of the Kaze are slimmer. Maybe because I strecthed the ito too much on the Kaze, to make sure the wrap will be really tight.
Shot at a different angle to show that no hishigami are sticking out


This is what the placement of the menuki looks like as seen from the side

A picture of the mounted tsuba


There it is... my ultimate Kaze customization! I still have not drilled a new meguki-ana as I'm having a hard time looking for someone I know who has a drill press. Drilling a new hole is easier with a drill press than with a hand held one. So, no swinging of this sword for now. Total amount spent for this project was approx US$225. Well, I could have saved money if I bought the fittings from Chinese sellers on eBay, but I wouldn't be satisfied with the quality. And this is a sword that deserves high quality fittings, so I had to spend more.
To show you the person behind this project... Aldwin P. (aka Katana Hunter) from Metro Manila, Philippines

Thanks everyone for viewing my project. I hope you liked it and have learned a lot as much as I did. I will try to improve my skill as time and funds will allow. This was definitely a learning experience for me. Any comments will be very much appreciated!
Regards,
Aldwin
Some of you may have seen what I did with my Tenchi several months back, which was my first try on tsukamaki - My Tenchi Reborn thread
Several months after customizing my Tenchi, I finally had the time and funds to do another customization. This time with my Kaze and it involves my 2nd try on tsukamaki and a 1st with samemaki saya (rayskin wrap on saya).
This customization started last April 2008 and until now I haven't finished with it. But let me share with you what I have done so far. Please bear with me on this one, it's kinda long and it has lots of pictures! ;D
Samemaki Saya
First, the parts, materials used, and the costs...
Original Kaze saya
Scrap of rayskin = got it for free from a Japanese seller, only paid for the shipping of ¥1,000 (approx $9.50)
Sandpapers - I've lost count of how many I bought and spent
A couple of paint brush - doesn't really cost that much
Glazing putty (1 quart) = $2.00
Black lacquer (1 quart) = $2.00
Wood plane = $1.70
Wood glue = $1.30
2 spring clamp = $6.00
Total cost = about $22.50
You all know what the Kaze looks like, but I'll post a picture for the "before and after".
The moment my scrap of rayskin arrived, I immediately started out with the saya. Stripped off the paint by using 150 grit sandpapers. But I realized that its taking a long time to strip off the paint with this grit, so I changed grit to 60-80. This definitely hasten the paint stripping. While I was stripping off the paint, I realized that there was a white coating underneath the black lacquer. I realized that it was some sort of putty. So I asked my local hardware store, what type of putty is used for wood, and they gave me the glazing putty.
After stripping off the paint:
I removed the kurikata because I didn't like the placement of the kurikata on Cheness' sayas. They were very near the koiguchi. So I had to carve a new one, but made a (1st) mistake with my measurement of the new groove, and carved out a wider one.
But it was easily fixed by cutting a piece of bamboo chopstick to fill the gap. I did the same thing on the original groove of the kurikata, which will be covered by the rayskin.
Another thing that I don't like about Cheness' sayas, is that the circumference is too wide or fat. So I had to shave off a lot of wood from the saya to achieve my desired circumference.
I think that's a lot of wood I shaved there...
But it's still not enough... I have to remove more wood on the part of the saya where I'll be wrapping the rayskin to keep it flushed.
The raykins above were still wet... when they are wet, they become soft, rubbery and flexible. Cutting the rayskin was really tough because the nodes were quite hard that I had to use a heavy duty pair of scissors, then sand the edges to make them even.
I think I shaved off enough wood here (but later on realized that it weren't enough... I should have removed more wood! 2nd mistake along the project...)
Now it's time to wrap the rayskin...
I readied the materials I'm going to use... 2 spring clamps, wood glue, cotton cord (which are used as an ito and sageo), and the rayskin that I'm going to wrap was still being soaked in water. My 3rd mistake in this project was when I cut the rayskin panel when it was still wet. I thought I measured it accurately, with an excess to make it flush. But I forgot that when the rayskin dries up, it shrinks and hardens like that big scrap above.
4th mistake was when I applied too much glue!
After wrapping the rayskin on the saya, I wrapped it with the cotton cord. Then placed clamps on both ends, so when it dries up and shrinks, (hopefully) it'll be flushed.
Now what's an electrical clamp doing there? Hahaha... well, I need to reinforce the wrap and this was the next thing to a spring clamp that I found.
After 24 hours...
The result of too much glue and wrong measurement that the rayskin left a gap when it dried off.

The result of not enough wood removed...
Oh... I forgot, before applying the rayskin, I glued back the kurikata first, then made a measurement on the rayskin for the kurikata.
Oh well... I don't think I can undo what I did now that the rayskin has been glued on. Have to move forward and see if I can still do something about those mistakes.
After cleaning up the rayskin, and gluing a strip of rayskin to fill the gap (I was told over at SFI not to fill the gap with putty or caulk or anything, but only with nodes), I applied the glazing putty.
Now time to lacquer the rayskin...
After lacquering and letting it dry off, I started sanding the nodes. 5th mistake! I unevenly sanded off the nodes.

There you go. My semi-finished samemaki saya. I still haven't applied a clear gloss lacquer and haven't painted it as well, because I'm still thinking what color should the saya be. I'm also thinking if I can still fix the uneven sanding of the nodes.
Man... I sure have learned a lot in this project, especially from the mistakes I made. I was quite disappointed in how it turned out and I know it looks like crap and I know I could have done much better... But hey, this was my first try with this and I hope to really do better on my 2nd try. Anyway, I still have a lot of rayskin left (enough to do a full wrap on a saya) and I can always buy a new saya from Cheness.

Now, let's go to the Tsukamaki[/u]
There will be no mistakes with this one.

First, the parts and costs...
From Nishijin Sword
Samurai fuchi/kashira = $39.80
Naginata Yoroi menuki = $32.50
Namigumura tsuba = $67.40
Shipping = $9.57
Total $149.27
All of these fittings were made in Japan. The Namigumura tsuba is the tsuba used by the Yagyu clan. I chose it for its historical background, and I liked the design and it was within my budget. I was planning on mounting an authentic old tsuba, but couldn't find one within my budget.
Okay, moving on...
From Shadow of Leaves
14 ft of Nando silk ito = $41.30
180 cm of Nando Chem Fiber Kakuchu sageo = $18.00
Shipping = Free
Total = $59.30
I love buying at Shadow of Leaves, gives an extra length of ito (I think about a foot) and gives a 10% discount, so $5.93 was refunded. So the total cost for the ito and sageo is $53.37
The tsuka I used was a replacement Shura tsuka (this picture was shown in my other customization thread - My Tenchi Reborn).
I didn't use the original tsuka of the Kaze because it was cracked. And then when I got the replacement tsuka from Cheness, it didn't have the groove for the rayskin panels.
The picture above shows the replacement Kaze tsuka without the groove, then below it is the Shura replacement tsuka. I think I read about it somewhere before, that a groove is necessary on the tsuka if you're going to use rayskin panels, so that the panels won't shift from side to side or move from its place.
The rayskin panels I used are cut outs from my stock of rayskin where the nodes are bigger and better quality. The fit of the fuchi and kashira on the tsuka was quite loose. So I had to glue some paper strips so it'll have a tight fit. I also did some sanding on the tsuka to make it slimmer (sorry for the blurry picture).
My first try in folding the hishigami before was quite a task. But this time, I got the hang of folding them and finished 60+ paper triangles easily and uniform in shape and size.
The tsukamaki...
In placing the menuki, I had to do a test wrap to make sure it'll be in place.
Then tightening up the wrap.
Placing the 2nd menuki.
Done with the 2nd menuki, and now its time for the ura and omote side knot.
If you have noticed the yellow plastic straw, I mentioned its usage in my Tenchi customization thread. This is necessary to easily insert the ito underneath the folds without loosing the tightness of the wrap.
Done with the ura side knot.
After 5 hours with aching fingers, I am finally done with the tsukamaki.
"Before"
"After"
Omote side
Ura side
Omote side at a different angle
A close up of the omote side
Ura side at a different angle
A close up of the ura side
A side by side comparison with my 1st tsukamaki
If you have noticed, the diamonds on the Tenchi are much wider, and that of the Kaze are slimmer. Maybe because I strecthed the ito too much on the Kaze, to make sure the wrap will be really tight.
Shot at a different angle to show that no hishigami are sticking out
This is what the placement of the menuki looks like as seen from the side
A picture of the mounted tsuba
There it is... my ultimate Kaze customization! I still have not drilled a new meguki-ana as I'm having a hard time looking for someone I know who has a drill press. Drilling a new hole is easier with a drill press than with a hand held one. So, no swinging of this sword for now. Total amount spent for this project was approx US$225. Well, I could have saved money if I bought the fittings from Chinese sellers on eBay, but I wouldn't be satisfied with the quality. And this is a sword that deserves high quality fittings, so I had to spend more.
To show you the person behind this project... Aldwin P. (aka Katana Hunter) from Metro Manila, Philippines
Thanks everyone for viewing my project. I hope you liked it and have learned a lot as much as I did. I will try to improve my skill as time and funds will allow. This was definitely a learning experience for me. Any comments will be very much appreciated!
Regards,
Aldwin


 Wow! Great work, wonderfully thoughtful and thoroughly informative documentation. Thank you so much for showing where you can go wrong AND how to avoid it next time. Just an awesome job! +1
 Unfortunately I'm an edge-perfectionist. Also one wrong move when unsheathing and the throat nicks the edge on either side.
