|
|
Post by Uncle Mack on Feb 2, 2016 3:02:09 GMT
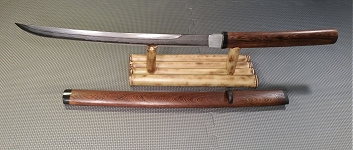
I wanted to share a project I'm working on: having a guard cut on a waterjet, or in this case a CNC laser. A little backstory: A few weeks ago I bought a second-hand Albion type X moat blade off Wes Beem (I have questions about finishing the blade I'll be posting later in another thread) but started to think ahead to furniture. Every tutorial I read said basically the same thing: finishing the slot for the tang is a pain unless you have a mill. Even a drill press (which I have) still left a ton of file work. It got me thinking about finding an easier way to do it... So I grabbed a set of calipers to measure up some guards in my collection (a monstrous sample size of 3). I figured it would be a start. I also measured up the tang to figure out the dimensions of the slot. Not wanting to waste my friends time, I played around with a design and printed it with my 3D printer. I figured it would at least let me know if I was close to something dimensionally functional. I think I might be on to something here... Below are some pics... Keep in mind the quillions will be longer and I'm unsure about the side ring. I just wanted to play around with designs. Considering my friend can cut these for me out of mild steel for around $15, am I on the right track? Attachments:

|
|
|
|
Post by Croccifixio on Feb 2, 2016 8:37:49 GMT
You'll need to finish that with files and paper but looks like a lot of work was saved! You could make it a bit thinner IMO. They look quite thick.
|
|
Scott
Member
Posts: 1,675
|
Post by Scott on Feb 2, 2016 11:19:45 GMT
Looks good, and worth playing around to get a guard you're really happy with. I'd say keep the side ring...
|
|
|
|
Post by Uncle Mack on Feb 2, 2016 12:27:24 GMT
You'll need to finish that with files and paper but looks like a lot of work was saved! You could make it a bit thinner IMO. They look quite thick. I agree... The dimensions are a little off. I am going back and forth between keeping the same height but thinning out the quillions/ring or just making it a type 1,2, or 3 guard. A few minutes with an online design program and 45 minutes with my 3D printer (which once it starts I can walk away) and I can see what I'll have... |
|
|
|
Post by DigsFossils-n-Knives on Feb 2, 2016 13:05:20 GMT
Are those textures or details on the surface intentional or an effect of the 3D printer. I'm not sure if the CNC will be able to mimic them, but I think they look pretty cool.
Do you thinks that the edges are a bit too square? Can the 3D printer or CNC machine round them off a bit? I'm sure the CNC machine can be programmed to round them off. Or I guess the customer can to it themselves.
|
|
|
|
Post by Uncle Mack on Feb 2, 2016 14:31:25 GMT
Are those textures or details on the surface intentional or an effect of the 3D printer. I'm not sure if the CNC will be able to mimic them, but I think they look pretty cool. Do you thinks that the edges are a bit too square? Can the 3D printer or CNC machine round them off a bit? I'm sure the CNC machine can be programmed to round them off. Or I guess the customer can to it themselves. Those lines you see are an effect of the 3D printer: It is the path of the printer nozzle, so you're actually seeing the lines of filament. You can play around with the settings on a printer to make the surface finish either more of less smooth. Typically the faster the print, the more lines you see... You can also increase the thickness of each layer, which would give you enough material to actually sand the surface down (you can then spray it or coat the surface for a finished look). I'm sure you could program a CNC mill to round off the edges, but I imagine it would up the machining costs. And from what I understand, programming a mill is a pain. Part of the draw of the waterjet (and a CNC laser works the same way) is the simplicity: You pick the thickness of the material (by what stock you use), and just the shape is cut out. I was planning on getting the rough shape done with the CNC laser and then finishing it off (rounding the edges, adding some design work, etc) with my belt sander and files. There would still be work to be done by hand for sure, but I have to figure it will be MUCH LESS work than just starting with raw bar stock. |
|
|
|
Post by newfoundviking on Feb 2, 2016 21:05:24 GMT
I've been starting with bar stock to make my guards, drill press 4 or 5 holes, dremel with a cutting disc then file. Its a pain. Your process would speed things up a lot! As a side note with shapes cut out of bar stock you could put guard in a press and bend it various ways and if you messed up your not out all that much.
|
|
|
|
Post by chrisperoni on Feb 2, 2016 21:14:16 GMT
And of course, once your friend has the cnc written you can have multiple guards made and sell them to help feed your sword addiction!
|
|
|
|
Post by Uncle Mack on Feb 3, 2016 1:01:02 GMT
And of course, once your friend has the cnc written you can have multiple guards made and sell them to help feed your sword addiction! I played around with the design today and got much closer to a final design. It's nice being able to make .25mm adjustments... I want to make a few guards for myself, then I'll offer to make a few "pro bono" to build a portfolio/get some feedback. If those go well, then I'll happily sell them. |
|


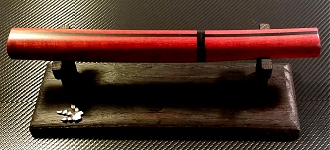


 Unfortunately I'm an edge-perfectionist. Also one wrong move when unsheathing and the throat nicks the edge on either side.