

New tsuka! 2
Apr 12, 2008 3:14:44 GMT
Post by Deleted on Apr 12, 2008 3:14:44 GMT
Good day everyone! I'm finally done with my custom.This is my second customization on a blank katana that i am naming Usagi which means rabbit. If you remember a member named red dragon, he depressingly told me to help him do this so here goes.
First, the parts and costs...
From Shadow Of Leaves
13 feet of purple silk ito = $2.95 x 13ft = $38.35
Shipping to the Asia = FREE!!
Total = US$38.35 plus 10% discount = $34.51
I sure hell am going to buy more from him!! ;D
From cheness
Tsuba = $24.99
Shipping = $12.99
Total = $37.98
What?! No discount?!

From on eBayer (I have forgotten... )
)
Menuki = $0.99
Shipping = $10
Total = $10.99
WTF?! Shipping for 2 tiny metal items is $10?! OMG...
Total cost for the parts = US$83.48
Ouch...
Fitting the tsuba on the Usagi's tang was loose since the tsuba was meant to fit a wide katana but was still perfect. Just have to buy some seppas. As most of you would know, i did a review on my Hana katana a few months ago. So doing the tsukamaki was quite easy for me. Just lots of practise. LOTS.
1st stage:
Materials used:
Standard paper
Tweezers
My fingers
I unwrapped the ito from the cheness tsuka and noticed it has some double tape on the both sides. Probably to make the wrapping tight and hold the ito in place. Again as most of you who had read red dragon's customization thread, he said that when he inserted the nakago of Usagi into the tsuka, the tsuka cracked. I removed the fuchi kashira and checked how bad the crack was. It wasn't that bad but it was quite concerning. I epoxied the crack to reinforce it. And what do you know, it worked. When i removed the ito, it had some fibre left by the cotton ito i removed. So, i took the tsuka a quickly roasted it over a not so intense flame. All the fibres later easily came off with a brush.
2nd stage was the folding of the hishigami.
Everyone would think this is tedious. Of course it is!! But lucky for me, i had nothing to do the day before the silk ito came because of that i had all the time in the world to do hishigami. The luckiest part was that i did it without thinking. My mind was away the whole time i did it. And by the time i came to, it was finished!! In folding the hishigami, I used standard writing paper. It took me a quarter hour to make 20+ making paper triangles. The number of hishigami I needed were at least 20+ and ended up with 30 which was exactly the right amount i needed. My reference in folding the hishigami was Thomas Buck's guide. Half of the 30 hishigami were uniform in size, but as time passed by, I was just folding paper triangles in different sizes ranging from small and thin to big and fat hishigami due to the lack of concentration. But this wasn't as tedious in placing the hishigami under the ito while wrapping...
3rd stage: Actual wrapping...
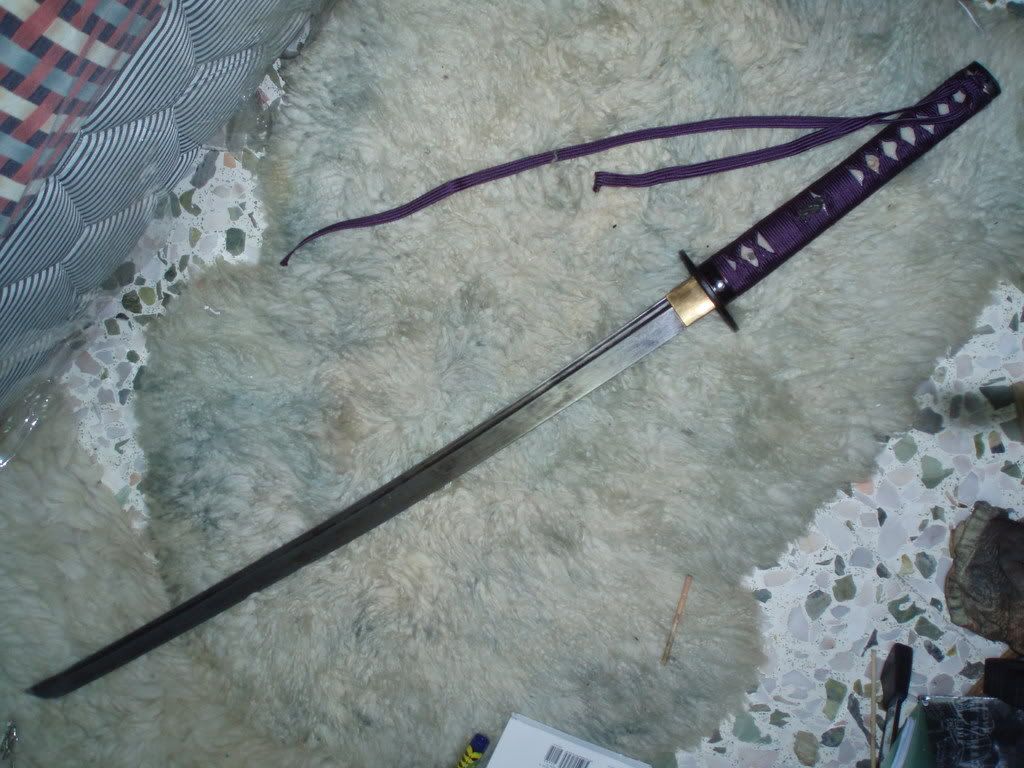
I did not use water or anything to aid me in wrapping just hands. I like to challenge my frustration. How long till i explode or give up. Heheh... Since this was my first time using silk, i had to wrap test a few times before i got used the elasticity. After making a fold, i had to press the centre with my thumb really hard to really stretch the silk and have a tight fold. Placing the menuki was fairly easy. My menuki has two rabbits playing/ chasing each other. I di a battle wrap and placed the first at the left hand sider. FYI, i'm left handed. I still inserted hishigami when I placed the menuki, under the ito not under the menuki.
Last stage of tsukamaki: Tying the ura and omote side knot...
Only using a pair of tweezers as an aid to pull ito under the wrap, easy as pie... Hmm... Pie
Finished at last. Took me a 2 hours to finish the wrap, plus the 15 minutes spent folding the hishigami... Everything was done in 2 hours. Only my thumb was aching from the pulling of the ito tightly. Despite that, I was proud of the finished tsuka. As mentioned in Buck's guide: "tsukamaki should be started and completed on the omote", Could anyone tell me where's the omote side?!
Sorry guys, not alot of pictures. As i'm a poor photographer...


Side by side with Hana. Paper can still be seen at the knots...


My drums. TAMA

Yeah, i know... My diamonds look like crap... What to do, it's my first time using hishigami. My second concern is that I'll have to do a little adjustments with tucking in the hishigami a little more as there some parts of paper sticking out from the folds. The paint blackening or paint (?), from the fuchi and kashira are fading. Don't know how to fix that...
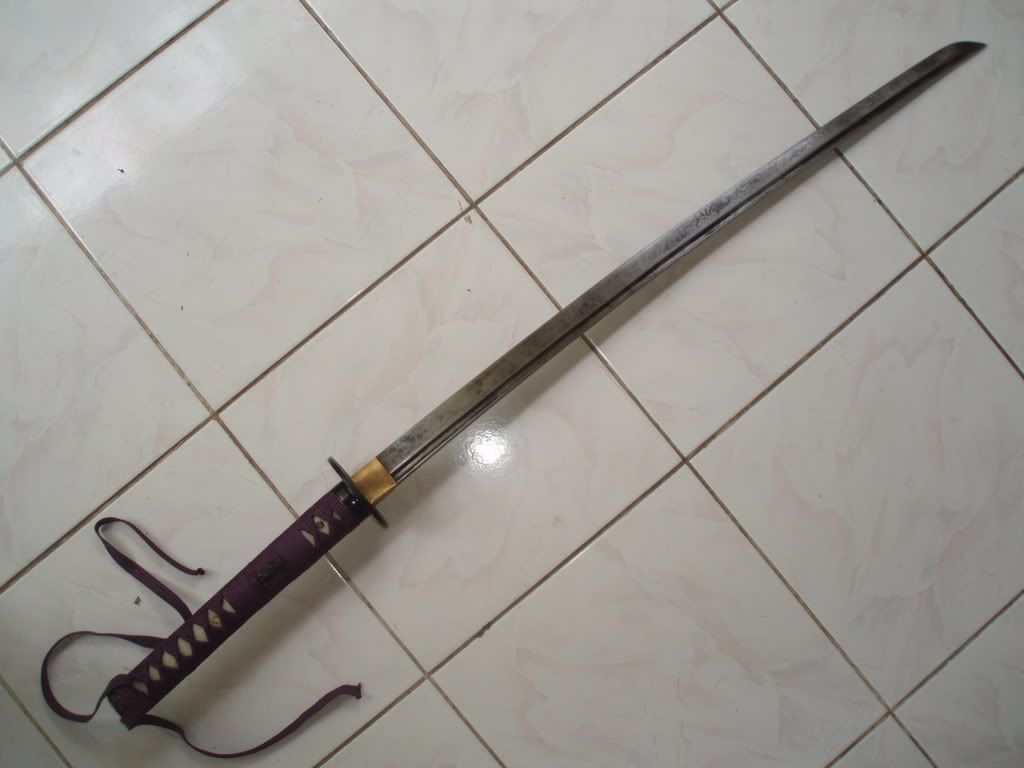
If you're wondering why i don't cut excess ito after doing the ending knots, it has to do with tightness. I don't cut them for the fear that it will go loose. Also, if you're wondering why the blade looks so ugly, it is because i have yet to DH it. Just waiting for clay.
I'm thinking of making a saya for it since it is a blank sword. Maybe i'll go for either same' or rattan wrap around the mouth area. I just need to know where to buy the rattan...
Most text were taken from the thread "My Tenchi reborn! My first tsukamaki ". Sorry aldwin!!
If you have read "Custom project on the way", this goes out to you guys!! Comments and advices are welcome!! But if you want to critisize, at least try to make it sound good.
First, the parts and costs...
From Shadow Of Leaves
13 feet of purple silk ito = $2.95 x 13ft = $38.35
Shipping to the Asia = FREE!!
Total = US$38.35 plus 10% discount = $34.51
I sure hell am going to buy more from him!! ;D
From cheness
Tsuba = $24.99
Shipping = $12.99
Total = $37.98
What?! No discount?!

From on eBayer (I have forgotten...
 )
)Menuki = $0.99
Shipping = $10
Total = $10.99
WTF?! Shipping for 2 tiny metal items is $10?! OMG...
Total cost for the parts = US$83.48
Ouch...

Fitting the tsuba on the Usagi's tang was loose since the tsuba was meant to fit a wide katana but was still perfect. Just have to buy some seppas. As most of you would know, i did a review on my Hana katana a few months ago. So doing the tsukamaki was quite easy for me. Just lots of practise. LOTS.
1st stage:
Materials used:
Standard paper
Tweezers
My fingers
I unwrapped the ito from the cheness tsuka and noticed it has some double tape on the both sides. Probably to make the wrapping tight and hold the ito in place. Again as most of you who had read red dragon's customization thread, he said that when he inserted the nakago of Usagi into the tsuka, the tsuka cracked. I removed the fuchi kashira and checked how bad the crack was. It wasn't that bad but it was quite concerning. I epoxied the crack to reinforce it. And what do you know, it worked.
 When i removed the ito, it had some fibre left by the cotton ito i removed. So, i took the tsuka a quickly roasted it over a not so intense flame. All the fibres later easily came off with a brush.
2nd stage was the folding of the hishigami.
Everyone would think this is tedious. Of course it is!! But lucky for me, i had nothing to do the day before the silk ito came because of that i had all the time in the world to do hishigami. The luckiest part was that i did it without thinking. My mind was away the whole time i did it. And by the time i came to, it was finished!! In folding the hishigami, I used standard writing paper. It took me a quarter hour to make 20+ making paper triangles. The number of hishigami I needed were at least 20+ and ended up with 30 which was exactly the right amount i needed. My reference in folding the hishigami was Thomas Buck's guide. Half of the 30 hishigami were uniform in size, but as time passed by, I was just folding paper triangles in different sizes ranging from small and thin to big and fat hishigami due to the lack of concentration
. But this wasn't as tedious in placing the hishigami under the ito while wrapping...3rd stage: Actual wrapping...
I did not use water or anything to aid me in wrapping just hands. I like to challenge my frustration. How long till i explode or give up. Heheh... Since this was my first time using silk, i had to wrap test a few times before i got used the elasticity. After making a fold, i had to press the centre with my thumb really hard to really stretch the silk and have a tight fold. Placing the menuki was fairly easy. My menuki has two rabbits playing/ chasing each other. I di a battle wrap and placed the first at the left hand sider. FYI, i'm left handed. I still inserted hishigami when I placed the menuki, under the ito not under the menuki.
Last stage of tsukamaki: Tying the ura and omote side knot...
Only using a pair of tweezers as an aid to pull ito under the wrap, easy as pie... Hmm... Pie
Finished at last. Took me a 2 hours to finish the wrap, plus the 15 minutes spent folding the hishigami... Everything was done in 2 hours. Only my thumb was aching from the pulling of the ito tightly. Despite that, I was proud of the finished tsuka. As mentioned in Buck's guide: "tsukamaki should be started and completed on the omote", Could anyone tell me where's the omote side?!
Sorry guys, not alot of pictures. As i'm a poor photographer...
Side by side with Hana. Paper can still be seen at the knots...
My drums. TAMA
Yeah, i know... My diamonds look like crap... What to do, it's my first time using hishigami. My second concern is that I'll have to do a little adjustments with tucking in the hishigami a little more as there some parts of paper sticking out from the folds. The paint blackening or paint (?), from the fuchi and kashira are fading. Don't know how to fix that...
If you're wondering why i don't cut excess ito after doing the ending knots, it has to do with tightness. I don't cut them for the fear that it will go loose. Also, if you're wondering why the blade looks so ugly, it is because i have yet to DH it. Just waiting for clay.
I'm thinking of making a saya for it since it is a blank sword. Maybe i'll go for either same' or rattan wrap around the mouth area. I just need to know where to buy the rattan...
Most text were taken from the thread "My Tenchi reborn! My first tsukamaki ". Sorry aldwin!!
If you have read "Custom project on the way", this goes out to you guys!! Comments and advices are welcome!! But if you want to critisize, at least try to make it sound good.


