|
|
Post by Anankai on Oct 21, 2014 2:22:16 GMT
Wow interesting project! Already looking nice! Hope everything goes well. Good luck to you Wes, and keep us updated!
|
|
|
|
Post by KaOsBlaKbLaDe on Oct 21, 2014 15:06:27 GMT
Nothing at all veiled here , my thoughts are pretty clear and straightforward........not to mention plural.
|
|
|
|
Post by Adrian Jordan on Oct 22, 2014 17:59:01 GMT
Again, please do not derail the thread, nor be disrespectful towards fellow members.
|
|
TomK
Member
Senior Forumite
Posts: 2,377
|
Post by TomK on Oct 25, 2014 5:01:32 GMT
As for heat treating: you can heat treat in a small forge (mine is maybe 8 inches long) by passing the steel through the forge in a sawing motion. This is difficult, imprecise, and certainly not the best way put an even heat can be done. Heck I've seen Howard Clark do it so there ya go. I did it for the sword I forged this summer and it worked out pretty well. Basically I start by heating the tang/nakago and slowly working the red down the blade to the tip. Once I have an even dull red I work it back and forth until it gets a little orange and stops being magnetic. I then let it get just a touch hotter and I hold that color as evenly as possible for a few minutes before I quench. Hold time varies based on steel. 5160 likes a longer soak than 1080 which almost needs no soak. 1095 needs maybe 3 minutes but I give it 5 and 5160 likes 12 to 15.
When in doubt: WWKCD "what would Kevin Cashen do?"
|
|
avery
Senior Forumite
Manufacturer/Vendor
Posts: 1,530
|
Post by avery on Oct 26, 2014 23:44:50 GMT
Hey Tom, did you ever see the box forge Paul Champagne used before he passed away? It was a great traditional box bellows forge with a long trough and a manifold to heat the coal evenly. A real easy build and very much worth it; saves loads of time heat treating long pieces.
|
|
|
|
Post by Lonely Wolf Forge on Oct 27, 2014 0:11:33 GMT
i might need to look into that myself as i move on to doing my own treats on longer blades  |
|
|
|
Post by LG Martial Arts on Oct 27, 2014 0:49:58 GMT
|
|
TomK
Member
Senior Forumite
Posts: 2,377
|
Post by TomK on Oct 28, 2014 1:29:50 GMT
Avery, I'm pretty sure I have seen it. It's a pretty good rig for sure.
LG, that's a good link man thanks.
I'm still building my shop's walls but I have a plan for my heat treat rig already and I think it will be sweet.
|
|
|
|
Post by Lonely Wolf Forge on Nov 5, 2014 23:34:14 GMT
|
|
|
|
Post by LG Martial Arts on Nov 6, 2014 2:56:52 GMT
Hope this helps... The backs of blades, besides being a point of comparison for the shinogi, also possesses other identifying characteristics. The back could terminate in four modes - flat (Figure 9a) as in most of the 'Early Period' swords,' rounded - (Figure 9b), two-sides peak (Figure 9c), or a truncated peak resulting in three planes (Figure 9d). Further, the two-sided peak may have a high sharp peak or a low, relatively flat peak. Figure 9. The rounded back (marumune) is most usually found on works of Kyushu smiths, especially the Takada school, as well as occasionally on blades of the Late Aoe (Yamashiro). It is rarely found in Shin-To work. The peaked back (Ihore-mune) blades with the sharply angled backs are usually found in Yamato School work, or that of their followers. The flatter angled backs are usually found on blades of' the Bizen school and their followers. The three-plane backs (Mitsu-mune) are most often found on Soshu blades, Yamashiro tanto, and such Shin-To followers of Soshu as Horikawa, Umetada Myoju, and Yasutsugu. home.comcast.net/~colhartley/Oriental/ShapeOfTheSword.htmAttachments:
|
|
|
|
Post by Lonely Wolf Forge on Nov 6, 2014 4:07:27 GMT
awesome info LG, thanks for that  ill be doing Figure C or D on this one |
|
|
|
Post by Lonely Wolf Forge on Nov 6, 2014 7:39:05 GMT
and we break from this bit of work to play some good music... |
|
|
|
Post by LG Martial Arts on Nov 6, 2014 23:41:03 GMT
Cool - can't wait to see the final product |
|
|
|
Post by Lonely Wolf Forge on Nov 6, 2014 23:47:01 GMT
Soon enough. Ive got a couple new files on order to true up the flats and prepare for heat treat  |
|
|
|
Post by Novice_Surgery on Nov 7, 2014 3:24:19 GMT
Nice diagrams LG, good stuff there. Looking really nice Wes, keep up the good work!
|
|
|
|
Post by LG Martial Arts on Nov 7, 2014 4:22:25 GMT
While I'd like to take credit for the info/diagrams, I can't - not my doing... I found them while perusing the internet. But, from the sounds of it, they'll be helpful to at least one person on SBG. Keep up the good work Wes. Waiting for the final reveal.
|
|
|
|
Post by DigsFossils-n-Knives on Nov 10, 2014 16:20:30 GMT
This is going to be a great thread I'm sure, especially for me. I have cut out a few sword blanks and I might be doing the same thing you are to draw-out the blades, get more length, tapper the blades from tang to tip, widen the blade, and not waste all that steel. When done I will send on out the blades for HT, then grind them myself. I'm very glad you showed us this technique with a small forge.
|
|
|
|
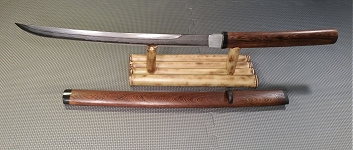
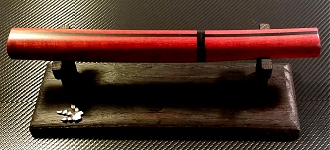
Post by Lonely Wolf Forge on Nov 14, 2014 0:22:22 GMT
|
|
|
|
Post by Adrian Jordan on Nov 14, 2014 0:23:46 GMT
Lookin' mighty fine!
|
|


 ill be doing Figure C or D on this one