

Polishing the Kuramono
Jul 12, 2010 2:55:01 GMT
Post by muerteblack on Jul 12, 2010 2:55:01 GMT
The below post is a testament to how any sword, regardless of material or craftsmanship, can fail due to some microscopic flaw. Don't worry, though, it yet lives!
I was doing a normal cutting session a few days ago with my new Kuramono, cutting very light cardboard. I'm not even talking about corrugated type cardboard found on moving boxes. I mean the papery kind found on kleenex boxes, TV dinner boxes, etc. It is theoretically a very safe target for swords, and I have been doing it for a while with no problems. This cutting session seemed no different. I finished it normally, having felt no problems during the cuts. Then, as I was cleaning the blade with rubbing alcohol afterwards, I noticed something that made my stomach drop:


Yikes!
There was a chip in the kissaki area, a few mm deep. I had to get rid of it. I was saddened, because I knew that my re-polish was not going to look as good as the original one, which was beautiful. My polishing skills are abysmal, and I also did not have hardly any tools at my disposal. I took some tape and blocked off the yokote line and started working the scratch out with some 180 grit paper. The pit was deep enough that I had to reshape the kissaki.


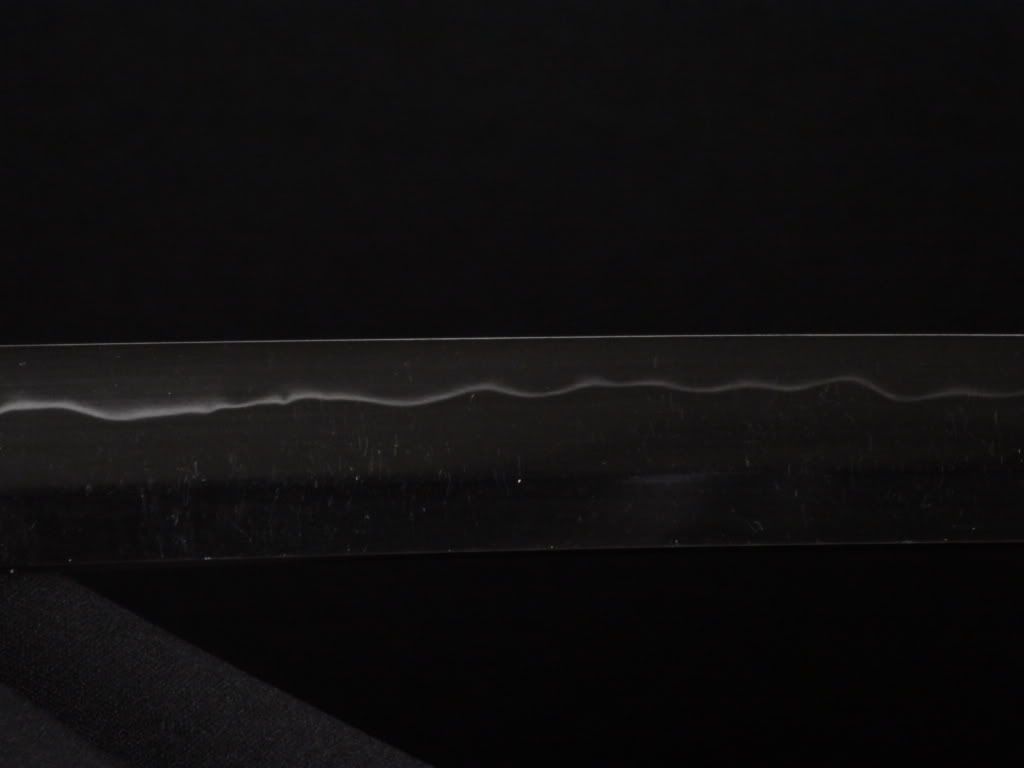
Once done, I proceeded to polish the tip back up from 400, 800, 1000, an 2000 grit sand papers, then I took off the tape.


As you can see, I must have either applied the tape wrong, or it may have slid or somehow the sandpaper got under it. The yokote was now blurred. The kissaki was also still extremely rough. I also noticed some other scratching on the sides of the blade. I figured a re-polish of the blade was in order, and I would re-make the yokote line. I'm not saying I did this traditionally, or even got the best placement of the line, but I am not trained in such things. My main goal was it get it somewhat pretty again and make the edge fit to cut with, and that's what I did.
First, I knocked the polish on the whole sides of the blade back down to 800 grit. It was a bit scary, as the hamon of course disappeared. I then brought it back to a 1000, then 2000 grit finish with sandpaper on a block, polishing back and forth for a while on the 2000 grit until the hamon finally re-appeared again. Then, I went back to where the original yokote line was (I could still just barely see it in a couple spots) so I put the tape back on there, then took a small square of 2000 grit paper, and with my thumb, vary carefully counter-polished the tip, being especially careful along the edge of the tape to get a clean line. Then, I cleaned up the shinogi-ji to delete the polishing marks that had krept up onto it, in order to restore its crispness in the kissaki. Once done, I removed the tape, and was pretty happy with what I saw (the next picture is blurry, not the line itself).

The line was once again crisp, and after my final polish of the tip, the boshi was now fully visible again. Then, to make things even more shiny, I wiped the whole blade with Mother's Mag polish, which gave the blade an elegant shine and luster. Here are some pictures after I did that, and cleaned the blade up with rubbing alcohol.


The polish was such that the sword could now do the "black sword" trick where it disappears when using camera flash.


It can also do the "disappearing sword" trick, which it couldn't quite do with its factory polish.


Today, I then sharpened it using Tom K's leather strop method, stropping it first with the rough side until I could shave my arm hair with it, then switched to the smooth side and stropped it until it could slice my kevlar glove (yes, it can do that now). Afterwards, I cleaned it up again with some Mother's, and here is the final result.


All in all, although it was a scary event because of the damage to my new prize that I had waited months for, it was also a great learning experience for me, and as a bonus, I got it wicked sharp - much sharper than it was when I got it, which is saying a lot because it was already very, very sharp.
I was doing a normal cutting session a few days ago with my new Kuramono, cutting very light cardboard. I'm not even talking about corrugated type cardboard found on moving boxes. I mean the papery kind found on kleenex boxes, TV dinner boxes, etc. It is theoretically a very safe target for swords, and I have been doing it for a while with no problems. This cutting session seemed no different. I finished it normally, having felt no problems during the cuts. Then, as I was cleaning the blade with rubbing alcohol afterwards, I noticed something that made my stomach drop:
Yikes!
There was a chip in the kissaki area, a few mm deep. I had to get rid of it. I was saddened, because I knew that my re-polish was not going to look as good as the original one, which was beautiful. My polishing skills are abysmal, and I also did not have hardly any tools at my disposal. I took some tape and blocked off the yokote line and started working the scratch out with some 180 grit paper. The pit was deep enough that I had to reshape the kissaki.
Once done, I proceeded to polish the tip back up from 400, 800, 1000, an 2000 grit sand papers, then I took off the tape.
As you can see, I must have either applied the tape wrong, or it may have slid or somehow the sandpaper got under it. The yokote was now blurred. The kissaki was also still extremely rough. I also noticed some other scratching on the sides of the blade. I figured a re-polish of the blade was in order, and I would re-make the yokote line. I'm not saying I did this traditionally, or even got the best placement of the line, but I am not trained in such things. My main goal was it get it somewhat pretty again and make the edge fit to cut with, and that's what I did.
First, I knocked the polish on the whole sides of the blade back down to 800 grit. It was a bit scary, as the hamon of course disappeared. I then brought it back to a 1000, then 2000 grit finish with sandpaper on a block, polishing back and forth for a while on the 2000 grit until the hamon finally re-appeared again. Then, I went back to where the original yokote line was (I could still just barely see it in a couple spots) so I put the tape back on there, then took a small square of 2000 grit paper, and with my thumb, vary carefully counter-polished the tip, being especially careful along the edge of the tape to get a clean line. Then, I cleaned up the shinogi-ji to delete the polishing marks that had krept up onto it, in order to restore its crispness in the kissaki. Once done, I removed the tape, and was pretty happy with what I saw (the next picture is blurry, not the line itself).
The line was once again crisp, and after my final polish of the tip, the boshi was now fully visible again. Then, to make things even more shiny, I wiped the whole blade with Mother's Mag polish, which gave the blade an elegant shine and luster. Here are some pictures after I did that, and cleaned the blade up with rubbing alcohol.
The polish was such that the sword could now do the "black sword" trick where it disappears when using camera flash.
It can also do the "disappearing sword" trick, which it couldn't quite do with its factory polish.
Today, I then sharpened it using Tom K's leather strop method, stropping it first with the rough side until I could shave my arm hair with it, then switched to the smooth side and stropped it until it could slice my kevlar glove (yes, it can do that now). Afterwards, I cleaned it up again with some Mother's, and here is the final result.
All in all, although it was a scary event because of the damage to my new prize that I had waited months for, it was also a great learning experience for me, and as a bonus, I got it wicked sharp - much sharper than it was when I got it, which is saying a lot because it was already very, very sharp.

 You can't tell the blade was damaged when looking at the end results.


 Unfortunately I'm an edge-perfectionist. Also one wrong move when unsheathing and the throat nicks the edge on either side.
