Deleted
Deleted Member
Posts: 0
|
Post by Deleted on Feb 25, 2010 6:05:26 GMT
I believe on my last design, Luka mentioned he liked historical designs best. I tend to do Fantasy more and more these days, though I do prefer to keep things simple...functional. This time, I wanted to stick with the popular vote of "Big Swords" while going for something more historically accurate. This time I went off to freshen up on my Oakeshott Typology and decided I wanted to make a Type XVIIIe blade. This is what happened. The sword surprised me...I ended up doing something I never do....I never cropped. I set my canvas for the bigger-than-normal 1000x2000 pixel size and used the whole thing. She turned into a fun sword and as I experimented with different shading techniques, I realized she was going to be far more beautiful than I had ever hoped. So I hope you all enjoy her as much as I enjoyed making her! I present my first attempt at type XVIIIe: Steorraniht. 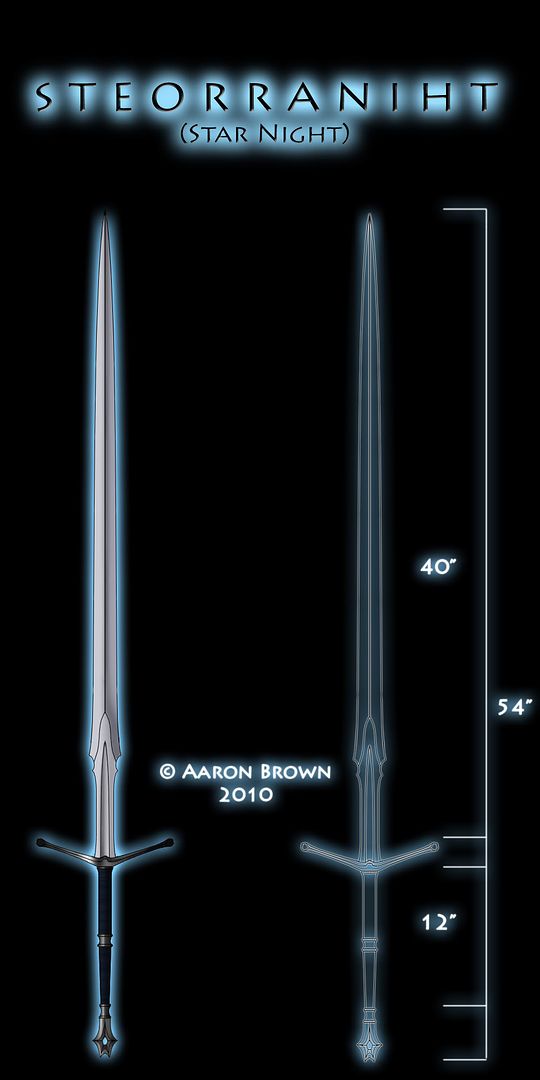 I was going for historically plausible with my own preference in style thrown in. And in doing so, I think I did give her one short coming - the pommel. The pommel came out nice and I didn;t want to get rid of it, but she concerns me with how it would be made...let alone how it would secure the tang. But other than that, I am very pleased. Thanks all! Aaron |
|
Deleted
Deleted Member
Posts: 0
|
Post by Deleted on Feb 25, 2010 9:10:33 GMT
That pommel could only be threaded and screwed on. And I still think you make a bit too small pommels for swords with such long blades. Other than that, it's great. The sword is very nice, I like your new designs very much. (But it's still fantasy.  ) |
|
Deleted
Deleted Member
Posts: 0
|
Post by Deleted on Feb 25, 2010 9:58:47 GMT
gotta remember, Luka, there's another side of the pommel. It could be pretty darn thick you know. |
|
Deleted
Deleted Member
Posts: 0
|
Post by Deleted on Feb 25, 2010 16:15:50 GMT
Yes, yes, it's just a feeling I get when I see them. |
|
|
|
Post by Brendan Olszowy on Feb 25, 2010 16:31:21 GMT
I think this has a pretty long handle putting the pommel weight far back, and the blade would be slim so the pommel wouldn't need to be that heavy to work well. I think it would work. The grip spacer would add a few ounces of counterweight too, remember. The tang would just have to travel through the hole in the pommel to the rear. Love it Aaron!  |
|
Deleted
Deleted Member
Posts: 0
|
Post by Deleted on Feb 25, 2010 17:24:20 GMT
But then hole would not really be hole anymore. |
|
Deleted
Deleted Member
Posts: 0
|
Post by Deleted on Feb 25, 2010 20:46:22 GMT
Love this one as well, though it doesn't look quite like a "proper" XVIIIe blade (you'd need to get that fuller all the way to the central ridge rather than stopping short) but who gives a flying f*ck about the specifics of the typology? The blade's perfect for this sword and this sword is awesome. ;D
|
|
|
|
Post by Dan Davis on Feb 25, 2010 21:42:56 GMT
But then hole would not really be hole anymore. Easy-Peasy; it's a breezy... - Drill a small hole all the way through the entire pommel.
- Turn it over and drill out a larger hole through the base until it reaches the center cut out.
- Shape the end of the tang so that the end of the tang protrudes a tiny bit past the end of your bigger hole on the pommel, at the center cut out.
- Make sure your tang end is relatively soft; you can draw it back with a torch.
- Make a sling of heavy leather and cord that will fit around the outside of the pommel; install two handles or a couple of loops on the ends. Leave an opening for the small hole in the top of the pommel.
- Clamp the blade tightly in a vise.
- Recruit your biggest friend to pull down on the sling, compressing the pommel onto the tang.
- Insert a blunt pointed rod of hardened steel into the small hole. A cut off drill bit with a 140o bevel on the tip works well.
- Hammer the tool into the softened tang end until it spreads out against the top and sides of the larger hole, peening it in place.
- Tell your friend to relax and have a beer.
- Insert a filler rod of soft metal into the small hole. Brace the bottom with a file or other metal tool.
- Peen the top of the filler rod into the small upper hole.
- File off any exposed rough surfaces.
- Go have a beer with your friend.
|
|
Deleted
Deleted Member
Posts: 0
|
Post by Deleted on Feb 25, 2010 22:58:45 GMT
You could also do a two-piece pommel. Peen the ring/spacer portion as if it were the pommel itself, then weld on the decorative piece with the hole in the end. Finish by grinding it to a smooth finish. |
|


 )
)


 Unfortunately I'm an edge-perfectionist. Also one wrong move when unsheathing and the throat nicks the edge on either side.