|
|
Post by salvatore on Sept 15, 2008 3:42:42 GMT
Well, I am bored once again. I have decided to give a whack at making chainmail.
And the punchline? I forgot where the bloody thread that stated the making of chainmail here on SBG is...So, any help? Guides, links, tips or advise?
Thanks
Sal
|
|
Deleted
Deleted Member
Posts: 0
|
Post by Deleted on Sept 15, 2008 13:46:24 GMT
Hi Sal,
Sorry I don't know where the thread is, but I am sitting on on a chainmail class tomorrow evening. I will pass along any references I get.
Debbie
|
|
|
|
Post by Jeff K. ( Jak) on Sept 18, 2008 3:13:23 GMT
Try this. I found it easiest to build a stand consisting of a base and 2 uprights with some twine strung tightly between them. Thread on about 50 or more rings and work across. If you do work across and are doing 4 into 1 construction, make sure after you get your first row on the twine, link the first ring of the second row into ONLY the first ring of the first row then continue to link the rest through 2....on your third row link you first ring through the first two rings of the second row and continue but end with your last ring linked through only one of the second row. Basically, start you row with a single, end with a double ...move down a row and start with a double and end with a single. This way you keep your pattern square intead of becoming a diamond shape and when you link the front of your hauberk to the back it will match up. Get it?  If not I can show you pictures of mine and try to explain a litle clearer this link might help you with seams and differnt forms of construction.....coifs, mantles, armpits, 6 into 1..... Good Luck, once you get into the rhythm, it's easy!! www.modaruniversity.org/Blackmaille27.htmHere's the home page www.modaruniversity.org/Blackmaille.htm |
|
|
|
Post by salvatore on Sept 19, 2008 3:29:23 GMT
Thank you for the link, Jak. It will come in handy!
Sal.
|
|
Deleted
Deleted Member
Posts: 0
|
Post by Deleted on Sept 20, 2008 18:25:36 GMT
Thanks Jak! That string trick was great. I was getting frustrated trying to keep the orientation straight, doh! Yes, I think I understood what you were getting at to keep the maille square. What kind of mandril do you use? That's my next step - making a mandril.
Debbie
|
|
|
|
Post by Jeff K. ( Jak) on Sept 20, 2008 19:15:06 GMT
Thanks Jak! That string trick was great. I was getting frustrated trying to keep the orientation straight, doh! Yes, I think I understood what you were getting at to keep the maille square. What kind of mandril do you use? That's my next step - making a mandril. Debbie Glad it helped! If you're doing a hauberk, this is how I did mine.. After I got the first 10 or 15 rows of rings completed i added the shoulder straps,then took it of the stand and started another section the same width as the first for the back section. After 10 or 15 rows on this I took it of the stand, laid it out flat on a table and connected the shoulder straps to it. From here I just worked of the table since it stays pretty straight after a dozen rows. Then I linked the side together...  Up until now I've just used wooden dowling and vice grips, but whenever I get around to finishing my hauberk (probably in the bitter depths of winter when thers nothing else to do!  ) I'm going to make a similar setup, a base and 2 uprights, but instead of the twine, a lentgth of 3/8" metal rod. Drill a hole on either side of the upright, one on the outside for a retaining pin & washer, the other hole on the inside to place the end of your wire through. At the other end of the rod, after it passes through the second upright, I'll put 2, 90 degree bends in it to form a handle. Simple yet infinitly easier than my previous method!!! BTW, I used 3/8" dowling / rod because im using massive 12 guage wire, I would suggest 16 guage wire at 1/4" round. It'll make tighter rings and might not be as heavy.    Here's the ring pattern I used...in case anyone didnt understand my description...  Note: Your rings should only attach to those above and below, not the ones beside. Also alternate the way you lay your rings so that one row lays to the left and the next lays to the right. Pretty obvious I guess but I learned by trial and error how to link them...only after I discoverd how to do the 4 in 1 patern did I get a book on blacksmithing that has an armoring section that shows how to do it...DOH!!! |
|
Deleted
Deleted Member
Posts: 0
|
Post by Deleted on Sept 21, 2008 15:02:07 GMT
Wow Jak, thanks for the detailed pictures and response! +1 I am using 16 guage wire with a 1/4" holes as that is what was recomended to me. It must be hard to hand wind 12 guage  . I actually went with the very "historically accurate" power drill mandril. Works great! I was checking out the hardware and tools in the garage and my husband was curious, "Watcha doin?" Hehe, so I told him and he offered (in addition to suggestions and parts) to run the drill while I guided the wire . Materials: 1/4" barstock (Agway) Drill T nut (with >1/4" hole) Workbench File a slot into one end of your barstock to anchor the wire. Pound the T nut into the side of the workbench. Thread wire into the slot. Insert threaded end into T nut and other end into drill. Make springs Thanks again, Debbie |
|
|
|
Post by Jeff K. ( Jak) on Sept 21, 2008 16:56:20 GMT
Debbie, sounds like a faster and easier way to make rings to me! Doing it by hand with 12 guage wire definitly is hard on your fingers after the first few hundred... . Just curious...never heard of a T-nut before. What is that? I've probably used them before....but I find when it comes to tools and hardware, people have different names for things. The only reason I went with 12 guage is since its only butted maille it seems to hold up a bit better than smaller guage. I even attach my plate armour to it and the rings havn't pulled apart yet. Next step is getting the tools to do riveted... ;D Thanks for the Karma BTW |
|
Deleted
Deleted Member
Posts: 0
|
Post by Deleted on Sept 22, 2008 1:01:33 GMT
Hi Jak, Sorry 'bout that, I am sure this piece goes by some other names too. Here is a page with some t nuts on it: www.globalsources.com/manufacturers/T-Bolt.htmlThe second and third ones down are what I was referring to. Basically I needed a housing to allow the bar stock to twirl freely, and this worked well as I had one that fit. It has prongs on it so you can anchor it into the bench. It is very fast. Only takes a minute or two to set up and then you can wind your 200' of wire into springs in 15 minutes tops (guesstimate). I heard/read that riveted is the way to go for best protection and period accuracy, and that to be best protected and accurate you should use cast iron wire as well. Apparently, cast iron wire is not made anymore. Good luck with the riveting project, I don't think I could ever muster the patience for that project. It must be really heavy when you attach your plates to the 16 ga maille. Any pictures you care to share? Debbie |
|
|
|
Post by Jeff K. ( Jak) on Sept 22, 2008 2:09:30 GMT
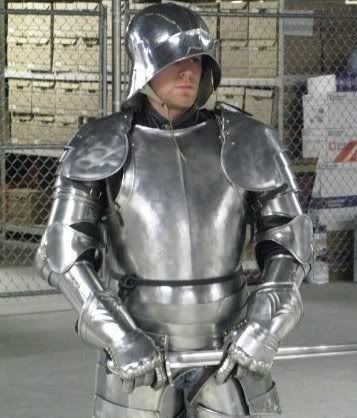
You know, Ive seen those T-nuts before but I guess I never heard the name. Hey, I learned something. Karma for you...I might just try your method...200' in 15 min sounds pretty good to me. What are you going to use to cut your rings? As for pics of my armor...I dont think I have any recent pics, but heres my maille under construction....I have since extended it and put short sleeves on. I intend to bring it past my waist and to the wrists.  Here it is all assembled..no legs or gauntlets yet..but I noticed both the cuisses and greaves I want from Merc Tailor are both on sale!!! ;D ;D ;D The mail is actually hard to see but the shoulder pauldron tie on by the neck and the arm harness ties on high on the bicep. 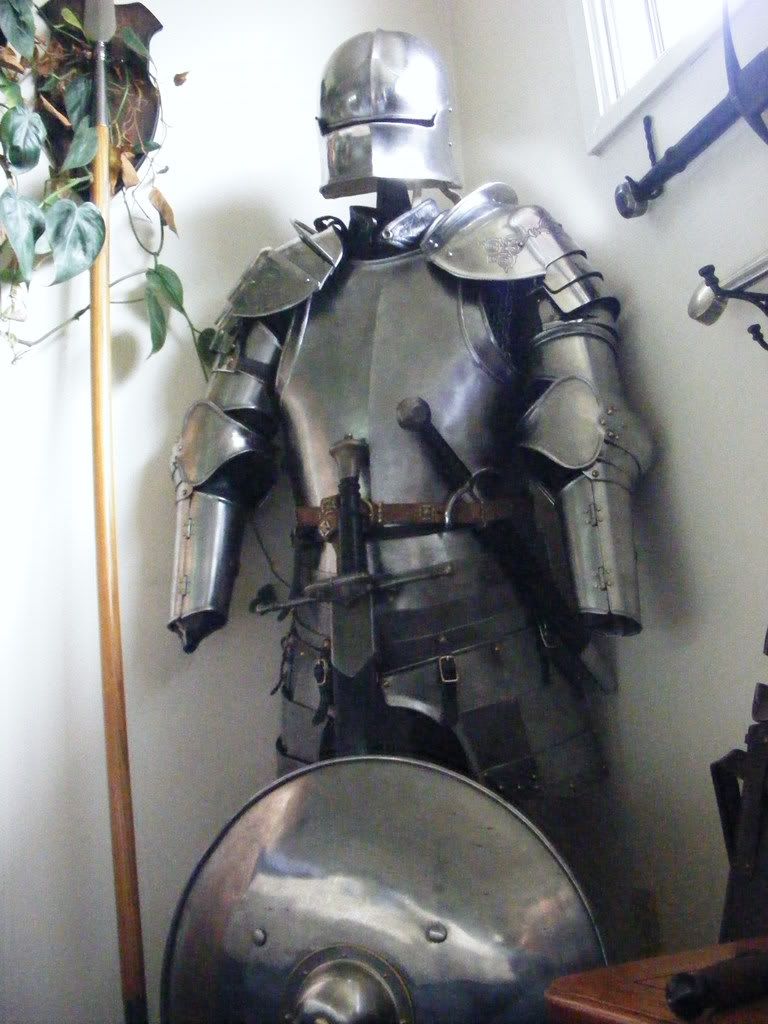 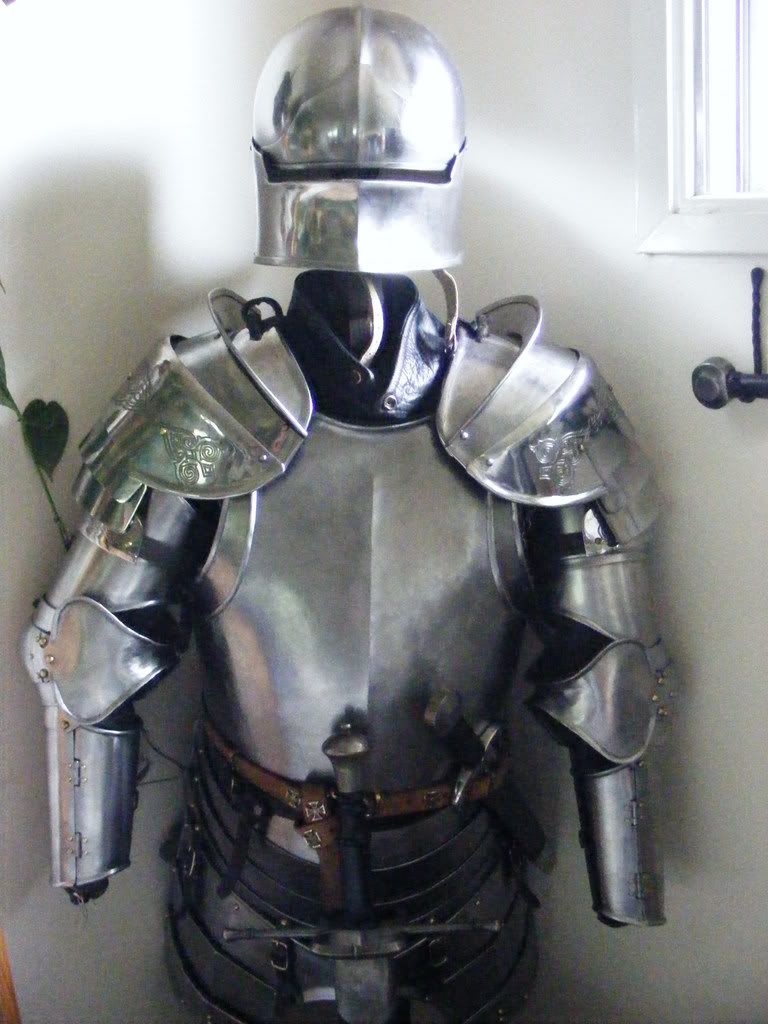 |
|
|
|
Post by Jeff K. ( Jak) on Sept 22, 2008 2:12:26 GMT
Never heard of cast iron wire, as cast iron is very brittle. Cast iron has greater than 2.2% content of carbon. Wrought iron has around .3% carbon which makes it much more malleable. Origionally a smith would draw wire out by hand, which obviously was a very labour intensive process. During the 13th century, a machine was invented in Germany for the drawing out of wire. I'd be interested to read up on cast iron wire if you have a link? As for the riveted maille...definitly the way to go, but again very labour intensive. After cutting the rings in an overlapping pattern (special cutters), you have to anneal them hammer them either flat or enough to flatten the overlap, punch holes in the overlap, cut wedges or brads, link 'em, and peen the rivets. I think one would have to forgo any form of a social life for a few months straight to get a hauberk done in reasonable time.... Might take me a few years How 'bout you? Any pics of your weapons/armor collection? |
|
Deleted
Deleted Member
Posts: 0
|
Post by Deleted on Sept 22, 2008 6:14:07 GMT
Oh my, that's beautiful armour, what's the story on it?
Also what I would recommend, as someone who has some experience with maile, I personally use a coat hanger/wire and put about 20-40 closed rings on it and then close the wire/coat hanger by bending it into a rough loop and locking the ends together with a singe twist, from there you work. You Should make a simple square of about 500ish links, this is about 23links by 20 links but you should use your own discretion. When you have your your square then you should stop and start another of the same size. This will continue until you have enough to connect together into a suit. This method is a lot more convenient than making your whole project in one go and it makes it a lot more portable so you can work on it on the go, which is really great by the way. =)
By the way, I use 14 gauge and it's a pain to use but it's really sturdy. I would not recommend the dremel tool because it gets too expensive and the wire cutters I have are a pair that I got at Harbor Freight, they are alright but their cutting blades don't have the best of angles so after cutting about 2 coils of about 150-200 links I have bruised, this is my limiting factor, so I am very open to opinions on a new cutting method!
|
|
Deleted
Deleted Member
Posts: 0
|
Post by Deleted on Sept 22, 2008 6:27:07 GMT
I don't know how to put pictures in but I would also suggest to put the hole in which you feed the wire closer to the crank and also it's easier to make the piece were you have a set number on top and then make it grow as if it were a type writer ( think *tick* *tick* *CLINK*) because making it grow out like in the picture, in my opinion, makes it harder and I had more mistakes in the weave.
I hope That made sence and great job with the pictures and that chain maile!
|
|
Deleted
Deleted Member
Posts: 0
|
Post by Deleted on Sept 22, 2008 13:41:24 GMT
Jak, that is beautiful armor! I would love to share pics, but I am just starting out. I have no armor and my chainmail is only a few rows long as yet. I am not even sure if I will have the patience/time to finish anything large. Yours looks great! Oops, my bad on the cast iron, you are right, it is brittle. Maybe I meant wrought iron. I am not really sure what kind of wire was used historically, I trusted the armourer who taught the class I attended when he said that: in 25 years of making chainmail he is still looking for a historically accurate source of wire. I guess I will need to do some more research too. He also stressed the importance of having well fitting chainmail for proper protection, and advocated the use of expansion links instead of triangle inserts for this purpose. His mail fit him beautifully. I bought a pair of end nippers (not the kind for tile, but the wire kind) at Home Depot. I was told to get these as they allow you to get a good angle on the snip (for a good "butt") and they do not leave much of a burr. Long handled ones are best (physics is your friend here ). Mine are 10 inches long and set me back about $12. I am not sure how well the edge will last, all of these are more expensive: www.cornerhardware.com/index.php?main_page=index&cPath=6741_6850_7158thecando, Thanks for the tip! I actually kind of got there on my own. I improvised a "coat hanger" with my 16 ga wire after the second row (because the string was sagging). I should have mentioned that earlier. My choices at the hardware store were 12 ga or 16 ga. I might have gone for the 14 ga if I saw it. I like that patchwork approach, it would make it much more manageable. This has been really helpful, thanks guys! Debbie |
|
|
|
Post by Jeff K. ( Jak) on Sept 22, 2008 17:44:16 GMT
Oh my, that's beautiful armour, what's the story on it? Thanks, Cando and Debbie, Cando what would you like to know? Some good tips there Cando, I actually prefer to work on mine as a whole, after i linked front and back together under the arms, it was just easy to go around row by row. I just found it easier than trying to join seperate patches. I have been using wire cutters for mine but never liked the "wedged" cut, hacksaw was way too slow,..... and then theres the DREMEL!!!!!!! I totally forgot that I had cutoff discs for that! In fact I never even thought to use it...DUH! Cando, a big FAT karma to you sir! |
|
|
|
Post by Jeff K. ( Jak) on Sept 22, 2008 18:14:39 GMT
Debbie are these (the 5 on the left) what you mean by nippers? www.hoofnail.com/tools_mustad.htmThese are pretty much what the smiths used except the would have had a hole a wire's width in from the end to cut overlaps for riveted maille. I used to have a link to a great site for buying maille tools. Snips punches special pliers for peening the rivets and a tool for flattening the rings... basically a short length of 2" bar with a sliding sleeve that sat over the ring to keep it in place as you whacked the bar with a hammer. |
|
|
|
Post by Jeff K. ( Jak) on Sept 22, 2008 18:30:07 GMT
Here are some vids I found.....totally different approach than what I used but just as effective. Watching how fast that drill winds it almost made me friggin cry thinking back to winding by hand without a stand.....
Part 1
part 2
|
|
Deleted
Deleted Member
Posts: 0
|
Post by Deleted on Sept 23, 2008 2:28:06 GMT
That makes me want to cry that he can cut those so fast and easily. Also the cutting wheels ware out fast and have a tendancy to throw things at your face . Your armour and shilf along with your swords and stuff are great. |
|
|
|
Post by Jeff K. ( Jak) on Sept 23, 2008 3:30:53 GMT
That makes me want to cry that he can cut those so fast and easily. Also the cutting wheels ware out fast and have a tendancy to throw things at your face . Your armour and shilf along with your swords and stuff are great. Well Ive got quite a few cutting wheels and they seem to be pretty good....I cut down the ricasso on my longsword and that barely put any wear on the disc so I'll try that. Thanks for the compliments on the armor. The helm is from GDFB The cuirass and arms are from The Mercenaries Tailor The Shoulder Pauldrons are from Steel Mastery and of course the chain maille is a la moi Im getting some 15th century legs from Merc Tailor pretty quick so I might try to do some chain maille chauces to go under them. Do you have any pics of your projects Cando? |
|
Deleted
Deleted Member
Posts: 0
|
Post by Deleted on Sept 23, 2008 18:26:46 GMT
Hi Jak, Here is a pic of my mandril set up including a pic of my end nippers. You can see the slot cut in the 1/4 inch barstock allows you to just slide the spring right off when you are done. 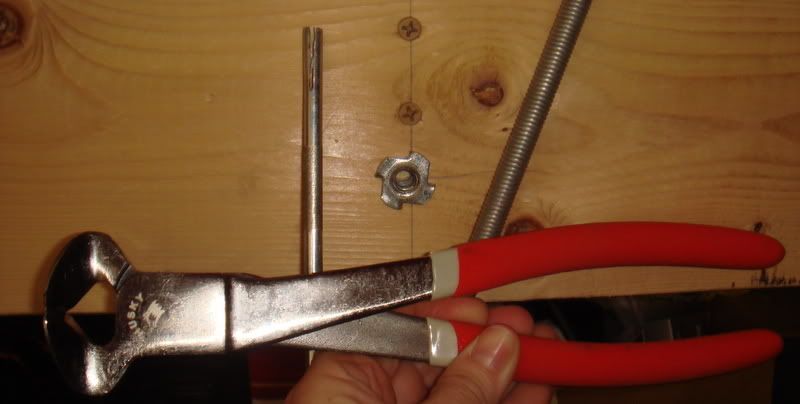 Debbie |
|


 If not I can show you pictures of mine and try to explain a litle clearer
 ) I'm going to make a similar setup, a base and 2 uprights, but instead of the twine, a lentgth of 3/8" metal rod. Drill a hole on either side of the upright, one on the outside for a retaining pin & washer, the other hole on the inside to place the end of your wire through. At the other end of the rod, after it passes through the second upright, I'll put 2, 90 degree bends in it to form a handle. Simple yet infinitly easier than my previous method!!!

 .
.  Unfortunately I'm an edge-perfectionist. Also one wrong move when unsheathing and the throat nicks the edge on either side.