|
|
Post by chrisperoni on Apr 11, 2015 23:13:02 GMT
Great looking project! This makes me want to try making an awabi style tsuba (ala Ogami Itto, Lone Wolf and Cub movies). i looked up the sword from that. looks like you could do those bumps with a properly shaped punch and clean up the circumference after. On soft metal at least but on steel you'd probably need to heat it first |
|
|
|
Post by chrisperoni on Apr 12, 2015 6:18:25 GMT
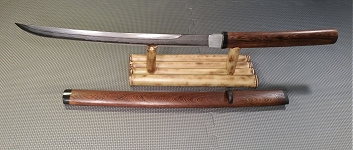
Not much time to work today but was able to get into the shop late night for a few minutes. Too late now to keep making noise but tomorrow I should be able to do the other seppa and have both fitted to the blade. Here's the start of one at least for now. I was going to file a pattern around them but it didn't look right to have something too symmetrical/planned with the hammered tsuba, so I scrapped that idea and decided to bevel and hammer the seppa to match the tsuba edge. The low/dark indents in the 3rd pic are how it looks all around but the hammer marks are so shallow that they don't show with light reflecting off them. (the little rectangle piece was my test for what file pattern I was going to try. Sanded the test back and whacked it to see if I liked that look better)    |
|
|
|
Post by DigsFossils-n-Knives on Apr 12, 2015 19:28:30 GMT
Are you planning to force a patina on the tsuba? What will you use? I've used gun blue and it works nice on some copper alloys and not on others (not sure which alloys work best).
|
|
|
|
Post by chrisperoni on Apr 12, 2015 19:34:03 GMT
no patina- I'll keep it polished or just let it age
|
|
|
|
Post by chrisperoni on Apr 13, 2015 2:34:51 GMT
|
|
|
|
Post by chrisperoni on Apr 14, 2015 2:34:22 GMT
Fuchi coming along. Aluminum and brass. Gave up on trying to solder it and used jb instead. It's setting overnight.   |
|
|
|
Post by shoboshi on Apr 14, 2015 14:18:32 GMT
Looking good, Chris. Neatly done.
|
|
|
|
Post by chrisperoni on Apr 14, 2015 14:53:50 GMT
Thanks shoboshi. I'm trying to take more time with this one than I usually do.
|
|
|
|
Post by etiennehamel on Apr 14, 2015 15:17:51 GMT
one thing i would have done differently though for the fuchi, i would have made the nakago slot before using the jb, otherwise it's not bad :)
|
|
|
|
Post by chrisperoni on Apr 14, 2015 16:48:00 GMT
I thought about that but wasn't sure how the jb would clean up inside it so I left the ana for last. I believe that the proper way to do all the small parts is to make the ana first, but for some reason always do things backwards.
|
|
|
|
Post by chrisperoni on Apr 15, 2015 4:18:04 GMT
|
|
|
|
Post by aussie-rabbit on Apr 15, 2015 5:50:00 GMT
how do I tell what kind of motor I have? Usually marked on a plate on the motor, voltage, current and type  and/or manufacture and model |
|
Deleted
Deleted Member
Posts: 0
|
Post by Deleted on Apr 15, 2015 8:01:41 GMT
If I'm not mistaken (please correct me if I'm wrong), universal motors make a quiet hum (ie. bench grinder) when they run, while induction motors screech (ie. angle grinder).
|
|
|
|
Post by chrisperoni on Apr 19, 2015 20:12:29 GMT
Menuki   Weights of toso: seppa 1 - 16g tsuba - 189g seppa 2 - 16g fuchi - 15g menuki 1 - 9g menuki 2 - 9g kashira - 19g tsuba is on the heavy side but I've seen antiques weighing about the same |
|
|
|
Post by The Lone Stranger on Apr 19, 2015 20:46:41 GMT
I like what you're doing with this project. Very nicely done!
|
|
|
|
Post by chrisperoni on Apr 19, 2015 21:04:47 GMT
Thanks! All the materials have been in my shop for this ever since I bought the sword. It's rewarding to finally get it going.
edit/add- moving on to the tsuka now. I've cut down the end to account for the thickness of all the new parts, and shaped it to fit the fuchi. Now I'm getting into the part I think makes me the most nervous- taking the rest of the tsuka down in girth to account for the samegawa and ito. I need to make it narrow enough for a flush fit to the edge of the fuchi/kashira, and I want to give it a bit of rikko of course.
|
|
|
|
Post by chrisperoni on Apr 21, 2015 19:41:29 GMT
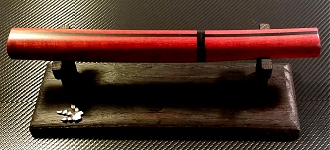
Shaping the tsuka is pretty much done. This rosewood really eats up sandpaper. before cutting for kashira and sanding down  little bit o' waist  looking good!  edit/add: cut the samegawa just now and tested the thickness. It was close at the fuchi but with the bigger nodes trailing from the emperor I for sure needed to sand back more at the kashira. Ended up taking more off the omote and ura flats end to end, with focus on extra at the kashira and fuchi. Some pics of the samegawa   I have the center piece backwards in this pic. Is is cut correct for the direction of the hooks in the nodes  |
|
|
|
Post by chrisperoni on Apr 22, 2015 22:44:34 GMT
Made a tsukamaki stand just now. Should make it easier to do the wrap.  |
|
|
|
Post by chrisperoni on Apr 23, 2015 19:52:21 GMT
Trimmed up the sides of the stand, started making hishigami, and a test fit from the samegawa wrap from a few days ago. I've since lined up the nodes better and have it wrapped to dry out and take shape, then will sand the seam flush on the ura side and glue it down.   |
|
|
|
Post by Cottontail Customs on Apr 24, 2015 3:01:02 GMT
Looking good Chris. How did you determine where the nodes will be? Will they be exposed through the wrap?
-Josh
|
|


 and/or manufacture and model


