Deleted
Deleted Member
Posts: 0
|
Post by Deleted on Jul 28, 2010 3:17:48 GMT
Well, there was some interest in my little user knives I drew over in the Member's Design section. I thought maybe it would be fun for you guys to follow along while I try to actually forge them out lol. This will be the first time I've ever actually taken a set image from my mind and tried to create it in steel, so I'm sure there will be plenty of cursing, mistakes...and other forms of entertainment for you all. There will also be lots of pictures (c'mon...you knew that right?), and maybe...just maybe, I can inspire some of you to grab up a hammer and anvil and try it out for yourselves =D. Anyhow, lets jump right in! First, I'll begin with a picture of my workspace:  And...the original drawings: 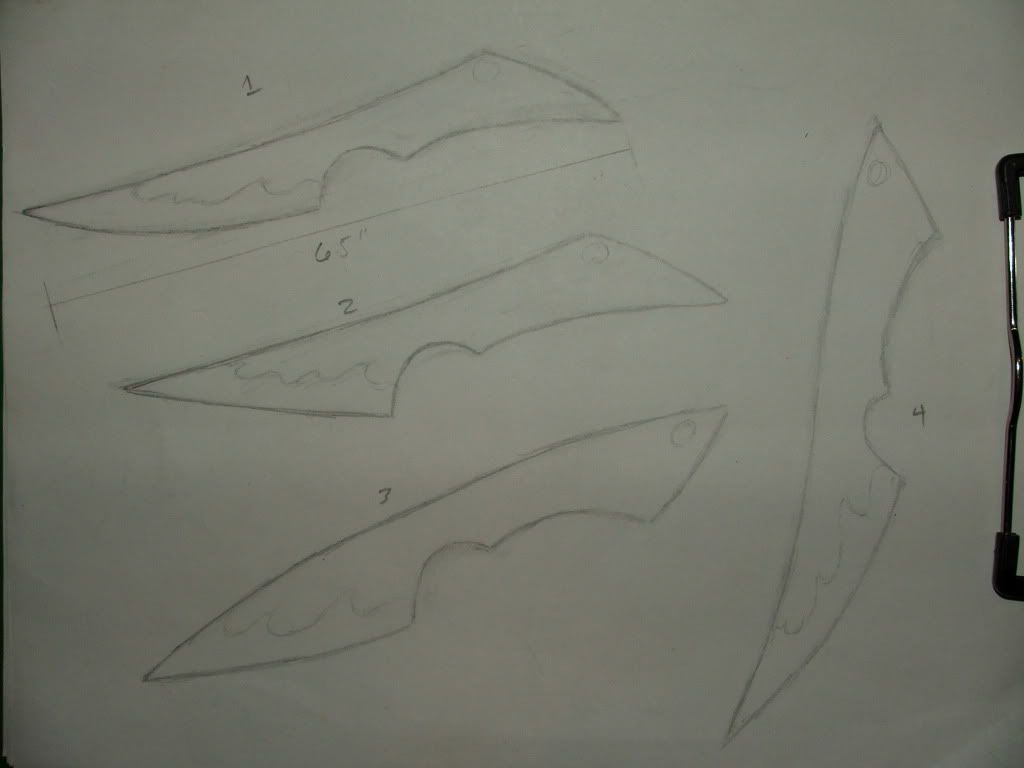 I've decided to try my hand at #3 first. It was very popular in the other thread, and the broad, sweeping line from butt to tip across the spine really appeals to me. Here's some pictures of the progress I made since yesterday (more on that below):  I started with a 12" x 1 1/2" x 1/4" piece of 1075/1080 from Admiral Steel. The length is far more than I needed of course, but I need to gauge how much steel each blade will require, and by starting with an overlong piece, I can measure the remainder to see what I used. Additionally...the longer piece was easier to draw out to my desired 1" wide dimension (yeah...I didn't have the right size steel on hand =p). Had I the right steel, I could have done everything up to this point...and possibly more...in one evening. I started with a 12" x 1 1/2" x 1/4" piece of 1075/1080 from Admiral Steel. The length is far more than I needed of course, but I need to gauge how much steel each blade will require, and by starting with an overlong piece, I can measure the remainder to see what I used. Additionally...the longer piece was easier to draw out to my desired 1" wide dimension (yeah...I didn't have the right size steel on hand =p). Had I the right steel, I could have done everything up to this point...and possibly more...in one evening. Here we go after about an hour and a half of drawing out. I'm kind of glad I had to do this, since I was very out of practice and it helped me get used to controlling the hammer, as well as used to my new workspace. Out of the forge, hammer down the width, flatten the thickness on one side, flatten the thickness on the other, straighten, back in the forge. Rinse/repeat...over and over and over.... Here we go after about an hour and a half of drawing out. I'm kind of glad I had to do this, since I was very out of practice and it helped me get used to controlling the hammer, as well as used to my new workspace. Out of the forge, hammer down the width, flatten the thickness on one side, flatten the thickness on the other, straighten, back in the forge. Rinse/repeat...over and over and over....  All drawn out. Roughly 15" x 1" x 5/16". If things work out this might just make 3 of these blades...but more likely it'll be 1 blade and a kitchen knife lol. All drawn out. Roughly 15" x 1" x 5/16". If things work out this might just make 3 of these blades...but more likely it'll be 1 blade and a kitchen knife lol.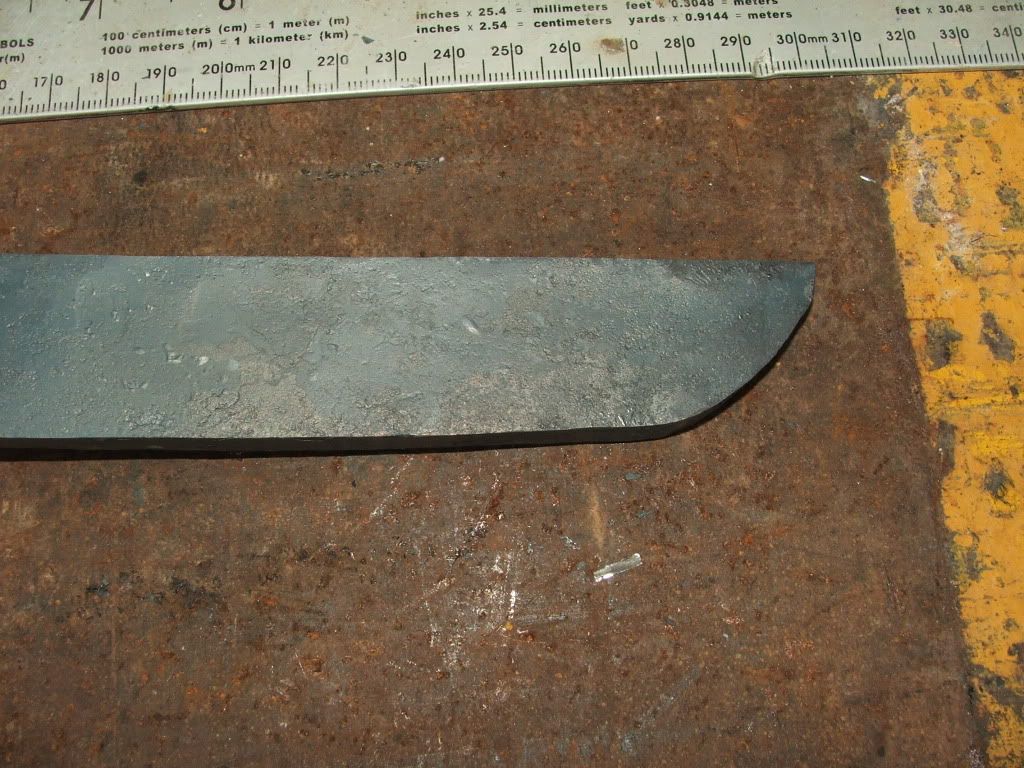 Beginning to rough out the butt. Beginning to rough out the butt. Here I'm starting to forge out the main grip area. Remember, every time I change a dimension in width...I've got to spend time repairing the thickness as well. It's a back and forth process. Changing width thickens the blade, thinning it down widens the width. You just keep whittling at it until it's where you want it. Here I'm starting to forge out the main grip area. Remember, every time I change a dimension in width...I've got to spend time repairing the thickness as well. It's a back and forth process. Changing width thickens the blade, thinning it down widens the width. You just keep whittling at it until it's where you want it. Here I have the main grip forged out, and have forged my precurve into the spine. I anticipated that this would likely straighten a little as I tried to work the finger choil area...so I made the curve a bit more aggressive than my final intention. Just saving myself a bit of work is all. Here I have the main grip forged out, and have forged my precurve into the spine. I anticipated that this would likely straighten a little as I tried to work the finger choil area...so I made the curve a bit more aggressive than my final intention. Just saving myself a bit of work is all. This is as far as I got tonight. That finger choil is a PAIN IN THE #@)(* to forge in. Every time I screwed it up...an image of grinding it in flashed through my brain. That defeats the purpose of using these little knives for forging practice though...so I just stuck it out. As you can see I didn't stick it out very far =D. I'll do what I can to finish it tomorrow lol. This is as far as I got tonight. That finger choil is a PAIN IN THE #@)(* to forge in. Every time I screwed it up...an image of grinding it in flashed through my brain. That defeats the purpose of using these little knives for forging practice though...so I just stuck it out. As you can see I didn't stick it out very far =D. I'll do what I can to finish it tomorrow lol.Anyway, there we have it. I ran out of time this evening, but I think the forging and initial file work will be done tomorrow. I might even be able to heat treat tomorrow evening if I'm REALLY lucky. I'll of course keep you guys posted =D. Cris |
|
|
|
Post by Matt993f.o.d on Jul 28, 2010 19:38:16 GMT
Great to see you get back behind a hammer! Neat shaping too! Look forward to the finish!  |
|
|
|
Post by randomnobody on Jul 28, 2010 19:55:47 GMT
This is going to be fun.  |
|
Deleted
Deleted Member
Posts: 0
|
Post by Deleted on Jul 28, 2010 20:55:01 GMT
Well, the profile is 95% forged in, and the edge bevels just about finalized. 20 more minutes of forge time and it should be ready for file work. I've got to say...other than the finger choil...I'm really pretty pleased =D. Here's the pictures:  First thing I did was cut the blade off of the handle/billet. Cutting it at an angle saved me forge work on the blade. First thing I did was cut the blade off of the handle/billet. Cutting it at an angle saved me forge work on the blade. Here's what was left over. 12" long, with a nice angled cut to begin the next blade with. I should be able to get two more out of this piece easily. That tells me that 15" of 1"x5/16" steel (I could use 1/4" just as easily) will make me three of these knives. Good news =D. Here's what was left over. 12" long, with a nice angled cut to begin the next blade with. I should be able to get two more out of this piece easily. That tells me that 15" of 1"x5/16" steel (I could use 1/4" just as easily) will make me three of these knives. Good news =D.   In this picture the spine looks twisted...but it is absolutely not. I think it's an optical illusion because I have it turned a slight bit. In this picture the spine looks twisted...but it is absolutely not. I think it's an optical illusion because I have it turned a slight bit.And there you have it...a roughed out blade. Like I said, about 20 more minutes smoothing the flats, and giving the overal blade more transition from rear to front, and it'll be ready for file work! Cris |
|
|
|
Post by randomnobody on Jul 28, 2010 21:00:00 GMT
The spine is definitely just because it's angled a bit. One can barely make out the side of the blade there on the left, and from there it's easy enough to see the apparent bend is just the spine curving downward, rather than any other direction.  Nice work so far. |
|
Deleted
Deleted Member
Posts: 0
|
Post by Deleted on Jul 28, 2010 21:16:53 GMT
Thanks Matt and Random =D. It's awesome to BE back behind a hammer =D. This has been a lot of fun. I still love the Japanese blades...but being able to knock out something useful in a couple days total really rocks. I am going to be using this one HARD. The next one goes out to Random, and then I suppose I'll go back to the other thread and PM people who expressed interest, in order...and see if they still want one. For mine...I am going to heavily polish the entire knife with paper...clean it thoroughly, then do a deep etch on the whole thing in ferric chloride. Then I'll clean it again with a soft cloth and windex, rinse it...and back into the etch it goes. I'm going to repeat the process until it won't take an etch anymore...one more thorough cleaning, and it'll be done. Hopefully this will blacken the hamon, while leaving the remanider of the blade a dark, even (and hopefully durable) grey. Something like (only more even, and glossy from being oiled): 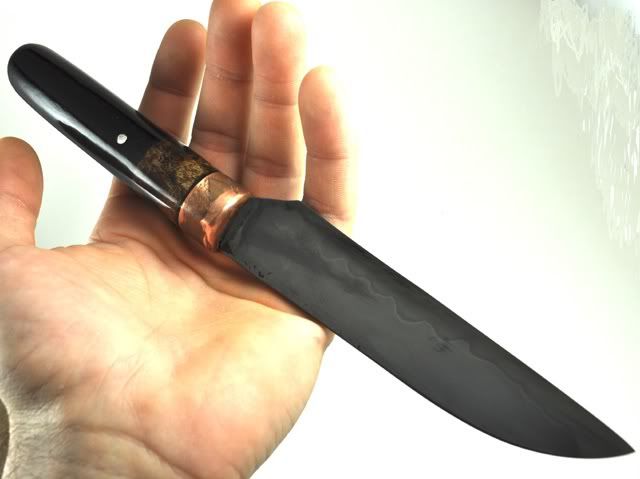 For the wrap, maybe some kind of braided leather lacing...like the brown in this picture: 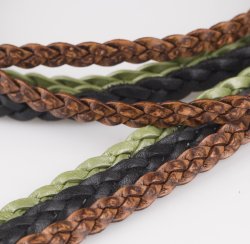 Oil the leather, and wrap it in a tactical style....with a couple of etched steel lanyard beads to tie it all in.... Whatcha guys think? |
|
Deleted
Deleted Member
Posts: 0
|
Post by Deleted on Jul 28, 2010 21:19:03 GMT
Oh, one other thing. Since the handles are really quite small...I'm considering making them left/right hand specific, and placing a palm swell on the appropriate side depending on who buys them.
I'm working on doing copper/steel mokume, and if it works...that's what I'll be making the beads and swell out of for the leather wrapped blades. For the paracord/tactical blades, perhaps a polished stainless swell and beads?
Hmm...
Cris
|
|
|
|
Post by randomnobody on Jul 28, 2010 21:20:03 GMT
Sounds lovely, but I'd prefer black.  ;D (etc.) Just caught your second post. Interesting idea; not sure how I'd go about it, myself. |
|
Deleted
Deleted Member
Posts: 0
|
Post by Deleted on Jul 28, 2010 21:21:49 GMT
Sounds lovely, but I'd prefer black. ;D (etc.) LOL yep =D. You just need to tell me if you'd prefer the paracord/tactical or leather/rustic look on yours =p. Cris |
|
|
|
Post by randomnobody on Jul 28, 2010 21:26:43 GMT
I'll wait and see how yours turns out. |
|
Dom T.
Member
Success, depress, ambition. Progress, regress, recognition.
Posts: 766
|
Post by Dom T. on Jul 28, 2010 22:32:15 GMT
Oooh! Oooh! I'm interested! I really want to see the finished product. Looks/sounds cool.
|
|
|
|
Post by Dan Davis on Jul 28, 2010 23:43:18 GMT
Cris,
Get you a piece of round bar and bend it into a u-shape so that it fits over top of your anvil. Then put your nice hot blade down on top of it and hammer it down from the spine to set your finger choil.
Simple, easy to make fuller tool and they can be made in all sizes.
|
|
Deleted
Deleted Member
Posts: 0
|
Post by Deleted on Jul 28, 2010 23:52:26 GMT
Cris, Get you a piece of round bar and bend it into a u-shape so that it fits over top of your anvil. Then put your nice hot blade down on top of it and hammer it down from the spine to set your finger choil. Simple, easy to make fuller tool and they can be made in all sizes. !!!! Dan...I can't even begin to count what I owe you for all the advice you've given. I'm just hoping that one of these days I get a chance to pay it back. In the meanwhile I'm doing everything I possibly can...to pay it forward. It's things like this that make it so worth documenting these builds. Call it karma or whatever...but in helping others...you almost invariably end up helping yourself. Good life lesson there, and thank you for your part in helping me keep it at the forefront of my mind! I'll wait and see how yours turns out. Good call =D. Oooh! Oooh! I'm interested! I really want to see the finished product. Looks/sounds cool. Hopefully...it'll be mostly done by this evening. I may even heat treat if I can get the flats filed out. Right now the blade is soaking in vinegar...but the profile's finished. Take a look:  Roughed profile. Can you tell I said '#)($^ forging the choil'? There's a very small amount of grinder work here, and a bit more forging to get the spine profile right. I can't believe I nailed the amount of material to chop off when I cut the blade loose =D. Roughed profile. Can you tell I said '#)($^ forging the choil'? There's a very small amount of grinder work here, and a bit more forging to get the spine profile right. I can't believe I nailed the amount of material to chop off when I cut the blade loose =D.    As I said...a slight bit of profiling with the grinder, then into the forge to fix the spine...then back out and there we have it. NOW the real work begins /sigh:  First...we draw file the spine. This step does two things...first, it creates and refines the perfect arc from tip to butt (as per the drawing). Second, it squares the spine of the blade to the flats. On this blade...I'm working it so that there are NO squared edges...but, you must start square for the rest of the knife to be true. You can see one spot where there is a dip alone the line of the spine. Normally, I'd remove that, but since the blade is going to be rounded, and it's a very small dip...I'm leaving it until later. Removing it now would require altering the arc of the spine. First...we draw file the spine. This step does two things...first, it creates and refines the perfect arc from tip to butt (as per the drawing). Second, it squares the spine of the blade to the flats. On this blade...I'm working it so that there are NO squared edges...but, you must start square for the rest of the knife to be true. You can see one spot where there is a dip alone the line of the spine. Normally, I'd remove that, but since the blade is going to be rounded, and it's a very small dip...I'm leaving it until later. Removing it now would require altering the arc of the spine. Same thing goes for the blade...and for the same dual purpose. Same thing goes for the blade...and for the same dual purpose. Working the butt. See that little 'dent' in the top right? Yeah...that took FOREVER to remove =/ (and it still didn't go all the way away lol). Caused me a blister too lol. Working the butt. See that little 'dent' in the top right? Yeah...that took FOREVER to remove =/ (and it still didn't go all the way away lol). Caused me a blister too lol. Finished the bottom to match the spine. Including that #$()% choil lol. Finished the bottom to match the spine. Including that #$()% choil lol.    The reason for ALL the hard work. Needless to say I'm pretty happy...both with the end result, and with the fact that I got it SO close with the hammer. Additionally, I'm THOROUGHLY pleased with my forge finish on the flats. MUCH smoother than I've ever done before! The reason for ALL the hard work. Needless to say I'm pretty happy...both with the end result, and with the fact that I got it SO close with the hammer. Additionally, I'm THOROUGHLY pleased with my forge finish on the flats. MUCH smoother than I've ever done before!Soon as the vinegar does its thing...it'll be out to file the flats...smooth the finish...round the edges...and maybe, just maybe...heat treat =D. Cris |
|
|
|
Post by Cottontail Customs on Jul 29, 2010 1:51:49 GMT
I saw this thread a few times but didn't understand the heading so never looked into it. NEW PERSONAL FORUM RULE: look at everything, always! I am a huge history/discovery/tlc fan because I love to be able to see what's being explained and or described, it really helps it sink in. Cris, thanks so much for the behind the scenes(I love those dvd extras too) look at the process. I know very little about what's involved in working metal so I hope you don't mind a few newbie questions, the first thing I wanted to know is what are you doing with the vinegar? I have used it on my Kats to enhance the Hamon but you mentioned you were soaking it, is this just for color or temper line or something more? and do you have to neutralize the acid before going further? what is the intended purpose for this blade shape and why and, are there a set number of variations you will do or would you take custom requests within the basic shape/theme? thanks in advance now about the wrap, (in my best gold member voice) "I love leatherrrrrrrrr the look of it, the taste of it, the shmell of it" sorry about that, shmoke and a pancake? anyway, I think a nice distressed wrap in either chunky round or flat leather or suede would look sweet. nubuck or deertan would look great too. if you go with the braided, really work in the oil well as it is a little on the stiff side. I'm waiting for my brother to drop off my leather oil to soften mine. if you are going to wrap it yourself, could you place a removable swell on the appropriate side per the customer? that way it can be used by someone else with only a re-wrap. or, a swell on both sides for the palm and fingers, also making it an ambidextrous fit? okay, I'll shut up now and just learn |
|
Deleted
Deleted Member
Posts: 0
|
Post by Deleted on Jul 29, 2010 3:18:43 GMT
Well...I've got about 8hrs in it today. Add about 6hrs yesterday (not counting the drawing out of the steel yesterday and the day before), and we've got 15hrs so far. I'll have at least two more hours of filing tomorrow just to get hammer marks out (yeah...looked smooth eh? NOT.), give it a couple more hours prepping for heat treat...and that puts us at around 20hrs in a finished blade blank. Rough estimate of another 8hrs for heat treat, temper, and rough finishing the blade to the point that it has an edge. Who knows how many hours for polish, etching, and wrap...but lets guess somewhere around 8, and that puts us at 36hrs. $200 ($5.56/hr...not counting material costs) for that, no sheath...would be a bargain...to say the least. Sooo, that means I either have to get substantially faster lol...which will happen I'm sure, just a matter of HOW much faster...or something else has gotta give, to make this worthwhile. In the meantime though, here's where we're at tonight!  This is the side with the majority of work left. Seemed pretty smooth, and I guess it was...for a hammer finish lol. Not having any kind of power sander lol...sucks =p. This is the side with the majority of work left. Seemed pretty smooth, and I guess it was...for a hammer finish lol. Not having any kind of power sander lol...sucks =p. This side is basically done...as far as filing the flats goes. This side is basically done...as far as filing the flats goes.  Filing vertically sucks too lol. I need to setup another blade fixture. Filing vertically sucks too lol. I need to setup another blade fixture. Not too bad if I do say so myself! I did make some changes...mostly to the width of the grip. My hands aren't huge, and it's a comfortable fit for me. Any narrower and it would still be usable by me...but anyone with larger hands would be out. This way...the knife would be usable by the majority of people. Not too bad if I do say so myself! I did make some changes...mostly to the width of the grip. My hands aren't huge, and it's a comfortable fit for me. Any narrower and it would still be usable by me...but anyone with larger hands would be out. This way...the knife would be usable by the majority of people.So there we are. I really am very happy about it to be honest. It's coming along nicely with no real mistakes that I am aware of. I've made what...five knives/swords total, and this one has by far come off with the least amount of hitches lol =D. Cris |
|
Deleted
Deleted Member
Posts: 0
|
Post by Deleted on Jul 29, 2010 3:57:05 GMT
I saw this thread a few times but didn't understand the heading so never looked into it. NEW PERSONAL FORUM RULE: look at everything, always! I am a huge history/discovery/tlc fan because I love to be able to see what's being explained and or described, it really helps it sink in. Cris, thanks so much for the behind the scenes(I love those dvd extras too) look at the process. I know very little about what's involved in working metal so I hope you don't mind a few newbie questions. Thank you Frank! Excellent questions as well =D. Let me see about going through them for you one by one. the first thing I wanted to know is what are you doing with the vinegar? I have used it on my Kats to enhance the Hamon but you mentioned you were soaking it, is this just for color or temper line or something more? and do you have to neutralize the acid before going further? Vinegar helps to remove fire scale...which is hard enough to DESTROY a file in short order lol. Take a look here: Pre Vinegar. Post Vinegar. Post Vinegar.This blade hasn't been heat treated...so there is nothing to show with an etch yet =D. what is the intended purpose for this blade shape and why Well, other than that I like the design...lol, the shape is a nice utility shape. The dropped point makes piercing and facilitates cutting things like linoleum and the like. It's very 'kiridashi' like, while retaining some of the more western aesthetics for a pocket type knife. The indented finger choil is a necessity on a blade with this small a grip in my opinion...and a nice design feature aesthetically. The same for the wide butt. Basically, your pointer finger goes in the choil, middle and ring finger grip the handle (the wrap is only about two fingers wide), and your pinkey finger wraps around the butt, locking onto the lanyard. and, are there a set number of variations you will do or would you take custom requests within the basic shape/theme? If a customer comes up with something cool I'll work with them. I've found in other artistic (and not so artistic) endeavors that if it's something I can't 'get into' I just can't do it justice though...so that's something to consider in those situations. now about the wrap, (in my best gold member voice) "I love leatherrrrrrrrr the look of it, the taste of it, the shmell of it" sorry about that, shmoke and a pancake? anyway, I think a nice distressed wrap in either chunky round or flat leather or suede would look sweet. nubuck or deertan would look great too. if you go with the braided, really work in the oil well as it is a little on the stiff side. I'm waiting for my brother to drop off my leather oil to soften mine. I have a local friend here who deals in distressed horse leather. I am considering sending the blades to him to add his touch to...but I REALLY prefer to do the work on my blades myself, so I don't know. I might just go through him for lacing and wrapping material...just to use something different. We'll see how it goes though. if you are going to wrap it yourself, could you place a removable swell on the appropriate side per the customer? that way it can be used by someone else with only a re-wrap. or, a swell on both sides for the palm and fingers, also making it an ambidextrous fit? okay, I'll shut up now and just learn The intent is to wrap them myself yes...and the palm swell will be removeable...kind of like a bar style menuki that follows the curve of the grip. The swell can be swapped sides...as the 'face' of it will be the same on both sides. The main reason I don't put two on, is because I want this to be somewhat slim...while still filling the hand nicely. The grip with no wrap is about 1/4" thick now. Add 1/8" per side in lacing thickness, and an 1/8" or so swell...and it's getting plenty thick for grip at 5/8", while still retaining a slim profile for comfortable carry. This way the flat side lays against your body (or the sheath). With a double swell, I think it will be just too thick overall. Also...I'm hoping to make the wrap removable without destroying it...so you can rewrap it in any style you choose. Hope that all made sense =D. Cris |
|
Deleted
Deleted Member
Posts: 0
|
Post by Deleted on Jul 29, 2010 4:01:13 GMT
Oh also...'EDC' is a knife collector/user term for 'Every Day Carry'. Meaning your personal pocket knife...as compared to say...a tanto, camp knife, kitchen knife...or art type blade.
Just thought I'd throw that out there =D.
Cris
|
|
Deleted
Deleted Member
Posts: 0
|
Post by Deleted on Jul 29, 2010 5:25:15 GMT
Looking beautiful! Can't wait to see it all finished with that dark etch on it. I think it'll look wicked |
|
Deleted
Deleted Member
Posts: 0
|
Post by Deleted on Jul 29, 2010 5:32:51 GMT
Looking beautiful! Can't wait to see it all finished with that dark etch on it. I think it'll look wicked Thanks! Me too by the way lol =D. One of the reasons I'm keeping this blade though is because I want to see how durable that finish is in normal use. Not quite sure it'll hold up. We'll see though! Cris |
|
|
|
Post by Dan Davis on Jul 29, 2010 12:29:23 GMT
$200 ($5.56/hr...not counting material costs) for that, no sheath...would be a bargain...to say the least.
Sooo, that means I either have to get substantially faster lol...which will happen I'm sure, just a matter of HOW much faster...or something else has gotta give, to make this worthwhile.
Duh, Buffy - Build a simple spring-loaded hold-down for that anvil of yours
- Invest in a flatter
- flatten your blades HOT.
- Go to Harbor Freight
- Buy a cheap-ass $89.00 sand blasting cabinet
- load it with 50-grit media
- stop messing around with vinegar and sandblast the fire scale off
- Go to Home Depot, Lowes, Harbor Freight or your local welding supply.
- Get a supply of resin-fiber grinding discs and a slotted backer disc to fit your angle grinder.
- Learn how to use it and then use THAT to rip down your surface and remove the hammer marks.
- Start your draw filing from clean, relatively smooth metal.
Nice work, though. |
|


 ;D (etc.)


