|
|
Post by Silent on Feb 20, 2016 19:34:01 GMT
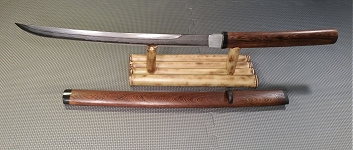
I am finishing a sunobe blank I bought. No problems so far.
I have read for months online about methods to do it obviously. Suffice to say that.I trained a bit about my methods and to improve skills to do this in case you are wondering ,all bevels are fine, Ii was progessing throw polishing/sharpening when I reached 400 grit sandpaper, I notice some tiny deeper scratches which I believe are from ground machinery polish, which will probably require me to go 120 grit again, still its ok.
Now my main question 1-Isnt the sword supose to feel very sharp already at 400 grit? Since the other grits will only pretty much scratch surface to remove the previous made scratches right?Im talking about the cutting section halfway up the sunobe.
2 - The shinogi-gi (the flat bevel above the main edge, not the gi line) I polish it to the same level has the main edge right?
Method of polish: Blade clamped to a flat table, polishing using sandpaper strips attached to a old file. Started at 120grit/220/320/400/600/800/1000--ETCH---1500/2000, then micromesh to eliminate scratches from sandpaper . I have multiple pastes/liquids to polish autosol, among others which I could use for a final protective layer/cleaning.
BTW: I already have the habaki/tsuba/tsuka core seppa fittings, tested to a perfect fit.
(I havent wrapped tsuka or inserted the fuchi/kashira yet...
Note:Its a aisi w1 blade, with DH clay tempered hamon.
|
|
|
|
Post by aussie-rabbit on Feb 21, 2016 8:56:46 GMT
|
|
|
|
Post by Silent on Feb 21, 2016 10:39:37 GMT
Ok Its informative piece which I had already read before, still its always good to read (revive memory)what works for each one to combine with my own.
Like i said and I state all my bevels are crisp, But Im guessing I could use 400 grit sandpaper using that method to create a somewhat sharp convex edge(because that method creats convex), and the start polishing again at 120/220 grit afterwards. Still I am going to take it slow and inspect everything has I go, not to mess anything up.
Another question tsuka related. The only Thing I having some "mental" issues is the tsuka/nakago hole. Since I dont have either, after having everything tightly secured in place I drill the hole on both at same time?(I do have angle adjusting jig for my driller)
BTW: Sorry for my english =)
|
|
|
|
Post by DigsFossils-n-Knives on Feb 21, 2016 12:46:10 GMT
1-Isn't the sword suppose to feel very sharp already at 400 grit? At 400 grit you can achieve a sharp edge, although it might be a bit "toothy". I guess if you were an expert at sharpening blades you could aim to achieve a sharp edge at 1000 or 3000 grit. The
point is you would be grinding less steel and achieving a sharp edge at the end of the process instead of the middle of the process. In all I don't think it makes much of a difference to a blade you made yourself, but it does make a difference if you are working on a rare nihonto.
2-The shinogi-ji I polish it to the same level has the main edge right? Typically yes, the shinogi-ji is polished to the same level as the jihada.
3-Since I don't have either, after having everything tightly secured in place I drill the hole on both at same time? It could be done that way. I think it would be easier and better to drill the hole in the tsuka, insert the nakago in the tsuka, use a marker to mark the nakago where the mekugi-ana should be, then drill into the nakago. If you are slightly off by accident you can use a thinner or thicker seppa to achieve a tight fit. I dont like drilling into both wood and steel at the same time because the heat generated will burn the wood. Also it's better to use a cutting oil to drill into steel and you can't this with a tsuka over the nakago.
|
|
|
|
Post by Silent on Feb 21, 2016 19:57:47 GMT
This is a sunobe(of total of 3)I bought from Pavel bolf. So I Must not really mess it up. Good thing is I already sanded it to the foundation sanding level and all the lines are has crispier then when I received them.(even better at kissaki which took me a lot of time)
Drilling into tsuka then marking nakago makes more sense because you can see where the hole is gonna be before actually drilling it, typically how far down the tsuka/nakago is the hole located 3cm/4cm?
Thanks
|
|
|
|
Post by Silent on Feb 23, 2016 17:26:12 GMT
Well started re-sanding it to 220grit today, did entire 220 grit on all bevel and 320 grit on half side already.
"Good" News its sharp actually I just made mistake of finger checking the sharpeness at 320 grit on the section near kissaki :p
Not a deep cut,but was enough to draw some blood.
|
|
Mikeeman
Member
Small Business Operator
Posts: 2,904 
|
Post by Mikeeman on Feb 23, 2016 18:36:29 GMT
So is it heat treated yet? From my understanding "sunobe" just means "pre form". As in it's not hardened.
|
|
|
|
Post by DigsFossils-n-Knives on Feb 23, 2016 21:01:44 GMT
... Drilling into tsuka then marking nakago makes more sense because you can see where the hole is gonna be before actually drilling it, typically how far down the tsuka/nakago is the hole located 3cm/4cm? Thanks Typically the mekugi-ana should be where your hands will grip the tsuka. This way if a peg pops out it will hopefully fall into your palm. |
|
|
|
Post by Silent on Feb 23, 2016 23:16:12 GMT
So is it heat treated yet? From my understanding "sunobe" just means "pre form". As in it's not hardened. Yes I bought them has finished sunobes, heattreated and pre-formed katana, just have to finish sanding/polish and all the fittings. In this lower grits I am sanding with old file, which is very hard surface. I think I am going to attach/glue either a piece of leather or backing of a mouse pad to one side of my file for the 400 grits and higher. |
|
|
|
Post by Anankai on Feb 24, 2016 3:36:10 GMT
Just use a rubber sanding block  |
|
|
|
Post by Silent on Feb 25, 2016 14:13:14 GMT
|
|
Mikeeman
Member
Small Business Operator
Posts: 2,904
|
Post by Mikeeman on Feb 25, 2016 21:22:21 GMT
Your pictures worked. And for the hamon popping out in pictures that bad, it must be REALLY nice in person. Looks like you're doing a good job.
The rubber sanding blocks are good, but the more flat your surface is, the more crisp you can make your shinogi and yokote.
|
|
Mikeeman
Member
Small Business Operator
Posts: 2,904
|
Post by Mikeeman on Feb 25, 2016 22:02:19 GMT
|
|
|
|
Post by Silent on Feb 26, 2016 16:43:30 GMT
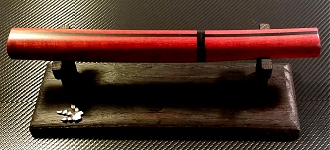
Thanks I Will stop sanding/polishing it now. I want to finish saya first. Or else Im just gonna scratch it later, I cannot restart polish again lol, such hard work :D
And I will be getting Ferrich Chlorid next week to etch too so =)
Any Advice on tsukamaki? I have no ideia how to do it , gonna have to "study" how its done fairly tight doesnt need to be too tight Im not gonna cut with it.
Thanks,
|
|
Mikeeman
Member
Small Business Operator
Posts: 2,904
|
Post by Mikeeman on Feb 26, 2016 17:44:38 GMT
Honestly, I'd almost just polish it out instead of etching it. The hamon pops out really good. But if a really deep etch is what you're in to, the FeCl will work well. I have it and I like the deep etch on some things. Here's a pretty good PDF on how to do tsukamaki. www.wpi.edu/academics/me/IMDC/IQP%20Website/ResourcesFiles/The%20Art%20of%20Tsukamaki.pdfYOU GOT A SWORD FROM PAVEL BOLF AND YOU'RE NOT GOING TO USE IT!?!? WHAT TYPE OF FOUL BEAST ARE YOU!?!? |
|
|
|
Post by Silent on Mar 3, 2016 10:05:50 GMT
Hallo!
I seam to be having troube fiding rayskin (in time for this first sword), after making multiple searches on the matter of alternatives. Theres one natural product that comes to mind that has similar caractheristics. Probably you guys have never heard of it. Recently im my country some companies started making multiple sub-bi products of cork!
Theres natural cork leathers/hides with 1mm/2mm thichness,some are though to the point that can be seewed. They are mostly used in shoes,furniture nowadays. I'm going to give that a try.Best Regards
Note: If I dont like it , I can just replace the tsuka or even use the cork leather for Saya =)
|
|
|
|
Post by aussie-rabbit on Mar 3, 2016 11:51:54 GMT
Look up " Shagreen "
|
|
Deleted
Deleted Member
Posts: 0
|
Post by Deleted on Mar 3, 2016 12:14:21 GMT
|
|
|
|
Post by Silent on Mar 3, 2016 16:13:48 GMT
I was saying I cannot find locally theres ebay, cheaper there. Around 20USD each genuine inc ship on ebay.
But I am from a fisherman zone, someone already promised me some free rayskins when they have them =)
This is just to complete project.
|
|
Deleted
Deleted Member
Posts: 0
|
Post by Deleted on Mar 3, 2016 16:29:54 GMT
Sorry about that. Lucky guy. Rayskin gets pretty expensive, bit free rayskin is pretty darn cool. Good luck on your project. Btw, how do you plan on treating fresh rayskin?
|
|


 To add pictures, go the the full editor (by clicking on the "Reply" button on the top right of the Quick Reply box) On the tool bar on the top of the text box, there is an Insert Image button. Click that. Right click on the image from Dropbox and select "Copy image address." Paste that address in the Insert Image box (replacing the HTTP or whatever) then hit Enter. It'll stick your pictures right in here like this.


 Unfortunately I'm an edge-perfectionist. Also one wrong move when unsheathing and the throat nicks the edge on either side.